Candidate Profile: Candidacy Tab
Important
Information and features vary according to the roles to which you belong and the permissions associated with those roles. For more information, contact your module manager or your campus support team.
Note
From the Jenzabar One Web navigation menu, select Enrollment, then Admissions, and then Candidates, or use the Find a Page search for the Candidates page. Use the filter to find candidates. On a candidate's row, click the Actions drop-down and select Candidate Profile. When the page loads, click the Candidacy tab.
You can also use the Person Search icon  to find a candidate. Then, use the Person options drop-down to select Candidate, and then Profile. When the page loads, click the Candidacy tab.
From the Candidacy tab you can perform the following actions for each candidate:
Select, view, create, and edit available candidacy information.
View and update Candidacy user-defined fields.
Admissions to Registration processing controls.
The Candidate Profile Candidacy tab gives Enrollment staff the ability to view and maintain information associated with a candidate. The page provides access to candidacy actions, institution-defined fields, and key academic and admissions information.
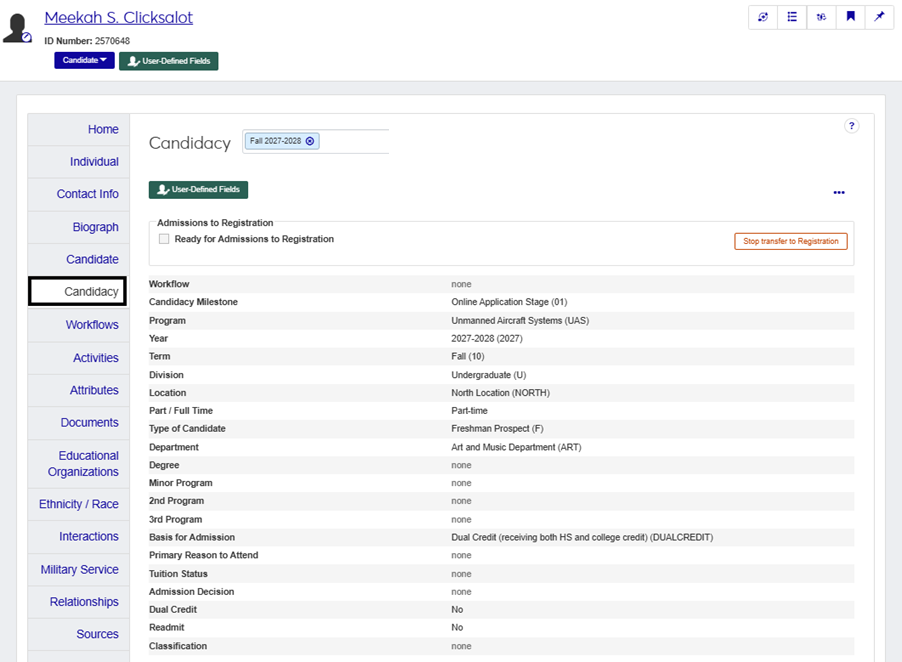
Candidate Profile: Candidacy tab areas include:
Candidacy: Candidacy selection based on a term and year. The options available in the drop-down are the candidacy records associated with the prospective candidate.
Admissions to Registration: Controls related to the Admissions to Registration process
Candidacy Information Fields: Information is specifically related to a particular year, term, program, division, location, department, and type for a candidate.
You can capture additional candidacy information with user-defined fields. User-defined fields are managed by your System Administrator and can be useful for internal reporting. Click the User-Defined Fields button to review or add more details to an individual's record.
To access this page and work with the general features, you must belong to the Admissions role or a customized version of this role with the Can view candidates permission enabled. In order to edit candidate information, you will need to enable the Can manage Candidates permission.
If you use user-defined fields (UDEFs) for tracking candidate information, users will also need permission to view and edit those fields. Access to user-defined fields is assigned by role-level permissions. For each role you want to give access to user-defined fields, click on the User-Defined Fields tab. There you can give varying degrees of access to each user-defined field group used in the system. For more information, review User-Defined Forms.
Access the Candidate Profile from the Candidates page. Following these steps will take you to the Candidate Profile: Candidacy tab.
Open and log in to Jenzabar One Web.
From the Jenzabar One Web navigation menu, select Enrollment, then Admissions, and then Candidates, or use the Find a Page search for the Candidates page.
Use the filter to find one or more candidates.
On a candidate's row, click the Actions drop-down and select Candidate Profile.
Click the Candidacy tab.
Note
You can also use the Person Search icon to find a candidate. Then, use the Person options drop-down to select Candidate, and then Profile. When the page loads, click the Candidacy tab.
Caution
If your institution is transitioning to Jenzabar One Web, you should create and maintain Candidacy information in Jenzabar One Web instead of using Jenzabar One Desktop. Jenzabar One Web is backward compatible, but Jenzabar One Desktop is not forward compatible.
The Maintain Candidacy window in Jenzabar One Desktop serves as the central location for managing candidate information. To access the Candidacy tab within this window, follow these steps.
Open and log in to Jenzabar One Desktop.
In the search bar for Activity Centers, type "Maintain Candidacy". The Create Students and Work with Candidates Activity Centers appear.
Select Maintain Candidacy from Create Students or Work With Candidates.
When the window opens, enter an ID number or search for a person. Then, select the Candidacy tab, and then click the General subtab to review candidate information.
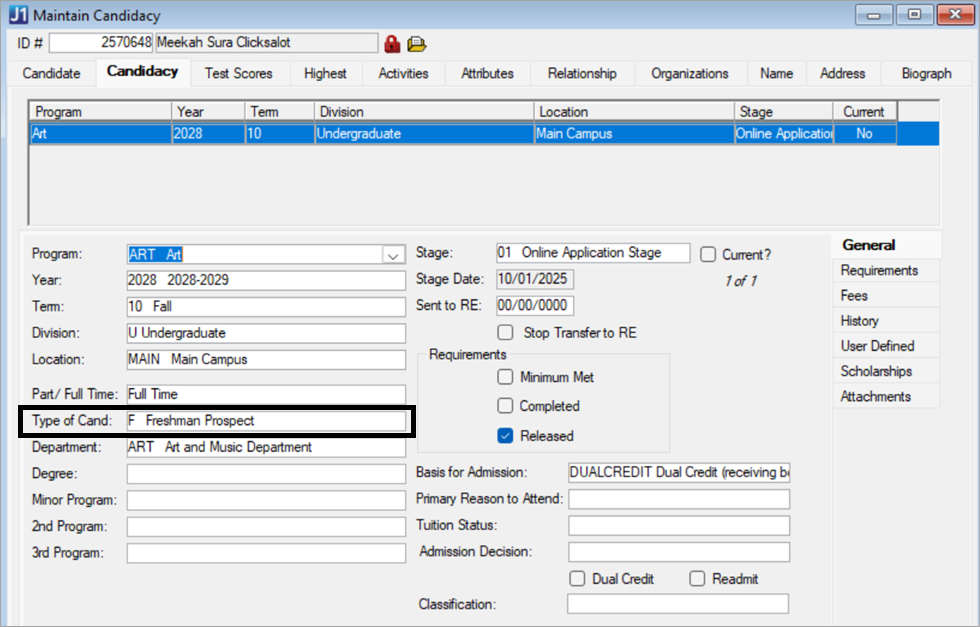
The following fields can be edited to maintain accurate records for the Candidate tab.
How To
Open and log in to Jenzabar One Web.
From the Jenzabar One Web navigation menu, select Enrollment, then Admissions, and then Candidates, or use the Find a Page search for the Candidates page.
Use the filter to find one or more candidates.
On a candidate's row, click the Actions drop-down and select Candidate Profile.
Click the Candidate tab.
Tip
You can also use the Person Search icon to find a candidate. Then, use the Person options drop-down to select Candidate, then Profile. When the page loads, click the Candidate tab.
Note
From the Jenzabar One Web navigation menu, select Enrollment, then Admissions, and then select Candidates, or use the Find a Page search.
Click the Designate Candidate button. The Designate Candidate drawer opens. (It's the Create Person page but already set to designate the person as a candidate.)
In the Designate Candidate drawer you will be asked Who are you making a candidate?
If the person exists in the system but isn't designated a candidate, click Existing Person.
You have three search options. Select a radio button to search by Name / ID, Email, or Phone.
Start typing a name or ID.
Select the person from the search results.
Click Designate as Candidate.
If the person does not exist in the system, click New Person.
Enter information in the available fields as needed. The Assign ID, First Name, and Last Name are required.
If you click No for Assign ID, then you will choose Create and designate as candidate.
If you click Yes for Assign ID, then you will choose Create Id'd person and designate as candidate.
On the Candidate Profile, Candidate tab, click the Edit icon
 in the Candidate Information category.
The Edit Candidate Information pop-up appears.
Make needed changes to the Candidate Information fields as needed.
When finished, click Update to save your changes or click Cancel to exit without making a change.
On the Candidate Profile page, Candidate Info tab, click the Edit icon
in the Alternate High School Information category.The Edit Alternate High School Information pop-up appears.
Make needed changes to the Alternate High School Information fields as needed.
When finished, click Update to save your changes or click Cancel to exit without making a change.
On the Candidate Profile page, Candidate Info tab, click the Edit icon
in the Legacy Information category.The Edit Legacy Information pop-up appears.
Make needed changes to the Legacy Information fields as needed.
When finished, click Update to save your changes or click Cancel to exit without making a change.
On the Candidate Profile page, Candidate Info tab, click the Edit icon
in the Other Information category.The Edit Other Information pop-up appears.
Make needed changes to the Other Information fields as needed.
When finished, click Update to save your changes or click Cancel to exit without making a change.
On the Candidate Profile page, Candidate Info tab, click the Edit icon
in the Institution History category.The Edit Institution History pop-up appears.
Make needed changes to the Institution History fields as needed.
When finished, click Update to save your changes or click Cancel to exit without making a change.
On the Candidate Profile page, Candidate tab, click the User-Defined Fields button in the Candidate Information section on the page.
On the User-Defined Fields Edit Data pop-up, edit the fields as needed.
Click Save to save your changes. Click Cancel to exit without making a change.
FAQ
Access to view and edit user-defined fields is based on permissions granted by your organization. For example, let's look at the Candidate Profile, Individual tab.
Someone with administrative level permissions will navigate to Core, User Management, then Manage System Roles.
User the System Roles Filter to find the appropriate role. In this example, choose a customized version of the Admissions Role .
From the Options menu, select Edit.
Click on the Users tab.
If you do not see the staff member in the Users in Role list, click the Add to Role button.
When the Add to Role pop-up window appears, type in the name of the user to search. Once the user name appears, click the green Add to Role button.
Click the User-Defined Forms tab.
Find one or more of the user-defined fields in the Name column. Each of these fields has a corresponding Permissions column. Select the relevant permission from the available options for the users assigned to the customized Admissions role as discussed in this example,
No permissions means users in this role will not see user-defined fields in the system.
Can configure UDEF form means users in this role can see user-defined fields in the system, and add, update, or delete data in the user-defined fields as well as manage the fields from the Core, Campus-wide Definitions, User-Defined Fields page.
Can view UDEF data means users in this role can see the user-defined fields in the system.
Can edit UDEF data means users in this role can add, update, or delete data in the user-defined fields in the system.
If you need to grant permissions to more than one User-Defined Fields area, repeat Step 8. Once completed, if the user has a permission value other than No Permissions the user should be able to log in to Jenzabar One Web and see the User-Defined Fields button for the related fields.
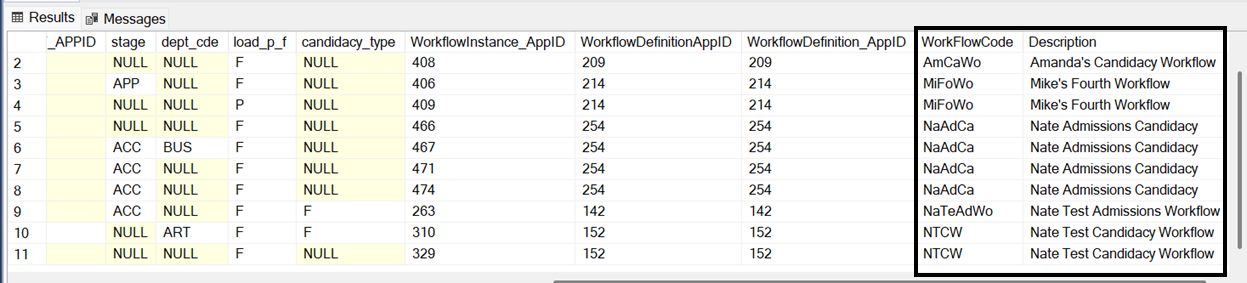
You can use the SQL syntax below to find the name of the workflow that displays on the Candidacy tab. The query below is restricting the data to only CANDIDACY rows where the CUR_CANDIDACY is "Yes" (Y).
SELECT
c.ID_NUM,
c.WorkflowInstanceAppID,
wi.AppID AS WorkflowInstance_AppID,
wi.WorkflowDefinitionAppID,
wd.AppID AS WorkflowDefinition_AppID,
wd.WorkFlowCode,
wd.Description
FROM CANDIDACY c
INNER JOIN WorkflowInstance wi ON c.WorkflowInstanceAppID = wi.AppID
INNER JOIN WorkflowDefinition wd ON wi.WorkflowDefinitionAppID = wd.AppID
WHERE c.CUR_CANDIDACY = 'Y' ORDER BY wd.Description
The results will include the WorkFlowCode and the Description.
The selections in the Candidacy drop-down are all of the candidacy rows for the candidate. If an individual does not have a candidacy row, the value of "None" will display. If candidacy rows do exist, the will appear by the most recent year/term combination and then by incomplete workflows.
In order for the ellipsis button drop-down to display the options Create Candidacy and Edit Candidacy, a user will need to belong to the Admissions Role or a copy of it with the Can manage candidates permission enabled.
Candidacy Information category columns that display as "None" indicates that the database column has a NULL value. When this occurs, the default option that shows on screen is "None".