Working with Topics
At least one topic must be defined before discussion can commence. By default, the Forums feature instance in your course context contains a topic called “Open Discussion” (within the “General” category). You can delete or rename this topic as appropriate, as well as create new topics.
After you add an instance of the Forums feature to a page, by default it contains a topic called “Open Discussion” (within the “General” category). You can delete or rename this topic as appropriate, as well as create new topics.
To complete the steps described in this section, the user should have the Can Administer Portlet permission.
Attributes of a Topic
When you create or modify a topic, you can make any of the following choices.
The name of the topic is its label in the feature instance, so you should pick a name that is meaningful. The name is shown in the Forum Home. The name is also shown when the user clicks through to maximize the topic.
 |
The topic description is an optional field. If you enter a topic description, it will be displayed under the topic name in the Forum Home. If the description is more than a sentence or so, the description is truncated.
When a topic is active, users can read it and add posts to it. By default, topics are active immediately and indefinitely. However, you can use the activation field to make the topic active for a specific time period only. For example, you can choose to have the topic launch at a specific time in the future. You can also choose for the topic to become inactive after a certain date.
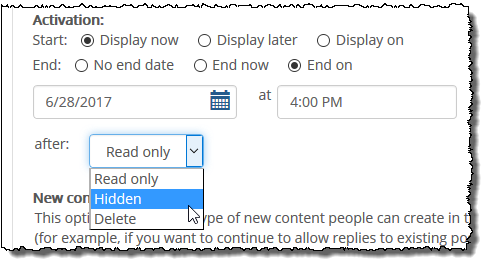
When the “activation” period ends, or before it begins, you can configure the system to take either of the following actions:
Hide the topic and its posts (and replies).
Make the topic and its posts (and replies) read-only.
When the activation period ends, you have the additional option of deleting the topic and all its content.
For details on how a post behaves when it has been marked read-only or hidden, see the About Visible, Read-Only, and Hidden Items section.
When you change the activation, first you set the dates for when the topic to be active. When you set a specific start time or end time, the system updates the screen to include a drop-down list that lets you specify what happens to the topic when it becomes inactive.
 |
If you choose Display later, the system adds a drop-down list that lets you choose whether the item will be read-only or hidden until you manually activate it.
Similarly, if you choose End now, the system adds a drop-down list that let you choose whether the item will be read-only or hidden.
Note that as an alternative, you can have the system automatically remove the topic’s older posts. To do this, you adjust the pruning setting for the category, as described in the Pruning section.
This choice lets you restrict the type of activity that can happen in this topic. Your choices are as follows:
Posts only
Posts and replies
Replies only
At the time of this writing, the feature doesn’t include messaging explaining which configuration it uses—so if you think users might be confused about why they cannot post or reply, you might want to communicate that to them in the topic description or by some other means.
Note that users who have the Can Administer Portlet permission are exempted from these restrictions.
The Access setting for a topic determines whether or not users can display the topic and its posts. By default, topics are accessible to all users and guests. To restrict access, click the Restricted access radio button, then specify who should be allowed access.
Note that the category access might be more restrictive than the topic access. If so, it won’t matter how you configure the topic access—the category settings will apply. (For details, see the Access Setting for a Category section.)
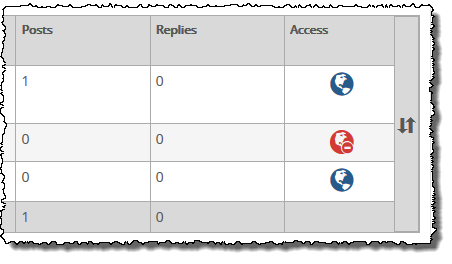
In the administrative view, all unrestricted topics in the category are marked with a blue globe icon. If access to the category is restricted, a red globe appears.
 |
Note that the Access setting does not have any effect on whether or not users can submit posts. The ability to submit posts is managed separately by clicking the Access link in the admin bar and assigning the Can Add Posts permission.
Further, note that regardless of how access is restricted, the category and its contents are always viewable by any role that has permission to administer the feature instance. (For details, on selecting who can administer the feature, see the Working with the Permissions Tab section.)
The Restrictions area lets you control what individual users can see when they view the topic. You must choose one of the following three choices:
No restrictions – All users can see all topic content
Post-first – Each user can view the topic’s content only after submitting a post and having it published (note that this might require moderator approval).
Private – Each user can see only their own posts, as well as any responses submitted by feature administrators. With this setup, the topic functions like an email system between an individual user and the administrators of the feature instance. Note that if you select this checkbox, the screen updates to hide the moderation options, since moderation is not relevant to private topics.
Regardless of which of option you select, you also have an option labeled Don’t allow changes. If you select this option, users will not be allowed to edit or delete their own posts within this topic, even if they have the Can Edit and Delete Own Posts permission.
Note that moderator users who have the Can Administer Portlet permission are exempted from these restrictions.
If appropriate, you can appoint moderators and enable one of the following types of moderation:
You can give the moderator (or group of moderators) permission to edit and delete users’ posts.
You can require that all posts be approved by a moderator before they are displayed. With this level, the moderator can still edit or delete users’ posts.
If you choose to require that all posts be approved before being displayed, note the following:
If a post is approved and the author later edits the post, the post is removed from the feature until it is approved once again.
Members of the Administrators role and people with the Can Administer Portlet permission are allowed to approve posts even if not specifically named as moderators.
For those people who can approve posts, their own posts automatically display as soon as they click Submit (that is, no approval is required).
By default, topics do not use moderation.
If you select one of the two levels of moderation, the system expands the screen to include a form that lets you choose moderators. If you are setting up a Forums feature instance within your course context, note that you are automatically considered a moderator.
How To
Use this procedure to create a topic. If you need help with any particular setting, see the Attributes of a Topic section.
Log in to the portal as a member of the Administrators role or someone with Can Administer Portlet privileges in the appropriate feature instance. Navigate to the appropriate feature instance.
Maximize the feature and click Edit forum.
Locate the category to which you want to add a topic and click the corresponding Add topic button.
The system displays the Adding a Topic screen.
Complete the fields as you see fit.
Click Save topic.
Use this procedure to change any of the following:
Topic Name
Topic Description
Activation
Access
Private Topic
Moderation
To modify a topic:
Log in to the portal as a member of the Administrators role or someone with Can Administer Portlet privileges in the appropriate feature instance. Navigate to the appropriate feature instance.
Maximize the feature and click Edit forum.
Locate the topic you want to modify, and click the corresponding Edit link.
The system displays the Edit topic screen.
Adjust any of the fields as appropriate. If you need help understanding any of the fields, see the Attributes of a Topic section.
Click Save topic.
Note that when you delete a topic, you also delete all of its posts and replies.
If you want to take a less drastic action, you can simply restrict access to the topic (as described in the Access Setting for a Topic section). You can also choose to delete a single post, or to hide a post.
Log in to the portal as a member of the Administrators role or someone with Can Administer Portlet privileges in the appropriate feature instance. Navigate to the appropriate feature instance.
Maximize the feature and click the Edit Forum button.
Locate the topic that you want to delete and click the corresponding Delete link.
The system displays a dialog asking if you’re sure you want to delete the topic.
Click OK.