Working with Announcements
This section describes how to create, edit, archive, and delete announcements.
Deactivated Announcements
By default, announcements will be displayed immediately and indefinitely. However, the author of the item, or someone with permission to modify it, can choose to do either of the following:
Have the announcement display in the future.
Make the announcement end at a specific time.
In most cases this is done using the Start and End on fields on the form where a user creates or edits the announcement. During those times when the announcement is not actively being displayed, it is considered deactivated (either unsent or archived). At these times, most users cannot see it, but the author can at any time edit the announcement and display it.
Note that while someone other than the author can deactivate an announcement (for example, an administrator), once it is deactivated, only the author can see it.
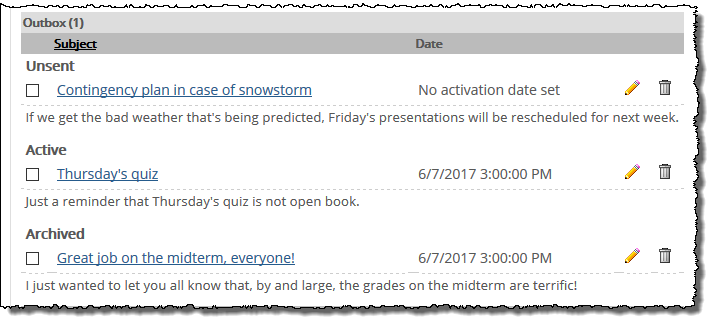
Unsent Announcements
If desired, an author (or an administrator) can specify that an item will launch at a specific time in the future, or that it will be launched later manually. Prior to its launch, the item is saved in the author’s outbox, under an Unsent subheading. At this point, only the author can see and work with the announcement.
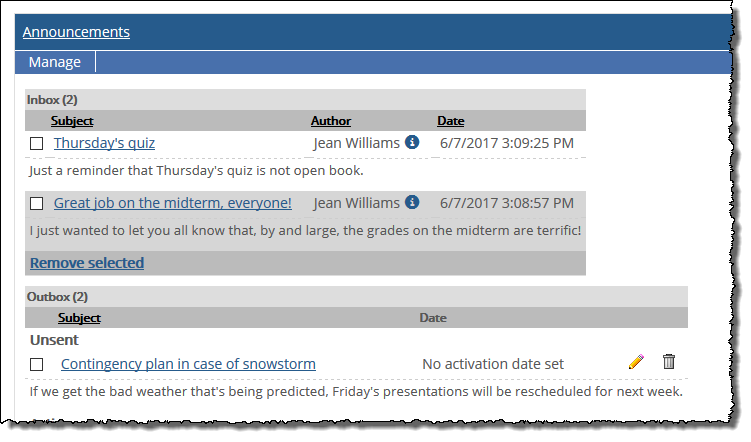 |
Archived Announcements
If desired, the author (or an administrator) can specify that an announcement will end at a certain time, after which it is deleted or becomes archived.
If the author does this and chooses to archive the announcement (instead of deleting it), it is stored in the author’s outbox under an Archived subheading. At this point, only the author can see the announcement.
 |
Posting Announcements
Regardless of who the intended recipients are, the process of publishing an announcement is more or less the same. However, because of potentially conflicting setup and permissions options, we suggest that you use one of the following procedures. If desired, you can mix and match these procedures as long as you understand the general requirements of each.
Note that whenever you post an announcement, unless you select an option to post the item anonymously, your name will be listed as the author. If you do not see the anonymous option on the form, then anonymous posting is not an option (and your name will be listed).
How To
Use this procedure to post an announcement to a context-specific role, such as the Students role within a particular course context (which includes only the students enrolled in the course section). To complete these steps, the user must have the Can Post Announcements permission for the appropriate feature instance.
Navigate to the Announcements feature instance. The instance must be located in the context that hosts the role to which you want to post.
Maximize the feature and select Manage > New Announcement.
The system displays a form, and the exact details may vary depending on your permissions.
In the Title field, enter a label or heading for the announcement.
In the Send to area, use the checkboxes to select the context-specific role(s) to which the announcement is targeted. Context-specific roles appear under the Context: context name heading.
In the Details field, enter the main text of the announcement (assuming the Title text does not cover everything you want to say).
By default, your announcement will be displayed immediately and indefinitely. But if you want to change this, choose dates and times for the Start or End on fields.
If you want to post anonymously, and if the feature instance is set up to allow for this, select the checkbox labeled Post Anonymously.
Click Save.
Use this procedure to post an announcement to a base (or global) role, such as the global Students role, which includes every student in the institution. Before doing this, you may want to make sure that the roles you are posting to have access to an Announcements feature instance that was set up using the General option. This is the only type of feature instance that will actually show an announcement posted to a base role.
By default, users have a General-type Announcements feature instance in their My Pages contexts, but if you plan to regularly communicate with base-role members this way, you may want to confirm that they actively refer to this feature instance or to a similar one.
To complete this procedure, a user must have the following permissions:
The Can Post Announcements permission for an instance of the Announcements feature, preferably one set up using the General option.
The Can Post to Base Roles global feature operation.
To post an announcement to a base (global) role:
Navigate to the Announcements feature instance. We suggest that you use a feature instance that has been set up using the General setup option. (Assuming that you are posting the announcement for immediate display, this type of feature will let you review the announcement as soon as you post it and see it as other users will.)
Maximize the feature instance and select Manage > New Announcement.
The system displays a form. The exact details on the form may vary slightly depending on your permissions.
In the Title field, enter a label or heading for the announcement.
In the Send to area, use the available checkboxes to select the base role(s) that should see the announcement. Base roles are listed under the Base roles heading.
In the Details field, enter the main text of the announcement (assuming the Title text does not cover everything you want to say).
By default, your announcement will be displayed immediately and indefinitely. If you want to change this, choose dates and times for the Start or End on fields.
If you want to post anonymously, and if the feature instance is set up to allow for this, select the checkbox labeled Post Anonymously.
Click Save.
Use this procedure to post an announcement to one or more individuals. Before posting an announcement this way, you may want to verify that the recipient(s) are people who have access to an Announcements feature instance that is configured using the General option. This is the only type of feature instance that will actually show an announcement posted to an individual.
By default, users have a General-type Announcements feature instance in their My Pages contexts, but if you plan to regularly communicate with individuals this way, you may want to confirm that they actively refer to this feature instance or to a similar one.
To complete these steps, the user must have the Can Post Announcements permission for any instance of the Announcements feature. To post the announcement to an individual who is not a member of the context that hosts the Announcements feature instance that is being used, the user must have the Can Post to Base Roles global feature operation.
To post an announcement to an individual:
Navigate to any instance of the Announcements feature.
Maximize the feature instance and select Manage > New Announcement.
The system displays a form.
In the Title field, enter a label or heading for the announcement.
Click Add individual users.
A drop-down selector appears.
Use the selector to choose the individuals who should see the announcement.
In the Details field, enter the main text of the announcement (assuming the Title text does not cover everything you want to say).
By default, your announcement will be displayed immediately and indefinitely. But if you want to change this, choose dates and times for the Start or End on fields.
If you want to post anonymously, and if the feature instance is set up to allow for this, select the checkbox labeled Post Anonymously.
Click Save.
Use this procedure to edit your own announcement or someone else’s. You can use the procedure to change the text of an announcement, to archive it, or, if it is currently inactive, to display it.
Note that in order for a user to edit an announcement other than their own, the user must be a member of the Administrators role or have a global feature operation called Show Admin Section.
Navigate to the Announcements feature instance and maximize it.
Locate the announcement that you want to edit and click the corresponding pencil icon.
If you are the author of the announcement, it is located under the Outbox heading.
If you are not the author, look for it under the area labeled All Announcements. (If you are the author and you have the Show Admin Section global permission, you will see the item in both places—it doesn’t matter which one you select.)
The system displays a form.
Make the necessary changes, including any of the following:
Changes to the announcement’s text—its Title and Details.
The people who are allowed to see the announcement—you can do this using the Send to area of the form.
The Start and End times of the announcement—for example, if the announcement is not currently active, you can make it display, and vice versa.
Click Save.
Use this procedure to delete your own announcement or someone else’s.
Note that in order for a user to delete an announcement other than their own, the user must be a member of the Administrators role or have a global feature operation called Show Admin Section.
Navigate to the Announcements feature instance and maximize it.
Locate the announcement that you want to delete. If you are the author of the announcement, it is located under the label Outbox. If you are not the author, look for it under the area labeled All Announcements. (If you are the author and you have the Show Admin Section global permission, you will see the item in both places—it doesn’t matter which one you select.)
Click the corresponding trash icon.
The system generates a dialog asking if you are sure you want to delete the item.
Click OK.
If there are several announcements that should be archived, you may want to archive them all at once. Note that after you do this, only the author will have the ability to relaunch the announcements later. If you don’t want the announcements to be relaunched, you might want to delete them instead, as described in Delete an Announcement.
Note that in order for a user to delete an announcement other than their own, the user must be a member of the Administrators role or have a global feature operation called Show Admin Section.
Navigate to the Announcements feature instance and maximize it.
Scroll down to the area labeled All Announcements.
Using the checkboxes at the left, select the announcements in this area that you want to archive.
Click Deactivate Selected.
For all users except the authors, the announcements are removed from view. For the authors, the items will be displayed under an Archived subheading under the Outbox label.