Working with Tabs
Tabs represent the highest level of organization within your portal. JICS comes with several tabs set up by default. You can make changes to these out-of-the box tabs, and you can also create tabs of your own. This section explains these processes.
Tabs Available by Default
When you install JICS, several tabs are installed by default. Some are intended for use with different CRMs, but you can use them in whatever way you see fit. As appropriate, you can rearrange these default tabs, rename them and add to them. You can also delete most of the default tabs, with the exception of the Home tab and the My Pages tab. Each tab is preconfigured to include several feature instances, which can also be modified or deleted as appropriate.
The tabs installed by default include the following:
Home – Intended to be a general welcome page for users, one that offers easy navigation to other parts of the site. It cannot be deleted, and it always holds the leftmost position among the other tabs.
Welcome – Includes background information about JICS that may be useful to a system administrator.
Academics – Intended for use with courses, possibly in conjunction with the e-Racer or eLearning learning management system.
Campus Life – Intended to host instances of JICS’s Campus Groups feature, which lets members of groups collaborate, recruit members and so forth.
Admissions – Intended for use by admissions personnel and applicants for admission, possibly in conjunction with CRM Candidate and CRM Admissions Officer.
Alumni – Intended for use by development personnel and alumni, possibly in conjunction with CRM Advancement Officer.
Finances – Intended for use by your institution’s financial staff, possibly in conjunction with CRM Staff.
Employee Info – Intended for use by your institution’s administrative staff, possibly in conjunction with CRM Staff, for the submission of timecards and so forth.
My Pages – Intended for use by all users. This tab and all its child pages are personalized for the person logging in and are viewable only by that person. When the JICS interface refers to the user’s “portal home page,” it is referring to the default page associated with this tab. This tab cannot be deleted, and it always holds the rightmost position among the tabs.
Note
For security purposes, HTML Sanitizer is included in JICS (in the JICS 2024.2 Release and following releases). It is always applied when users are in the My Pages area and using the text editor. The HTML Sanitizer strips out "<script>" and other potentially exploitable HTML elements. However, this rule does NOT apply to Site Administrators, who still have the ability to add HTML tags.
How To
Note
For aesthetic reasons, we recommend that you use no more than 12 tabs. As an alternative to creating a tab, you may want to consider adding a subsection or page to an existing tab, as described in Create a Subsection and Create a Page.
Log in to the portal as a member of the Administrators role.
Click the user icon and select Site Manager.
The system displays the Site Manager screen, with the Site settings tab selected.
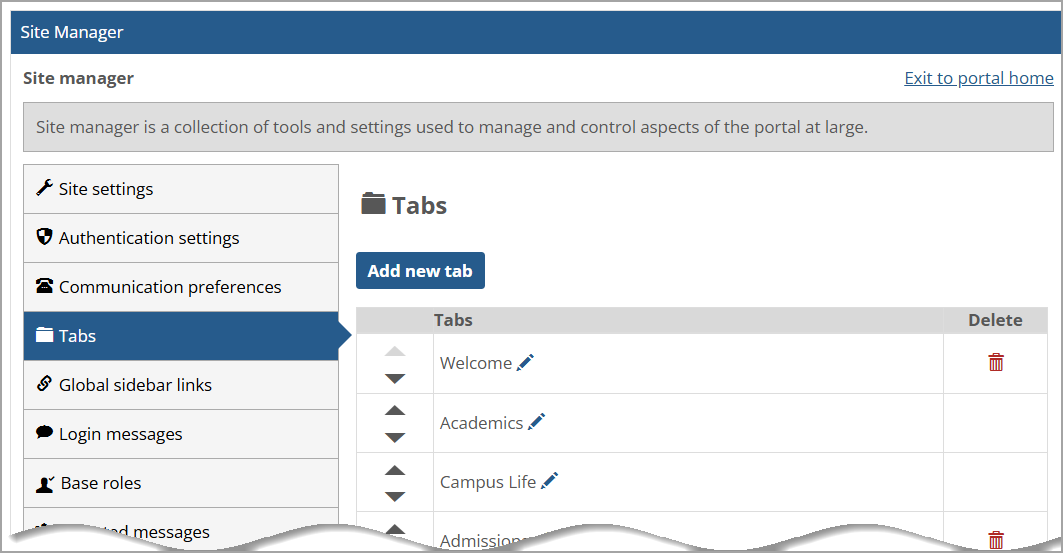
Click the Tabs tab.
The system displays the Tabs screen.
Click Add new tab.
The system displays a form for adding a new tab.
In the Tab name field, enter a name for the tab.
Use the Tab placement drop-down list to specify where the tab should be placed relative to other tabs. Note that the “First” position is the one immediately to the right of Home. Also, there is no “After My Pages” option because the right-most tab must always be My Pages.
In the area labeled Portlets available to pages in this tab, use the portlet buttons to specify which features can be placed on this tab’s child pages. Note that you can click the Allow all and Disallow all buttons to enable or disable all the features in the list.
Click Save.
The system creates your tab, along with a default page, and lists it on the Tabs screen. You may need to log out and log back in to see the new tab.
Note that your new tab’s default page does not yet have any content, so at this point you may want to do either or both of the following:
Add features to the page, as described in Add a Feature Instance to a Page.
Create subsections or add more pages to the tab, as described in Create a Subsection and Create a Page.
Use the following procedure if you want to do any of the following:
Change the name of a tab
Change a tab’s placement relative to other tabs
Change the list of features available to be added to pages associated with this tab
If you want to change the default page for the tab, see Make a Page the Home Page.
Log in to the portal as a member of the Administrators role.
Click the user icon and select Site Manager.
The system displays the Site Manager screen, with the Site settings tab selected by default.
Click the Tabs tab.
The system displays the Tabs screen, which lists all of the existing tabs.
Locate the tab you want to modify and click the corresponding pencil icon.
Do any of the following, as appropriate:
To change the name of the tab, modify the Tab name field. If appropriate, select the Change URL checkbox to update the URL to match the name. Note that if you change the URL, existing links to that URL will no longer work.
To change the position of the tab, use the Tab placement drop-down list. Note that the “First” position is the one immediately to the right of Home. Also, there is no “After My Pages” option because the right-most tab must always be My Pages.
In the area of the screen called Features available to pages in this tab, select or deselect features that you want to be available (or unavailable) for use on this tab’s child pages.
Click Save.
On the Tabs screen, you can easily reorder the list of tabs using the up and down arrows to the left of the tab names. This method is typically much quicker than reordering by editing each tab individually to change its placement, as explained in the previous section, Modify a Tab.
Log in to the portal as a member of the Administrators role.
Click the user icon and select Site Manager.
The system displays the Site Manager screen, with the Site settings tab selected by default.
Click the Tabs tab.
The system displays the Tabs screen, which lists all existing tabs.
Use the up and down arrows in the first column of the list to reorder the tabs as you see fit.
Click Save.
If you need to delete a tab, use the following procedure. Note that certain tabs—Home, Academics, Campus Life, and My Pages—cannot be deleted.
Warning
When you delete a tab, you also delete all content associated with that tab—including pages, subsections and feature instances. So do not delete the tab unless you are certain you don’t need any of this content.
Log in to the portal as a member of the Administrators role.
Click the user icon and select Site Manager.
The system displays the Site Manager screen, with the Site settings tab selected by default.
Click the Tabs tab.
The system displays the Tabs screen, which lists all of the existing tabs.
Locate the tab that you want to delete, and click the corresponding trash icon.
The system displays a dialog asking you to confirm the deletion.
If you are sure you want to delete the tab, click OK.
The system removes the tab and refreshes the screen.