My Profile and Settings
This chapter explains how to manage the My profile and settings feature, which individuals can use to review and manage information about themselves.
Key Concepts
In general, individuals can use the My profile and settings feature to do the following:
Review and edit information on record for themselves in the ERP system and JICS.
Turn desktop notifications on and off for their accounts.
Reset their passwords.
Tailor the details that will be displayed about him or her to other portal users, both in the My Info card and in certain other places in the portal.
Feature Basics
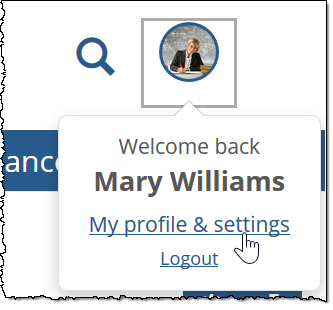
The My Profile and settings feature is different from other features in the sense that it is not manually added to pages. Rather, each user can access their own My profile and settings feature from the user menu.
To display the My profile and settings feature, click the My profile & settings link found on the menu that displays when you click your user icon in the upper-right corner of the page.
 |
Part of the purpose of the My profile and Settings feature is to determine what type of information will appear in the My Info card, which is a small window that any logged-in user can open to display information about another user. An individual’s My Info card can be displayed from many parts of the portal.
Essentially, when a username is displayed anywhere in the portal, each name is accompanied by a blue information i icon  .
.
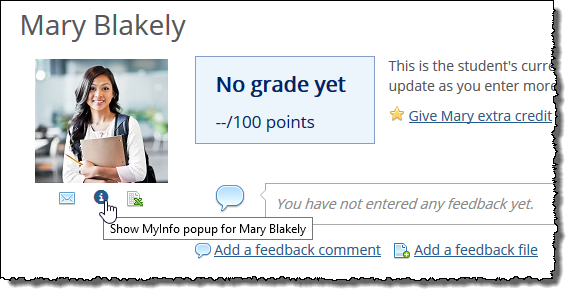 |
When you click the i icon, the system displays a My Info card for that person.
Whenever a user edits their address or legal name on the My profile and settings page, JICS will immediately communicate those changes to the ERP so that the changes can be reviewed and approved on the Process Internet Submission screen in the ERP.
To alert the appropriate person that such a change is ready for review in the ERP, you can have JICS send an email notification to an address of your choosing. The settings for doing so are found on the ERP settings screen in Site Manager.
To enable email notifications for updates to personal information:
Log in to JICS as someone with administrative privileges.
Click the user icon and select Site Manager from the drop-down menu.
The system displays the Site Manager screen, with the Site settings tab selected.
Click the ERP settings tab.
Click the Notify on update button to display Yes.
That section of the screen expands to reveal the fields of the email template the system will use to send the email notification.
Complete the email template fields as you see fit. Required fields are indicated by a red asterisk. On-screen instructions explain how to use dynamic components in the Message field.
Click Save.
To test your email template, click Send a test email.