Working with Roles
This section describes how to create and modify roles.
Creating Custom Roles
You may want to create custom roles if you need several different layers of authority.
Modifying a Role (Assigning Users to Roles)
At times you may need to modify a role. For example, you may want to change either of the following:
The name of the role.
Users assigned to the role. Note, however, that with certain roles, users cannot be added in this fashion. Essentially, if the role can be populated from within the ERP system, then users should be added there.
How To
If the role you want to create should be assigned privileges in several different parts of your site, make it a base, or global role.
Log in to JICS as someone with administrative privileges.
Click the user icon and select Site Manager from the drop-down menu.
The system displays the Site settings screen with the Site Manager tab selected.
Click the Base roles tab.
The system displays the Base roles screen.
Click Add new role.
The system displays a form for creating a new role.
In the Role name field, enter a name.
If you want to assign any existing roles (and their members) to this role, use the checkboxes under the Base roles heading.
If you want to add individual users to the role, complete the following steps:
Click Add individual users.
A drop-down selector displays.
Use the selector to choose the users you want to invite.
Click Save.
The system creates your role. Note that in the future, to add any additional users (or to remove users) from this role, you will need to modify the role, as described in the Modifying a Role (Assigning Users to Roles) section.
If the role you want to create should be assigned privileges only in one tab or subsection, create a context-specific role. This can be done from either the Context Manager or the Access screen, as outlined in the instructions below.
Note that the role will not be available for use within the child subsections of the context in which you are working (if any exist).
The role will be available only on the child pages that belong directly to the context. For example, if you create a role called Coach on the Athletics tab, and if the Athletics tab has a subsection called Football, the role will not be available to the Football subsection. It will be available to the Athletics’ tab’s default page and any other pages that were created directly on that tab.
Note
The Guests and All users roles cannot be added to a context-specific role.
To create a context-specific role from the Context Manager:
Log in to the portal either as a member of the Administrators role or as someone with Can Admin privileges in the tab or subsection. Navigate to the tab or subsection where you want to create a context-specific role.
Click Context Manager.
The system displays the Context Manager screen, with the Properties tab selected.
Click Permissions.
The system displays the Permissions screen.
Click Add context role on the top right.
The system displays a form.
In the Role name field, enter a name.
If you want any existing roles (and their users) to be automatically assigned to this role, use the available checkboxes to select the roles. Note that you may select either from the global roles or from any other context-specific roles that you might have created, both here and in other contexts.
If you want to add individual users to the role, complete the following steps:
Click Add individual users.
A drop-down selector displays.
In the left column, click the users you wish to add to the role. Note that you can use the Filter by field and the drop-down list of roles to filter the names that show up in the left column. The users that you select are added to the right column.
Click Save.
Use this procedure to do any of the following:
Change the name of a custom base role.
Add users to a custom base role that has not been linked to ERP data.
Add users to the Administrators role.
Except for the Administrators role, it is not possible to modify the predefined system roles (the roles installed by JICS). If you need to add an ERP user to one of these roles, you can do so through your ERP system’s interface. For details see your ERP system’s documentation.
Note that if you want to add a portal-only account user to a predefined system role, you can do so using the steps described in Modify a Portal-Only User Account.
If you want help granting privileges to a base role, see the next chapter, Managing Page and Context Permissions.
To modify a base role:
Log in to JICS as someone with administrative privileges.
Click the user icon and select Site Manager from the drop-down menu.
The system displays the Site Manager screen, with the Site settings tab selected.
Click the Base roles tab.
The system displays the Base roles screen, which lists all the roles in the system.
Locate the role you want to modify and click the corresponding Edit button.
The system displays a form for editing the role.
If appropriate, use the Role Name field to modify the name of the role.
Do any of the following as appropriate:
To add (or remove) groups of users from the role, in the bottom area of the screen, select (or deselect) checkboxes of roles whose users you want to add (or remove) from the role.
To add (or remove) individual people from the role:
Click Edit Users.
A drop-down selector displays.
Add users to the role by clicking their names in the left column or remove users from the role by clicking their names in the right column. Note that you can use the Filter by field and the drop-down list of roles to filter the names that show up in the left column.
Click Save.
Use this procedure to do any of the following:
Change the name of a custom context-specific role.
Add users to a custom context-specific role.
Note that if you want to add a portal-only account user to one of these roles, you can also do so using the steps described in Modify a Portal-Only User Account.
If you want help granting privileges to a context-specific role, see the next chapter, Managing Page and Context Permissions.
Note
You cannot modify a context-specific Faculty or Students role using this procedure.
To modify a custom context-specific role from the Context Manager:
Log in to the portal as a member of the Administrators role or as someone with Can Admin privileges for the appropriate context. Navigate to the appropriate context.
Click Context Manager.
The system displays the Context Manager screen, with the Properties tab selected.
Click Permissions.
The system displays the Permissions screen, which lists all the roles in the system on the right and the permissions for the currently selected role on the left.
From the list of roles on the right, select the context-specific role you wish to edit.
Permissions for the selected role display on the left.
In the Context role box, click the Edit button.
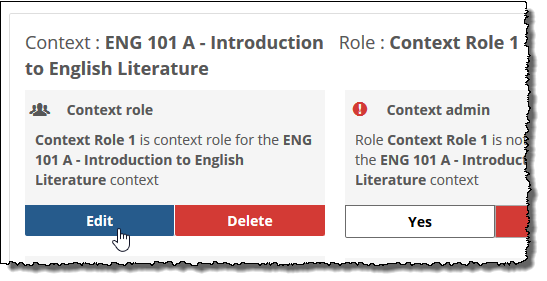
The system displays a form.
If appropriate, use the Role name field to modify the name of the role.
If desired, select or deselect any roles that you want to add or remove from the role you are currently editing.
If appropriate, select (or remove) individual users from the role as follows:
Click Add individual users.
A drop-down selector displays.
Add users to the role by clicking their names in the left column, or remove users from the role by clicking their names in the right column. Note that you can use the Filter by field and the drop-down list of roles to filter the names that show up in the left column.
Click Save.
To modify a custom context-specific role from the Access screen:
Log in to the portal as a member of the Administrators role or as someone with Can Admin privileges for the appropriate context. Navigate to the context.
Click the wrench icon in the upper-right corner of the page.
The admin bar displays.
Click the Access link in the admin bar.
The system displays the Access screen, which lists all the roles defined for this context as well as all the global roles.
Click the context-specific role that you wish to modify.
The system displays the permissions available in each of the features found on the page.
Click the View or change the members of role name role link at the bottom of the list of permissions.
The system displays the Access – Edit Role Name screen.
If appropriate, use the Role name field to modify the name of the role.
If you want to add individual users to the role, complete the following steps:
Click Choose the individual members of role name link.
The system opens a new dialog titled Add or remove members.
In the left column, locate the user(s) you want to add to the role and click their name(s) to move them to the column on the right.
Note
You can filter names displayed in the left column by entering text in the Filter by text box and/or by selecting a role from the drop-down list.
When you have added all the appropriate users to the right column, click OK. The system again displays the Access - Add a new role screen.
If you want to assign any existing roles (and their members) to this role, complete the following steps:
Click the Choose other roles to be included in role name link.
The system displays the Add or remove members window. Any context-specific roles are shown at the top of the window, and global roles appear in the lower portion.
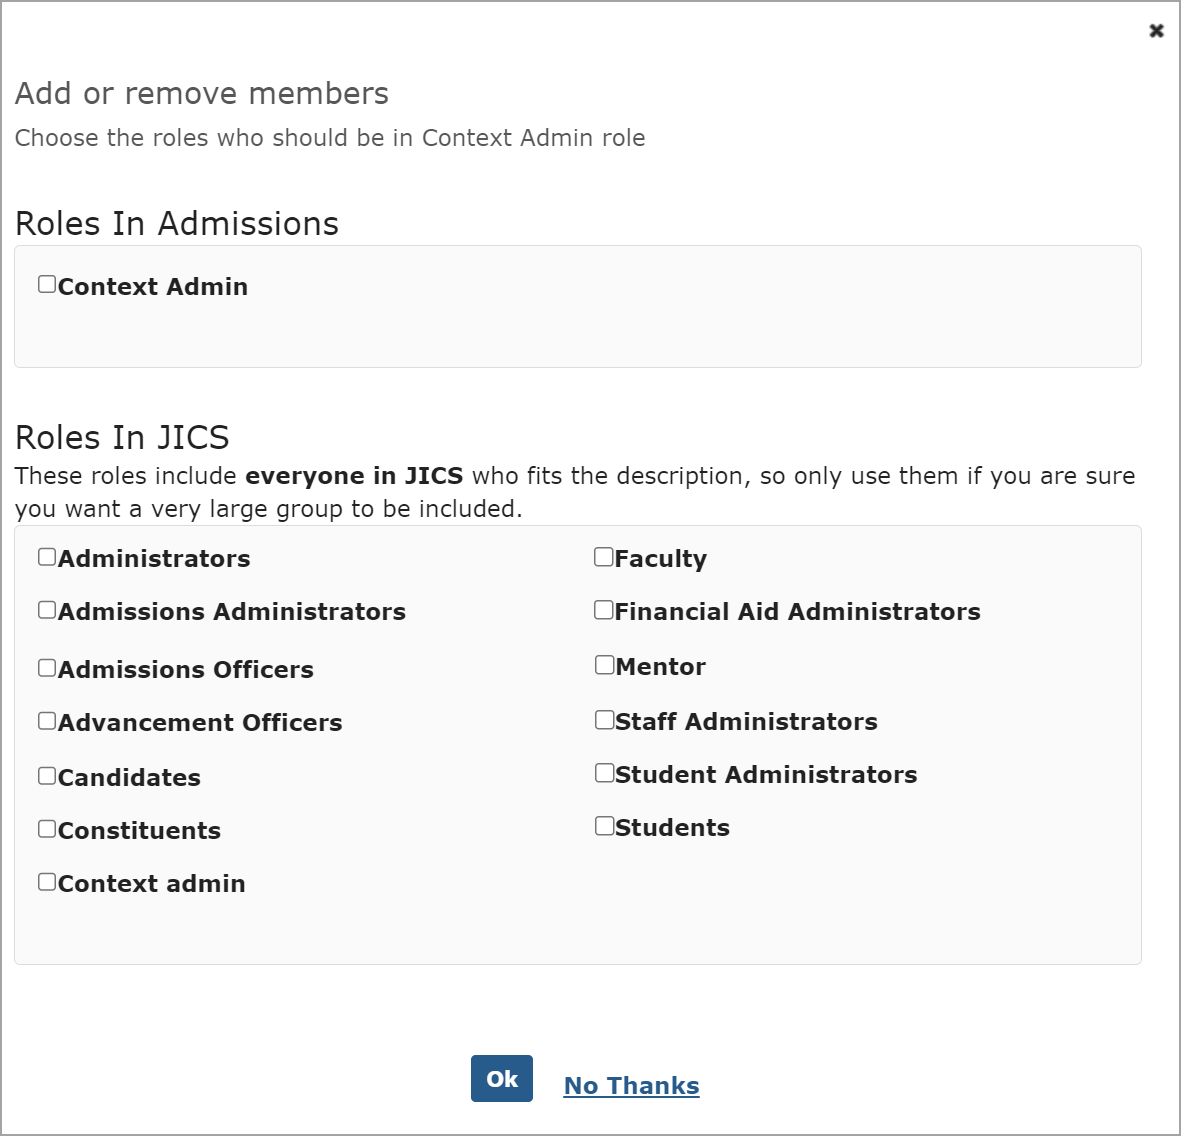
Select the roles you wish to add to the new role.
Click Ok when you are done.
Click Save.
The system updates the role and again displays the Access screen.