Introduction
Welcome to Jenzabar’s Internet Campus Solution, or JICS.
Key Concepts of JICS
JICS is a web-based portal product that allows members of your institution to collaborate and communicate. This is done partly through the use of features, a series of screens—or mini portals—that let users interact with the system and with each other in varied ways. This chapter elaborates a bit on features and on other unique aspects of JICS. You may find it helpful to review these details before you begin administering the system.
Base JICS vs. Optional Modules
All installations of JICS come with certain base functionality, including several standard features. Your school may also have purchased optional modules such as e-Racer, a CRM, or Course Evaluation, each of which comes with its own features.
If you need to check to see which versions of JICS and its modules you have installed at your site, open the Site Manager, and click the Portal version info tab.
Note that this guide does not cover those features that come as part of optional modules. For details on what precisely is covered by this guide, see the Scope of this Guide section.
The Help icon  is enabled on the top right of some JICS Campus Portal and eLearning pages, so you can click this icon to access the online help for that page.
The titles of online help topics may have minor differences compared to their associated portal page names. These differences are noted in parentheses in the list below. The following pages have their Help icons enabled.
Announcements
Blog
Bulletin Boards
Calendar
Chat
Course Evaluations Connector (online help shows "Setting Up Course Evaluations" information)
Data Import Transactions (online help shows "Working with the DIS" information)
Forums
Free-Form Content
Learning Tools
My profile and settings
Required Reading (online help shows "Working with Readings" information)
Reporting
Resources
RSS Reader
Task Manager
Usage Statistics
Note
Help icons are disabled on JICS Campus Portal and eLearning pages that are not included in the list above.
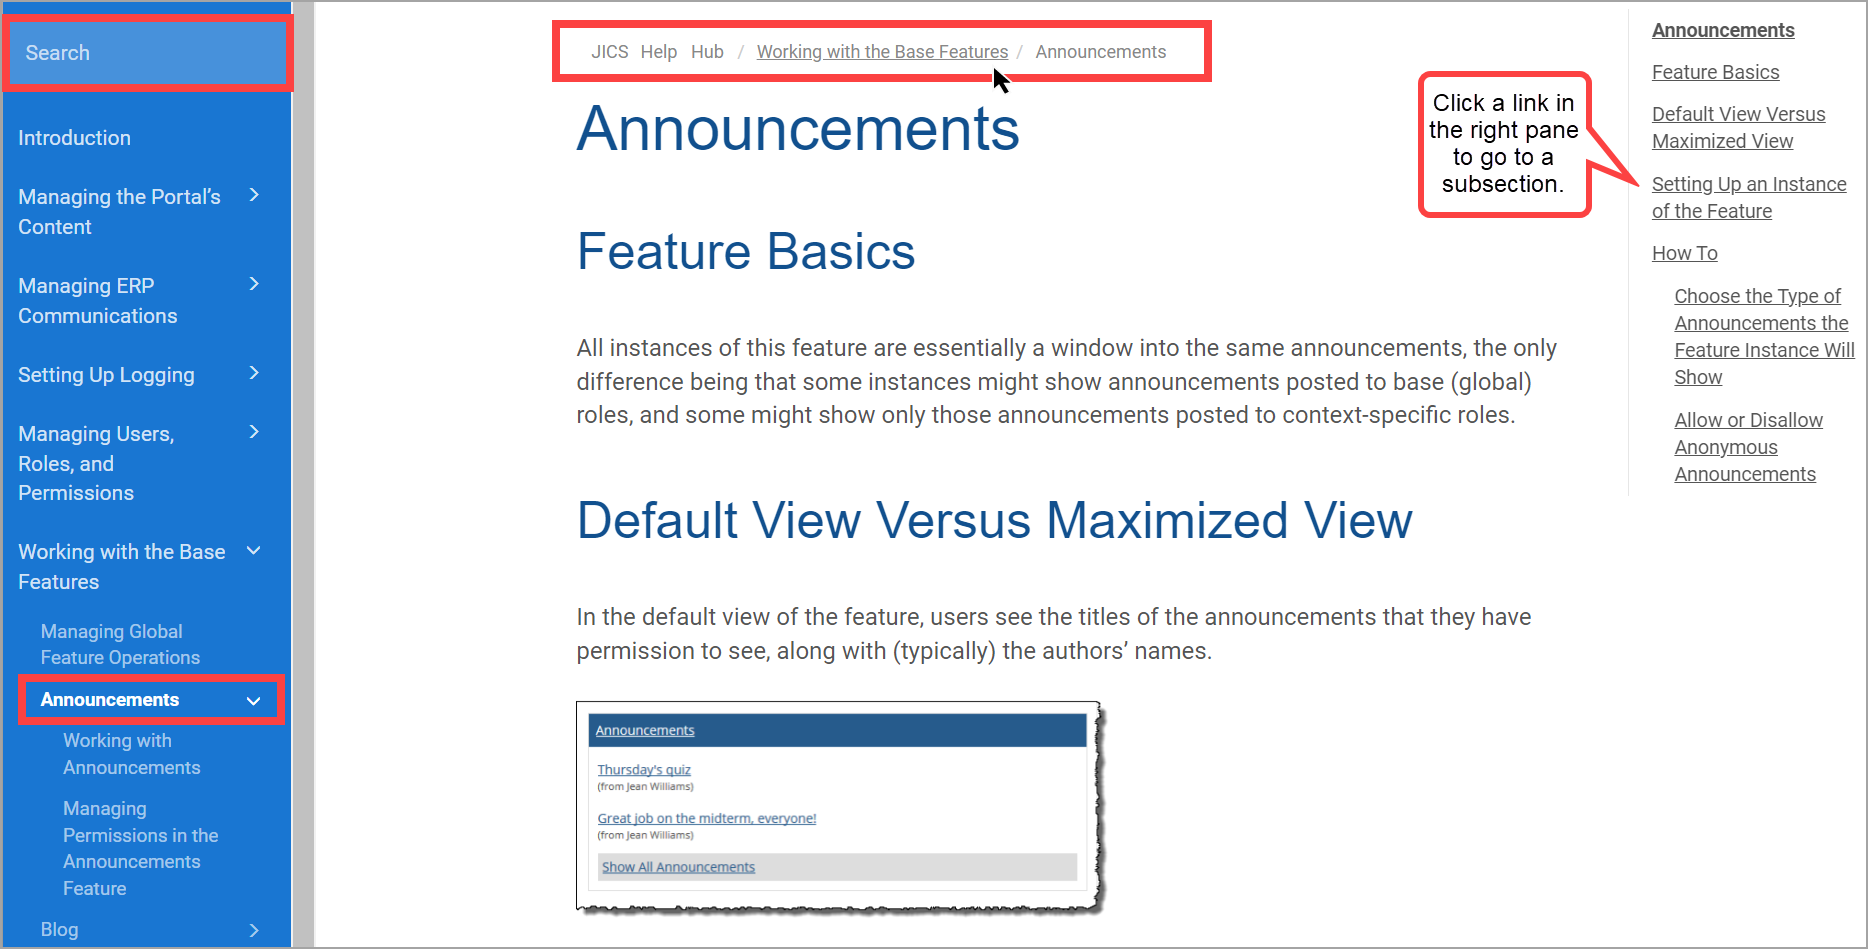
The Help icons provide entry points to the broader set of online help information from the JICS Admin Guide. The left pane on the online help page displays links you can click to navigate to various chapters and sections of this guide.
You can also enter search criteria in the Search field at the top of the left pane to find more specific information. You can search using part of a word, a word, a phrase, etc., and the Search results display automatically on the right. You do not need to press Enter on your keyboard to view the results (pressing Enter selects the first Search result by default and displays that information).
The top part of the Announcements online help page is shown as an example in the following screenshot. The left pane displays the Search field at the top and links to different chapters and sections. A navigation path above the "Announcements" heading in the online help page indicates where this section is located within the overall chapter, e.g., "Working With the Base Features" (which is a clickable link). You can click the links in the right pane to navigate to subsections.
 |
This section describes the basics of how users interact with JICS and defines key terms that will be used throughout this guide, especially in regard to topics such as site content, layout and permissions.
Your Site’s Layout
Like any web site, JICS is made up of pages, each of which contains content (which in JICS takes the form of features). It is also useful to understand the following terms when considering your site’s content and layout:
Tabs
Subsections
Sidebar
Contexts and the Context Manager
Features
A tab is a collection of pages. They represent the highest level of organization in the portal. Tabs are displayed in a row at the top of the screen. For example, in the following screen shot, the Academics tab is selected.
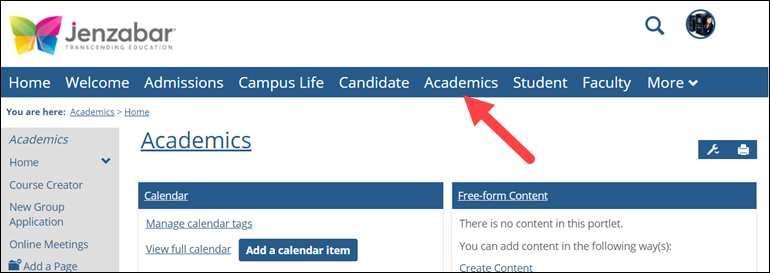 |
Each tab has a default page. When a user navigates to the tab, the system displays the default page first. Although a few tabs cannot be modified, you can add, rename and rearrange most tabs.
For more details on managing tabs, see Working with Tabs.
A subsection is a child element of a tab. It is essentially a collection of pages. By default, a link to a subsection is represented as a folder icon in the sidebar at the left side of the screen (although you can hide these icons).
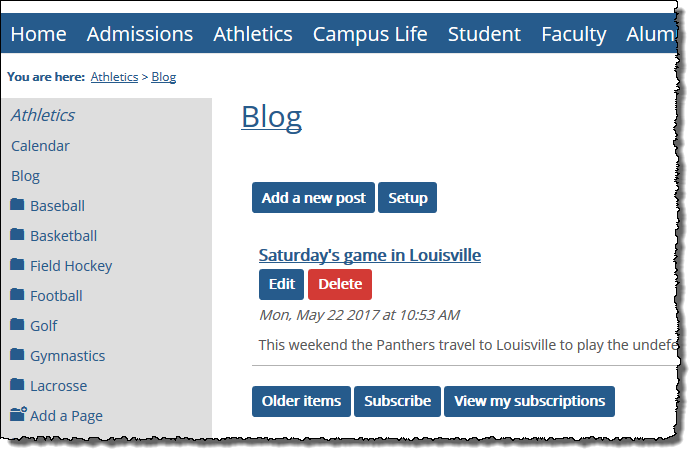 |
Like a tab, each subsection has a default page. A subsection can also contain child subsections. For more details, see Working with Subsections.
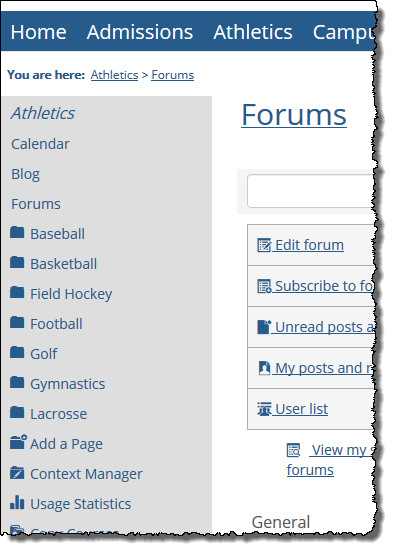
The sidebar is a pane, usually at the left side of the screen, that lets users view the structure of the currently displayed tab or subsection. The sidebar lets users navigate directly to a particular page or child subsection. For more details on managing this, see Working with Sidebars.
 |
Tabs and subsections are sometimes referred to as contexts. For each context, there is an administrative console called Context Manager, which authorized users can access to make changes such as selecting a default page, managing permissions and so forth. Among other benefits, this structure allows you to grant administrative privileges to a role in certain contexts, but not others.
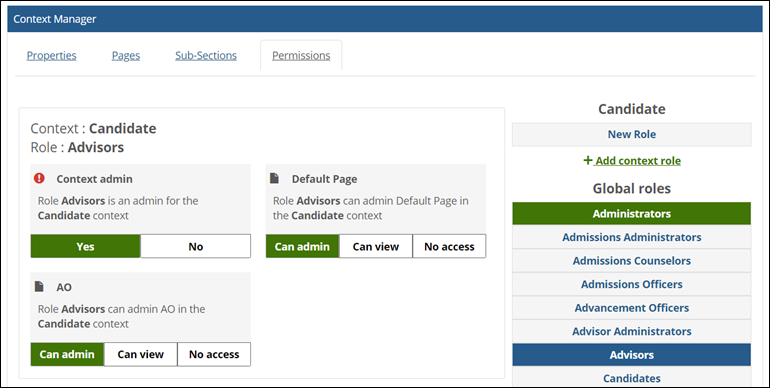 |
Context Manager is discussed in Managing Tabs, Pages, and Subsections and in the Managing Page and Context Permissions section.
A base installation of JICS comes with several different types of features, each of which is associated with a specific type of content or activity. For example, the Announcements feature lets users post announcements, the Bulletin Boards feature lets users post information about items for sale, and so on.
Each time you add a feature to a page, you create a feature instance. The information contained in the feature instance is often unique to that instance. Feature instances are represented on a page as a series of windows.
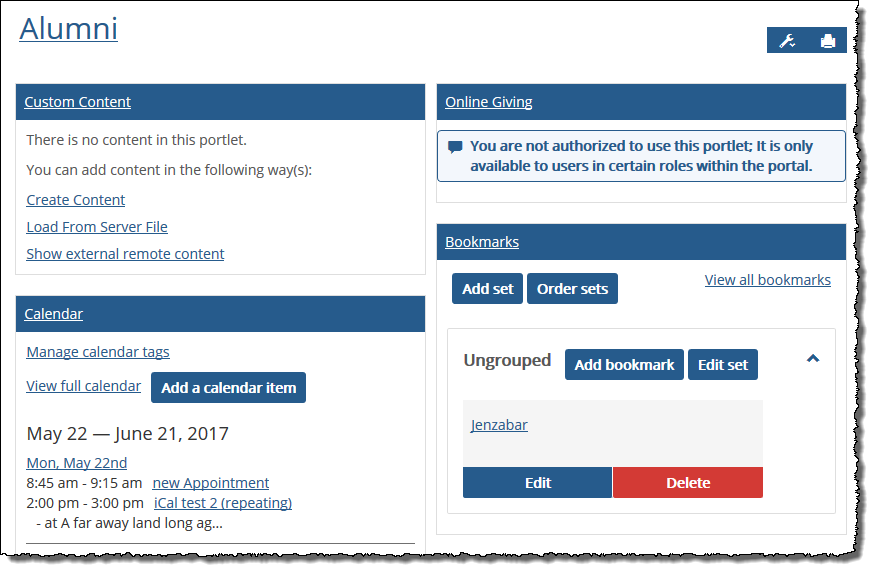 |
A page can host up to 10 feature instances. At any point, the user can maximize a feature instance, which sometimes allows the feature to display additional information.
Depending on the type of feature and on your school’s needs, you (or other managers of content at your school) might add several instances of a single feature type to your site. For example, you might set up one instance of the Calendar feature for faculty members and another for coaches. You can set up different permissions for different instances of the feature.
The setup process for the different feature types is covered in the Working With the Base Features section.
If desired, you can give your portal a name that will be used in automated messages throughout the site. You can also create messages to be displayed upon login, logout and so forth. These topics are covered in Naming Your Portal and Managing Sitewide Content.
In some cases, you may want to make a JICS page or feature instance available from within an iFrame on another web site. You do this using a feature called direct links. This is covered in Placing Content on Another Site.
Each person who needs to use JICS must have a user account and, in order to have any privileges, users must be assigned to roles. Each user inherits the privileges that are associated with the roles to which he or she belongs.
User Accounts
Most of your user accounts and role assignments probably will be imported from your ERP system. This process and related tasks are covered by your ERP system’s documentation. However, you can also create user accounts that exist only in JICS. For details on this process, see the Working with Portal-Only User Accounts section.
Roles and Privileges
As part of your overall planning process, you may want to look at the roles that are installed by JICS and decide whether more or different roles are needed. The process of creating roles is described in the Creating Custom Roles section.
You may also want to grant privileges manually to some roles. Some privileges, however, are handled at the feature level, and these are described in the sections on each feature.
Authentication
You can choose to have users internally authenticated by JICS, or you can have JICS authenticate to an external system, such as an Active Directory or a SAML 2.0 identity provider. This process is covered in the Managing Authentication section.
This section offers a brief overview of the types of information housed by several key components in a working JICS system, including the following:
The JICS program folder
The JICS instance of AD LDS or ADAM
The main JICS database and the logging database
The ERP system
When JICS is installed, it adds a directory structure to your web server(s) that hosts several key files. By default, this directory is installed at the following location:
Drive: Program Files\Jenzabar\ICS.NET
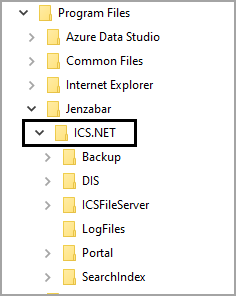 |
This directory contains the following folders (some of these folders will not be present for all installations):
Backup
DIS
ICSFileServer
LogFiles
Portal
SearchIndex
JICS Instance of AD LDS or ADAM
Main JICS Database and the Logging Database
ERP System
The JICS installer creates this folder for the temporary storage of AD LDS, the ICS_NET file system and the JICS databases while performing an upgrade. This folder appears only if the person doing the upgrade chose to have the installer back up these files. If the installation fails, you will be able to restore from the backups contained within this folder. If the upgrade is successful, the installer deletes these backups.
The DIS folder for the Data Import Service contains a series of sub-folders that the system uses as part of the import process that brings information to JICS from your ERP system. The DIS is described at a high level later in this chapter (The ERP System) and is covered in more detail in Working with the DIS.
The ICSFileServer folder contains a series of sub-folders that store the following:
Files uploaded for use in the Resources feature and certain other features.
Images uploaded for use in the My profile and settings feature.
Temporary files created if users are making attachments to emails that they create within JICS.
Audio and video recordings created using the text editor.
Certain other images and files used throughout the portal.
The Portal directory contains several folders and files. Some of the key files include the following:
Web.config – The main configuration file for your portal.
default.aspx – The page that loads when users visit your site.
favicon.ico – The icon displayed in the browser bar when a user visits your portal.
Some of the key Portal folders include the following. Except for ClientConfig, you should not modify the files contained in these folders:
bin – This folder includes all the compiled code for JICS, contained in .NET assemblies.
ClientConfig – This folder is intended as a home for your customizations (and is described more fully in the Adding Customizations section).
Portlets – This folder contains .ascx files used by the features for the base product and optional modules such as the CRMs and e-Racer.
StaticPages – This folder contains static web pages that are not part of any features and will not be placed on any page. For example, this folder contains pages displayed during SAML authentication and when users download resources and other files.
UI – This folder houses images, JavaScript files, and stylesheets.
This folder contains the index directory needed for the ICS Search function. For more information, see Configuring the Search Function.
Please note that the JICS installer provides the option to give this folder a custom name and location; therefore, it may not necessarily be titled “SearchIndex,” and it may not even reside in the ICS.NET directory.
Changes to SQL Stored Procedures
An internal security test of Jenzabar's systems found that, by default, two extended stored procedures in SQL could be executed by members of the public role in SQL. The procedures are:
xp_dirtree - displays a list of every folder, subfolder, and file for a path you give it.
xp_fileexist - validates that a file exists.
Jenzabar revoked the execute permission on these two files to address this issue. Jenzabar recommends that clients also revoke the execute permission on these two files for better security.
Important
Clients should check the settings on the xp_dirtree and the xp_fileexist files because Jenzabar cannot change these settings at client sites. Jenzabar recommends that clients remove the execute permissions on these files by using the following SQL commands:
REVOKE EXECUTE ON xp_dirtree FROM Public
REVOKE EXECUTE ON xp_fileexist FROM Public
The following types of information are stored in the JICS instance of AD LDS (Active Directory Lightweight Service) or ADAM (Active Directory Application Mode):
A “template” for each type of feature that exists in JICS. These templates define how each type of feature behaves.
Details about the structure of your site, including a series of records that represent each page, feature instance, subsection and tab that exist in your portal.
Data about individual users (such as their usernames, role assignments, email addresses, and so forth). Note that some of this data may have been imported from the ERP system.
Data about the privileges that have been granted to the various roles.
Additional information is stored in the two SQL Server databases that were created by the JICS installer. These include a main database and a logging database.
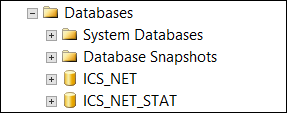 |
Main Database
The main JICS database, which by default is named ICS_NET, includes data such as:
All of the text strings used throughout the portal.
Settings for global preferences, such as whether or not users can change their passwords, whether or not direct links are enabled, and many others.
Details about email sent through JICS (if you activate email logging). Email logging is described in Email Logging.
Information about data created in certain feature types, including Attendance, Blog, Bulletin Boards, Forums, Campus Groups, Coursework and Gradebook, among others.
Logging Database
If you activate usage statistics logging, the system stores data about users’ visits to JICS in the logging database, which by default is named ICS_NET_STAT. For details about activating this type of logging, see Usage Statistics Logging.
Most customers use JICS in conjunction with an ERP system such as Jenzabar J1 or EX. For these sites, communication between JICS and the ERP system is very important. This communication is handled in the following two ways:
Though the DIS – The Data Import Service, or DIS, can be used to regularly import information, such as user accounts and role assignments from the ERP system to JICS. For more details, see Working with the DIS. Note that if your site uses e-Racer, details about courses, course sections, and terms are also imported using the DIS.
Though a series of plug-ins – If your site includes any CRMs, data is exchanged between JICS and the ERP system using a series of C# plug-ins and in some cases web services (depending on your ERP system). For details, see Managing CRM-ERP Communication. If your site includes e-Racer, note that this method of communication is used for the Gradebook Grade Entry feature.
If you intend to do customizations, make sure you review the Adding Customizations section for general guidelines.
Even if you do not plan to make sweeping customizations, at a minimum you will probably want to customize the following files:
The masthead image used at the top of the site. After installation, a Jenzabar logo appears by default.
The text files accessed by three links in the footer: Privacy Policy, About us, and Contact Us. After installation, by default these include boilerplate text that does not reflect anything specific about your school. For details, see the Changing Your Site's Footer Content section.
The favicon displayed in the browser’s address bar. By default, this image is a Jenzabar logo. You may want to change this to something that better represents your school. For details, refer to The Favicon section.