Actions for Resources
The following sections explain how a user with the appropriate permissions can add, edit, copy, move a resource to another set, reorder resources within a set, and delete resources in Card and List Views. Resources can also be sorted within a set in the List View.
There are two ways to add a resource on the Resources main screen:
Click the Add resource button within a set to display the Add resource screen.
Click the Add Set drop-down arrow above the Ungrouped set to display a drop-down list, then click the Add resource option on this list to display the following Add resource screen.
 |
Enter information in the Add resource fields as described in the following procedure.
Enter a unique name in the required Name field (maximum length is 250 characters). If the name entered is not unique, when attempting to save the resource, a warning message displays stating that the name already exists, and another name must be entered.
Click the appropriate button in the Source field. Selecting a Source file or entering a URL is required. (After selecting a file, the file's name appears on the right of the Choose File button.) Options are:
MoxieManager—Displays a Choose file button below it. Clicking this button opens your MoxieManager where you can select a file.
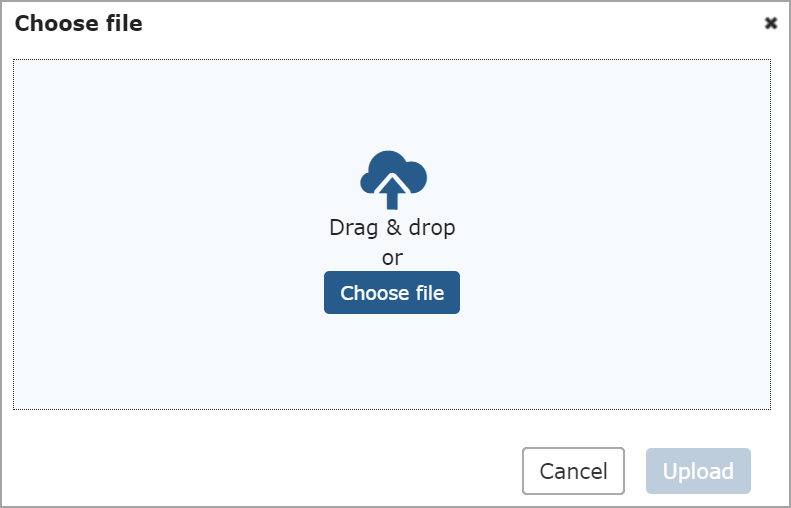
My computer—Displays a Choose file button below it. Clicking this button opens a new Choose file pop-up window, and you can click a file and drag and drop it into the pop-up window. You can also click the Choose file button on the pop-up window and select a file.
URL—Displays a URL field and New window/Same window toggle button. The URL field has a maximum length of 4000 characters. The toggle button default is New window, but you can click Same window if desired.
Click the required Set drop-down arrow and select the appropriate set. If you do not want a specific set, use the default Ungrouped option.
Click the required Status drop-down arrow and select the appropriate option: Extra Credit, (No status), Optional, Suggested, or Required (default).
You can enter information in the optional Description field (which has a text editor with various options, such as inserting a link or images). The maximum length for this field is 2000 characters.
Note
Date Range fields to select a range of dates in which the resource will be available is shown ONLY if the Use Display Indicator portlet setting is turned ON. If Display on is selected, the Start Date field displays and is required, and if End on is selected, the End Date field displays and is required.
Select the Start option: Display now (default), Display later, Display on.
Select the End option: No end date (default), End now, End on.
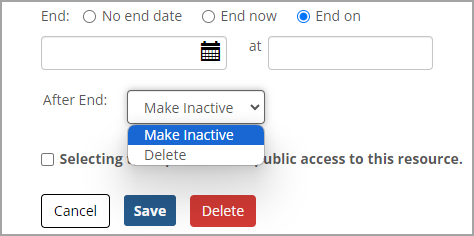
If the End on option is selected, then date and time fields are shown to enter when the resource's display will end. An After End drop-down list is also shown with Make Inactive and Delete options for selecting what happens to the resource after the end date and time.
Note
If Make Inactive is selected, the resource will still be visible to Administrators but hidden from read-only users. If Delete is selected, the resource will be deleted completely after the End on date and time pass.
The optional Selecting this option allows public access to this resource checkbox ONLY appears when MoxieManager or My Computer is selected in the Source field. To allow public access, select this checkbox. Anyone with the URL will be able to access the file.
After entering the resource information, clicking the Save button saves the data and goes back to the previous screen. Clicking the Save and add another button saves the resource data and clears the data in the fields to add another new resource. Clicking the Cancel button goes back to the previous screen without saving the data. After saving, a message at the top of the screen states: "[Resource name] has been successfully added."
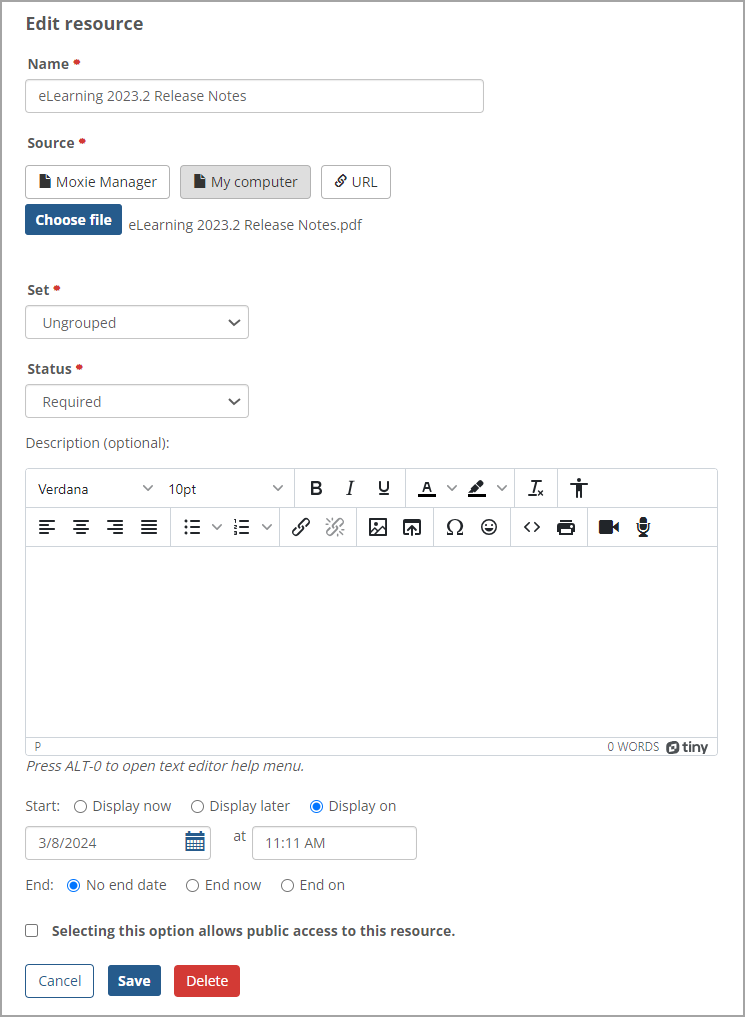
Click the Edit button in the Card View or the Edit pencil icon  on the right of a resource's row in the List View to display the Edit resource screen. With Release 2024.2, you can also select a resource, click the Manage button, and select Edit on the drop-down list. All fields on the Edit resource screen are filled in with the resource's current data, which can be changed. The required fields are Name, Source, Set, Status, and the Start/End fields.
 |
If the End on option is selected, then date and time fields are shown to enter when the resource's display will end, and an After End drop-down list shows options to Make Inactive or Delete the resource after the end date and time. If Make Inactive is selected, the resource will still be visible to Administrators but hidden from read-only users. If Delete is selected, the resource will be deleted completely after the End on date and time pass.
The optional Selecting this option allows public access to this resource checkbox ONLY appears when MoxieManager or My Computer is selected in the Source field. To allow public access, select this checkbox.
Clicking the Save button saves the changes, and a message is displayed at the top of the Resources screen stating: "[Resource name] has been successfully saved." Clicking the Cancel button does not save any changes, and the Resources screen is displayed.
Clicking the Delete button displays the Delete Resource pop-up window to confirm the deletion. Clicking the Delete button on this window deletes the resource. The Resources screen displays a message at the top confirming the deletion.
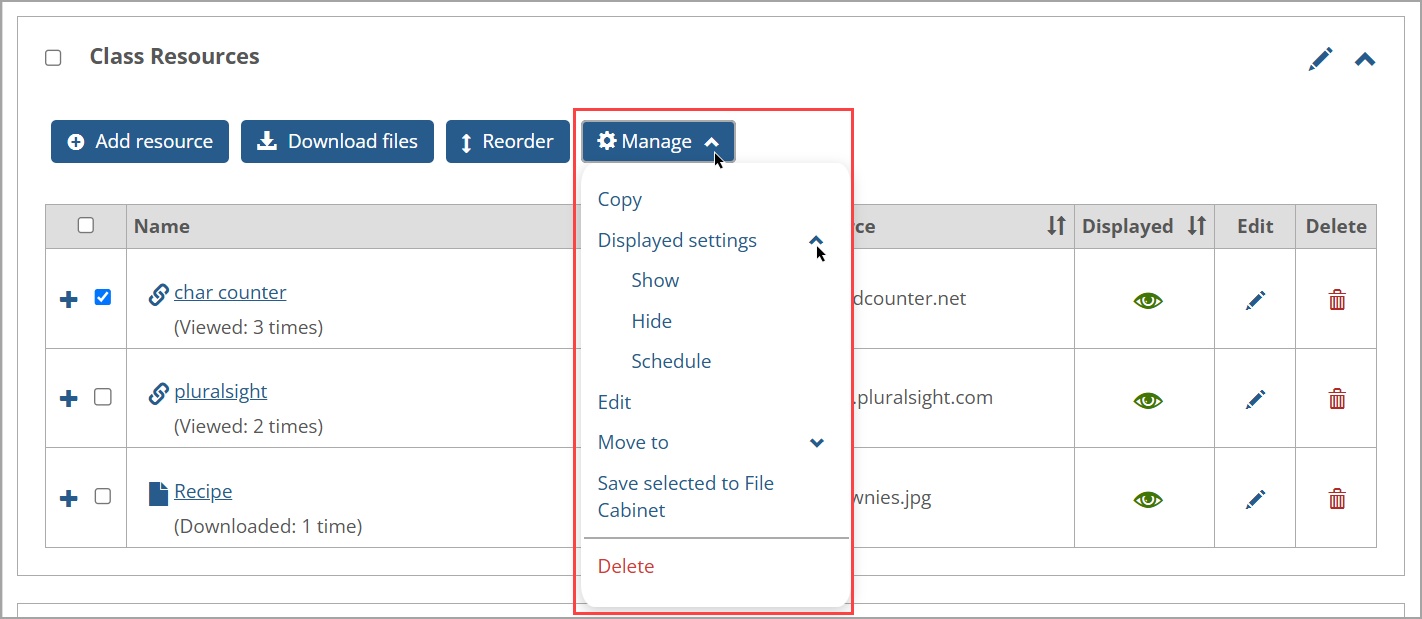
You can use the Manage button to take various actions on one, multiple, or all resources in a set. Selecting a resource's adjacent checkbox or a set's checkbox inserts a checkmark and enables the Manage button at the top of the set.
In the Card View, the Select all set checkbox displays on the top left above all resources in the set. In the List View, this set checkbox displays as a blank checkbox in the top left column heading on the left of the Name column. It doesn't have a Select all label. Clicking either checkbox selects all resources in the set and enables the Manage button. Clicking this button displays the Manage drop-down list of options as shown in the following List View screenshot. (Clicking the Manage button again closes the drop-down list.)
Note
The Manage drop-down options are only available in the List and Card Views of the Resources main screen. At least one resource must be selected for the Manage button to be enabled and available.
With the JICS 2024.2 Release, the Displayed settings and Edit options were included on the Manage drop-down list and can be used if one or more resources in a set are selected. Another change with JICS 2024.2 enables users to close the Manage drop-down list and the Manage sets drop-down list after opening them by clicking a screen area outside of these drop-down lists.
One, multiple, or all resources in a set can be copied within a set. After making your resource selection, click the Manage button. Clicking the Copy option on the Manage drop-down list does the following:
The Resources screen is updated to display a copy of each selected resource. The copy is placed in order right below the original resource. (All other resources are moved down in the order.) The copy has "(Copy)" at the end of the resource name. A second copy has "(Copy) (Copy)", etc.
Reporting data (e.g., how many times a file has been downloaded or a link has been viewed) is NOT copied and will be reset to 0. Otherwise, all fields are copied exactly.
If a file resource from MoxieManager was copied, a "pointer" is created to the same file in Moxie. Copying an uploaded file resource makes a copy of the file.
A green confirmation message appears above the sets stating: "The selected resources were successfully copied."
After selecting one or more resources in a set and clicking the Manage button, clicking Displayed settings displays drop-down options of Show, Hide, and Schedule. These options are shown in the following screenshot and are explained in the following paragraphs.
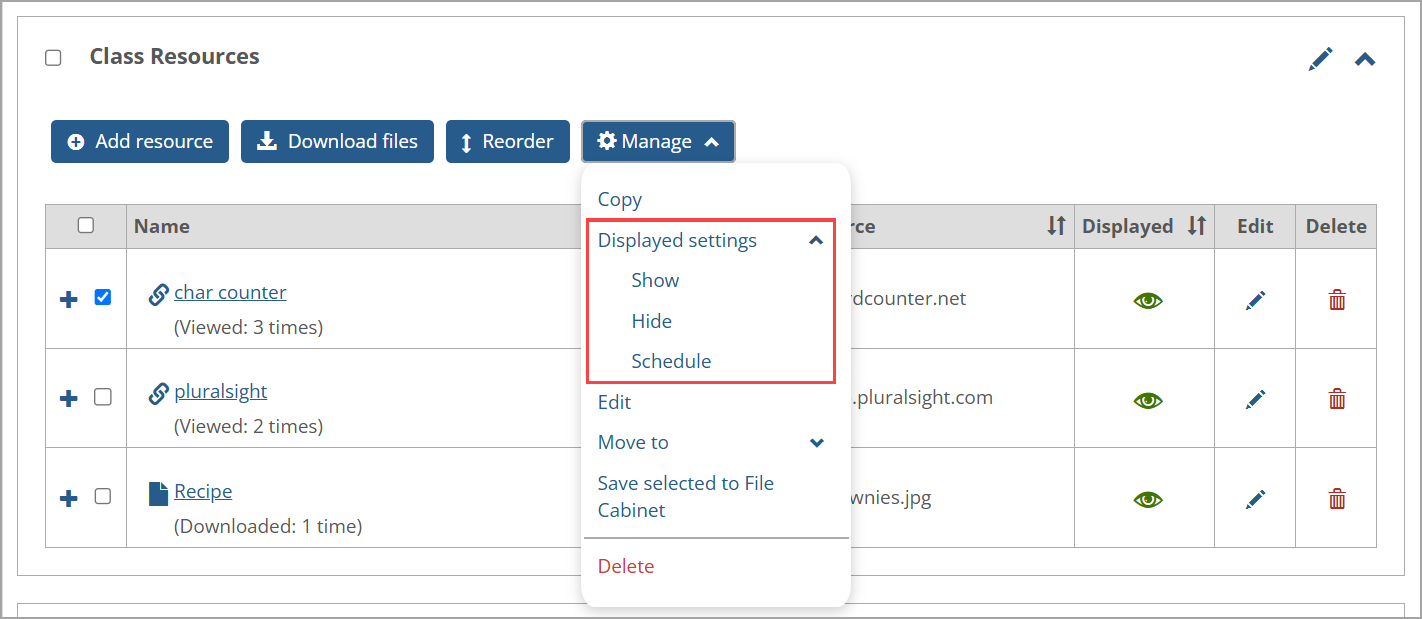
Clicking Displayed settings opens a drop-down list with Show, Hide, and Schedule options. The impact of selecting each option is described below.
Show—If the resources are hidden or scheduled to display on a future date or time, they will be shown now. The green open eye icon
 is shown as the displayed setting for the selected resources.
Hide—If the resources are shown or scheduled to display on a future date or time, they will be hidden now and no longer scheduled to display. The red slash eye icon
 is shown as the displayed setting for the selected resources.
Schedule—A "Displayed settings" pop-up window displays Start, End, and After End options. The selected resources are displayed based on the options selected on this window and saved. Most options selected will show a blue calendar and clock icon
 . The exceptions are "Display now" (which shows a green open eye icon ) and "End now" (which shows a red slash eye icon ) The options that initially appear and the default selections in the pop-up window are shown in the following screenshot:
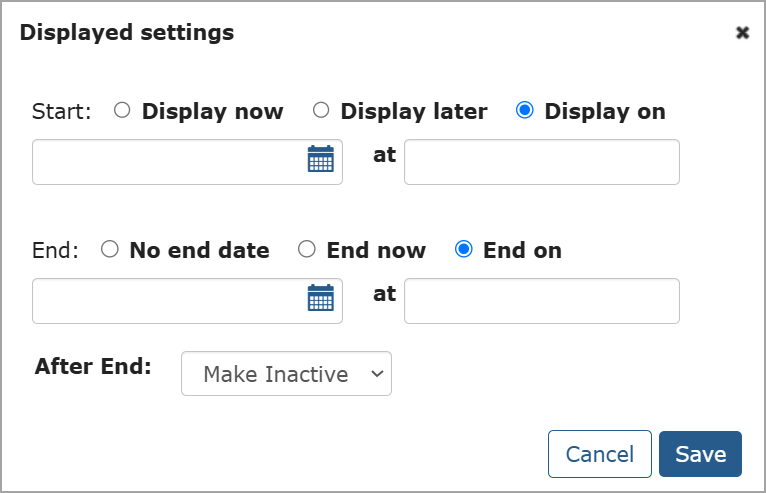
If either "Display on" or "End on" options are selected, then both a date and time must be selected. Otherwise, when you try to save the settings, a red warning message displays a message stating they are required. The After End options are "Make Inactive" or "Delete".
After taking action with a Show, Hide, or Schedule option, a green confirmation message appears above the sets stating: "The changes have been successfully applied to all selected Resources."
Note
To change an individual resource's display setting, click its associated display icon. The "Displayed settings" pop-up window appears for selecting options.
After selecting one or more resources in a set, click the Manage button and click Edit on the Manage drop-down list to display the Edit Resources pop-up window. The set that currently contains the selected resources appears in the Set field. The Status field does not display a value initially. The Start and End fields have Display now and No end date selected by default, respectively.
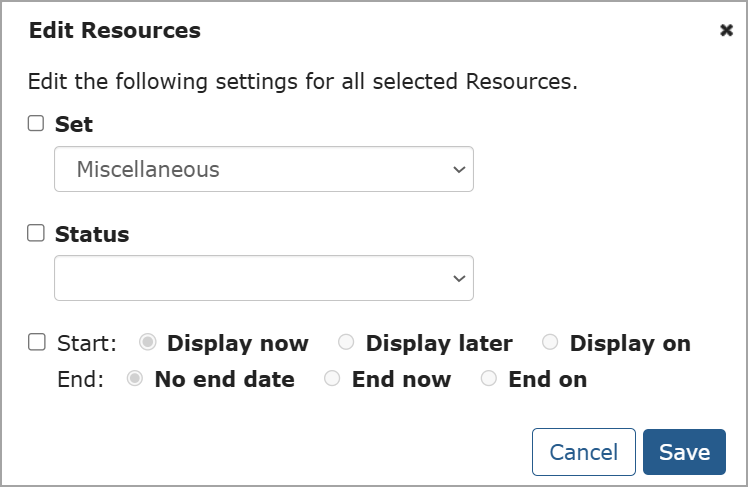 |
You can use the options on this pop-up window to take the following actions on the selected resources:
Move them to a different set
Change their status
Change their display settings
Moving Selected Resources to a Different Set
Select the Set checkbox.
Click the Set drop-down arrow and select the set you want the resources to be moved to.
Click Save.
Changing the Status of Selected Resources
Select the Status checkbox.
Click the Status drop-down arrow and select a status. Options are Required, Optional, Suggested, and Extra credit.
Click Save.
Changing the Display Settings of Selected Resources
Select the Start/End checkbox.
Select the Start display option. If Display on is selected, enter a date and time.
Select the End display option. If End on is selected, enter a date and time.
Click Save.
After changes are saved, the Edit Resources pop-up window closes, all sets collapse, and a green confirmation message appears above the sets stating: "The changes have been successfully applied to all selected Resources."
Note
If required data is not entered in the Edit Resources pop-up window, when you click Save, a red message appears at the top of window indicating the missing data. For example, if you select the Status checkbox but don't select a specific status, then the message states: "A Status must be selected."
When one or more resources is selected, clicking the Manage button and then clicking Move to displays a drop-down list of all sets, but the current set name is disabled (a checkmark on the left of the set name indicates the current set). If there is only one set on the Resources main screen, the Move to drop-down list does not display any options since there is no other set to move the resource to.
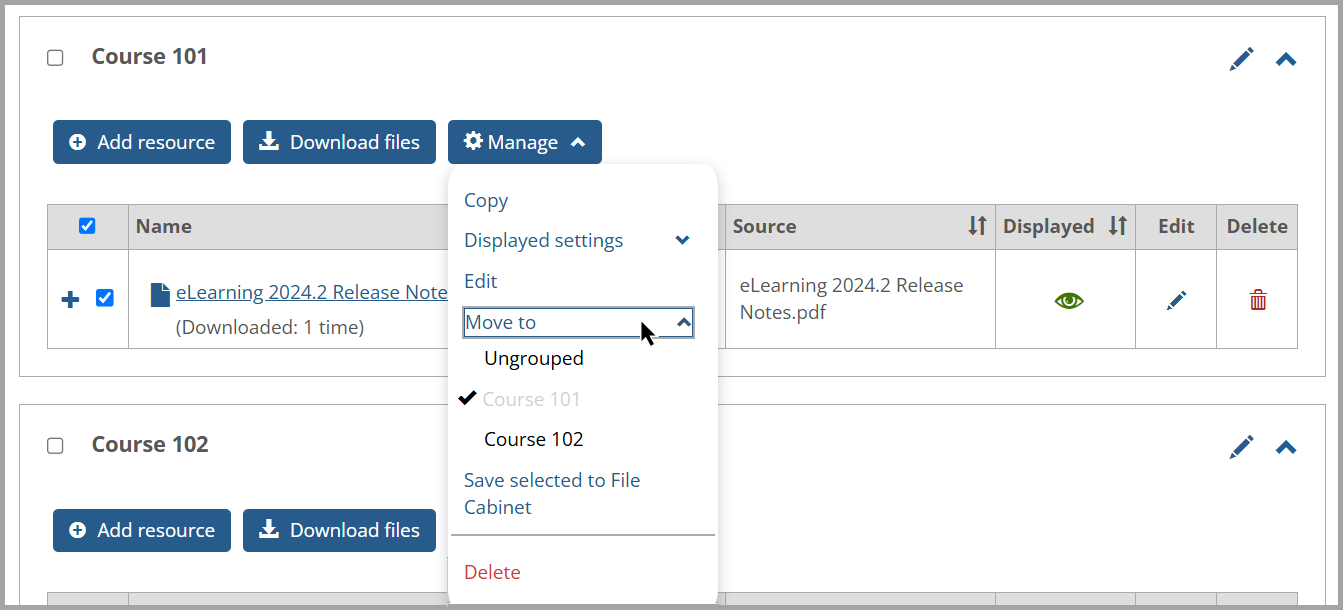
After you click any set (besides the current one) in the Move to drop-down list, the selected resource is moved to the bottom of the selected set. The Resources screen is updated, and the set that the resource was moved to is expanded to display the change. A green confirmation message appears above the sets stating: "The selected resources were successfully moved to [set name]."
You can save one, multiple, or all resources in a set to a File Cabinet. After making your resource selection, click the Manage button and then click the Save selected to File Cabinet option on the Manage drop-down list. A green confirmation message appears above the sets stating: "The selected resources have been successfully saved to your File Cabinet."
Note
A user must have the "Can Manage Resources" permissions AND access to a File Cabinet to view the Save selected to File Cabinet option on the Manage drop-down list.
After selecting one or more resources in a set, click the Manage button and then click the Delete option on the Manage drop-down list. A Delete Resources confirmation pop-up window appears to ensure you want to delete the resource. On this window, click the Delete button to confirm the deletion or the Cancel button to cancel the action. If you click the Delete button, the Resources main screen displays a green confirmation message above the sets stating: "The selected resources have been successfully deleted."
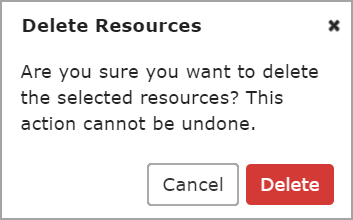 |
Warning
Once you click the Delete button in the Delete Resource confirmation pop-up window, you cannot undo the action.
If you delete all resources in a set, the following blue message displays within that set: "There are no resources in this set." To delete the set itself, refer to Delete Sets.
Note that there are other ways to delete a resource on the Resources main screen. In the Card View, you can click the red Delete button on the card displaying the resource. In the List View, you can click the red Delete trashcan icon on the right of the resource's row. The Delete Resource confirmation pop-up window appears to confirm the deletion.
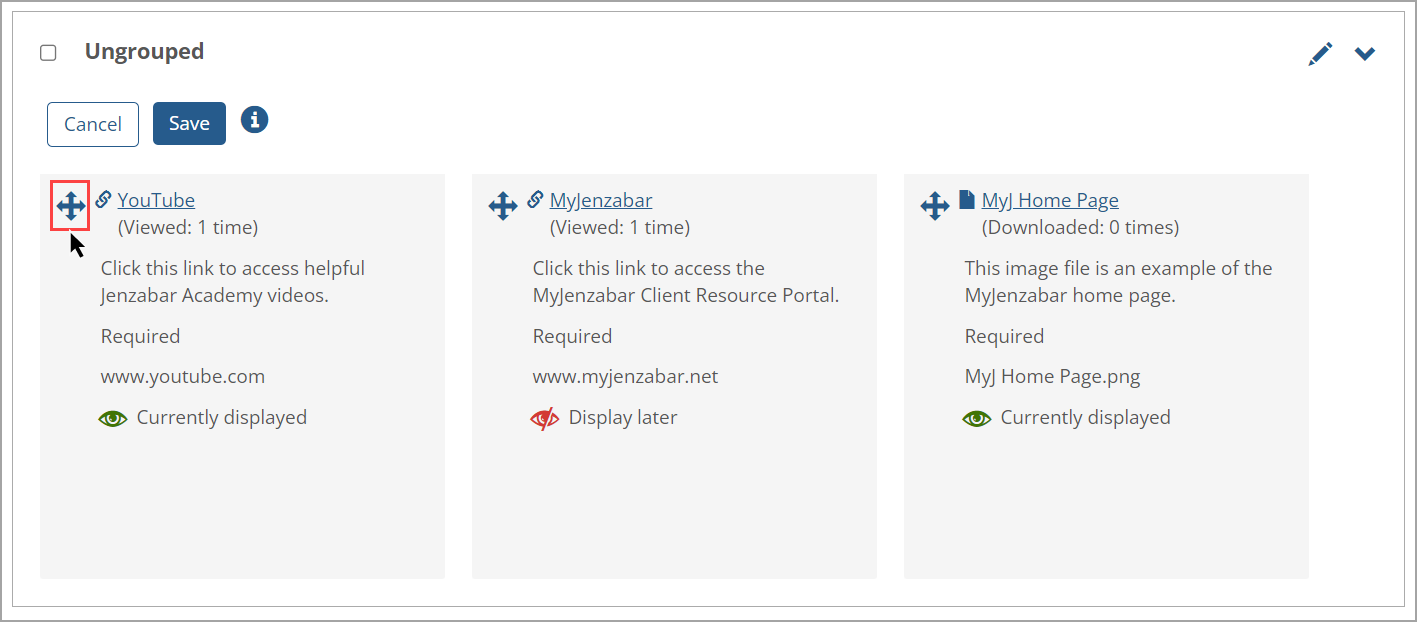
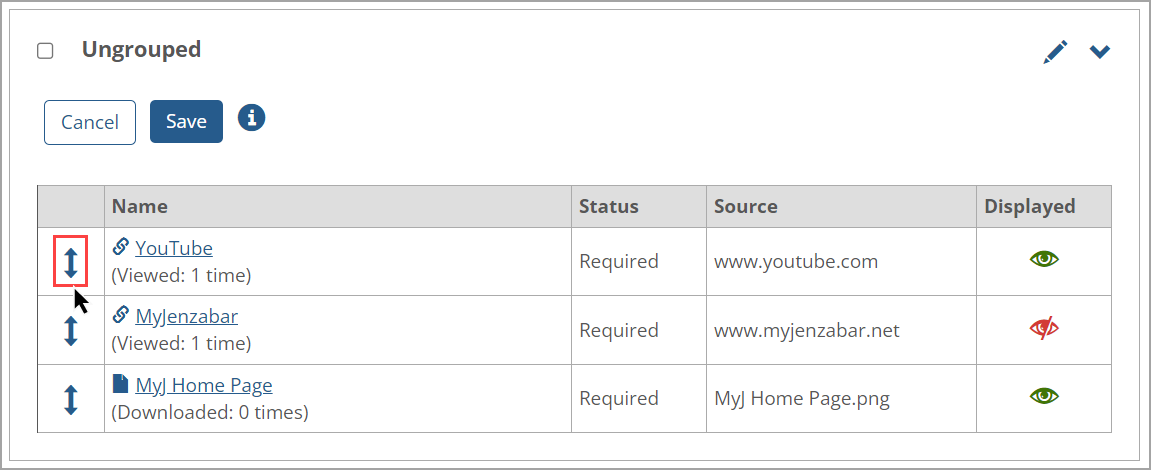
When there are multiple resources within a set, users with the appropriate permissions can reorder them by clicking the Reorder button at the top of set in the expanded Card View and List View. The Reorder arrows icon displays as intersecting arrows  in the Card View, but it displays as up and down arrows
  in the List View.
For example, if the Ungrouped set contains multiple resources, clicking the Reorder button in the Card View displays the Reorder arrows icon in the top left corner of the resources' names.
For this same Ungrouped set, clicking the Reorder button In the List View displays the Reorder arrows icon on the left of the resources' rows.
Note
The Reorder Resources feature enables you to save the changed order of resources. The reordered resources will then display by default any time any user opens the main Resources page.
In both views, you can reorder resources in the following ways:
Click a resource's row and drag it up or down (List View) or left to right (Card View), then click the Save button.
Click the Reorder arrows icon on the left of a resource and move the resource up or down, then click the Save button.
Use the reorder keyboard controls as described below.
After clicking the Reorder button, a blue information i icon  displays at the top of the set. Clicking this icon displays the Reorder keyboard controls pop-up window with steps. When finished, click the Done button or Close x icon to close the window.
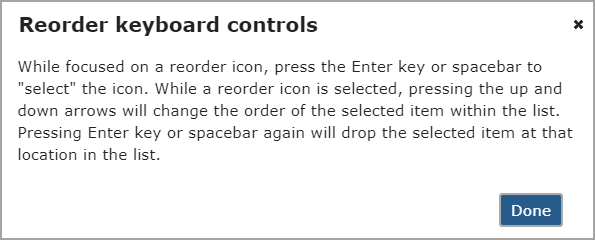 |
The steps to use the keyboard controls to reorder resources are:
Click or tab to the Reorder arrows icon on the left of a specific resource you want to reorder.
Press the Enter key or spacebar on your keyboard to "select" the resource. The resource's row or card appears in a gray shade to indicate it's selected.
Press the arrow keys on your keyboard to move the item to your desired location. On the List View, movement is vertical (up or down), and on the Card View, movement is horizontal (side to side).
Press the Enter key or spacebar again to "drop" the item. The resource's row or card displays in its normal color to indicate it's dropped.
Click the Save button.
After saving using any reorder method, the Resources screen shows the reordered resources. A green message is displayed at the top of the Resources screen stating, "The new order has been saved."
Note
The Edit and Delete buttons or icons don't display when you are reordering resources because those actions cannot be taken during the reordering process.
Unlike the Card View, the List View has a feature to sort the resources in a set by clicking a column's heading (except for the Edit and Delete columns). Clicking the column's heading or the Sort icon  on the right of the column's heading, such as the Name column, sorts the resources in that set according to the heading in ascending order alphabetically. The Sort icon
  changes accordingly. The link and file resources are displayed in ascending order as shown in the following screen:
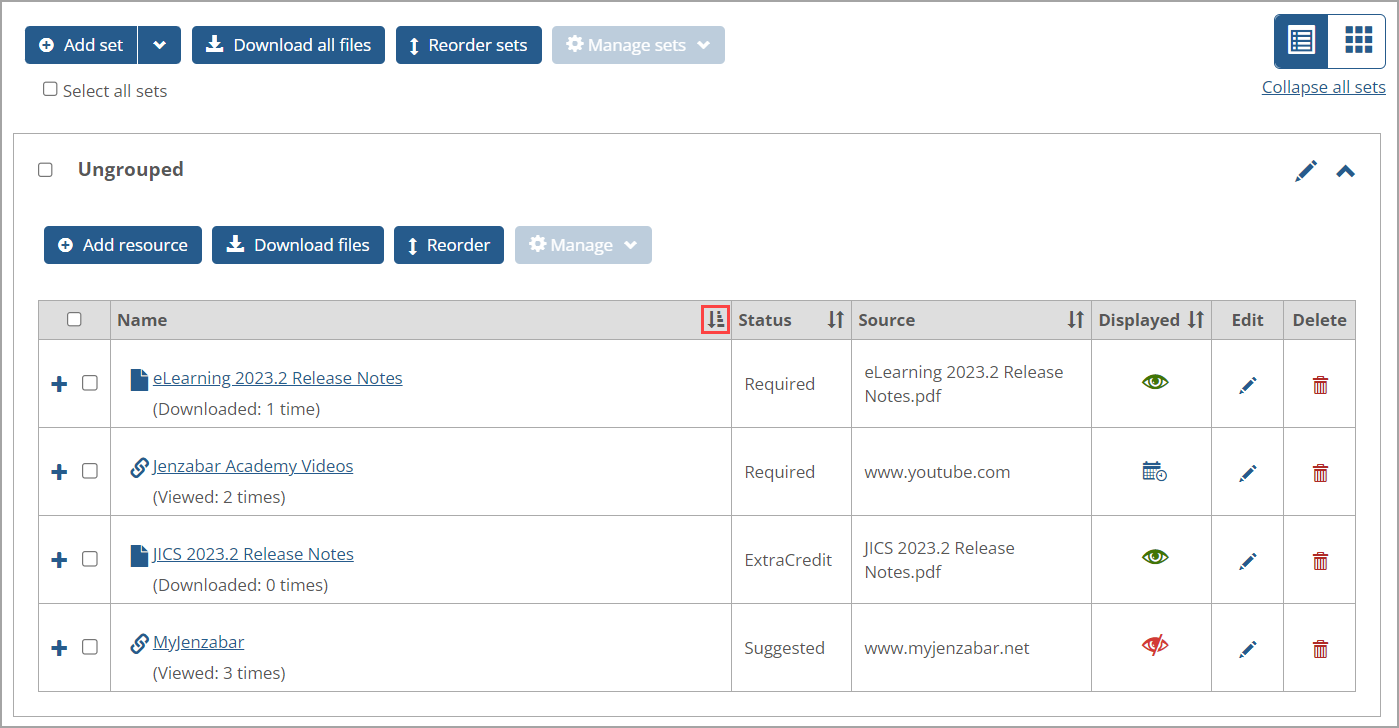
Clicking the Name column heading or its Sort icon again changes the sort to display resources in descending order alphabetically, and the Sort icon  changes to indicate this.
Since the Displayed column shows icons and not text, clicking the Displayed column heading or Sort icon shows the Displayed icons in ascending order according to:
"Display later" or "Inactive" (red slash eye icon
)"Currently displayed" (green open eye icon
)Scheduled start date, i.e., the display on date and time (blue calendar and clock icon
)
Clicking the Displayed column heading or Sort icon again shows the Displayed icons in descending order, so the order of the icons in the bulleted list above are reversed.
Initially, prior to sorting, the resources are shown in the order in which they were added OR reordered. For example, if the resources were not reordered, then a resource added today would appear on the list after a resource added yesterday. But if a user reordered the resources, then the resources are shown according to the reorder by default. For more information, refer to Reorder Resources.
Note
A sort order cannot be saved. If you sort resources, then go off the page and come back to it, the sort order does not remain, and the resources will display in the order they were added. If you want your changed order of resources to persist over time, then you need to use the Reorder Resources feature.