Working with Student Roles
This section explains how to display a list of all enrolled students and all non-roster students, including those that have been withdrawn and add or remove non-roster students.
About Non-Roster Students
There may be times when you want to allow a student who is not enrolled in a class to have full access to the course context. You do this by making the user a non-roster student. A non-roster student will have all of the following:
A link to the course context under the My Courses label (in the Quick Links section of the sidebar).
Full student access to the Coursework and Gradebook features, including the ability to take tests and have a grade sheet.
Permissions to view all other resources within the course context—all other pages, features, and materials.
For an ERP course, these users are treated as enrolled students in all ways except that their grades for the course are never sent to the ERP system. Also, on the Context Manager > Permissions tab, they are labeled as non-roster students.
For a portal-only course, there is nothing to distinguish non-roster students from enrolled students, except that on the Context Manager > Permissions tab, they are labeled as non-roster students.
You can add any user (but not a guest) as a non-roster student. In other words, the person has to have a valid JICS account but does not have to be a member of the global Students role or any other role. From a technical standpoint, what happens when you designate the user as non-roster student is that he or she is added to the context-specific Students role for the course context.
Non-roster students are managed through the Context Manager’s Permissions tab.
Note
If you want to give someone access to the course context, but not give them the ability to take tests, consider adding the user to a custom role that is configured with the appropriate access.
How To
If desired, you can view a list of all students and faculty for a course section, including:
All enrolled students (roster students).
All non-roster students.
All students who have withdrawn from the class, whether they were enrolled or non-roster students.
Regular and guest faculty
To view a list of all students and faculty:
Log in to the portal and navigate to the appropriate course context.
Click Course Manager.
The system displays the Context Manager screen, with the Properties tab selected.
Select Permissions.
The system displays the Permissions tab.
Click Manage non-roster students and faculty.
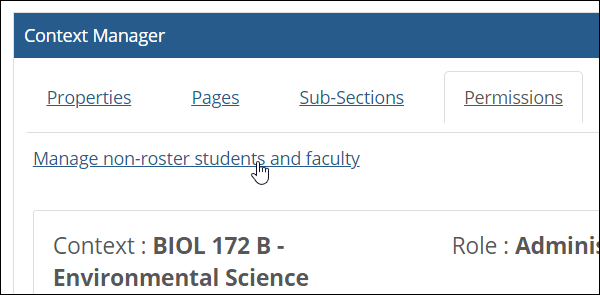
The system displays a screen that lists all roster students, as well as any withdrawn students and any non-roster students that have been added.
Use this procedure to make a user a non-roster student. From a technical standpoint, what this process does is add the user to the context-specific Students role for the course. For details on how this process will affect the user’s experience, see About Non-Roster Students.
Note
If you have users with any sort of grading and content-management permissions in the Coursework or Gradebook features, these users should never be added as non-roster students, because doing so will remove any extra permissions that you want them to have in those features.
Navigate to the Permissions screen that shows all students in the course, as described in View a List of All Students and Faculty.
Click Add a non-roster student.
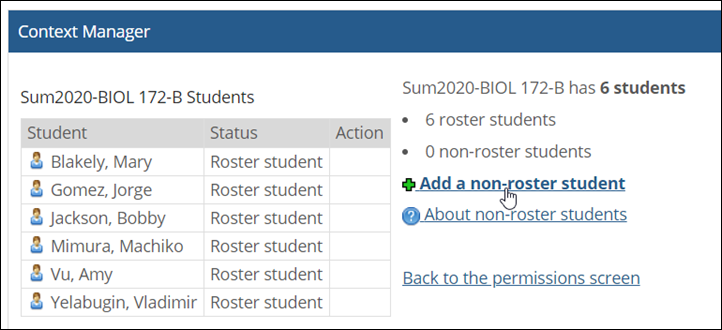
The system displays a pop-up labeled Add a non-roster student. This pop-up lets you do either of the following:
Select a role and all of its members.
Click Add Individual Users to display a second pop-up that lets you select specific people.
Use the pop-up(s) to select either a role or an individual user (or users). If you need help with this, see Select Users with the People Chooser.
In the Add a non-roster student pop-up, click Save.
The system adds the non-roster student to the course. The student’s name is now displayed on the Context Manager > Permissions screen, with the status Non-roster, and the user should now be able to access the course context.
Use this procedure to remove a non-roster student from a course, which ends their ability to access the course context.
Navigate to the Permissions screen that shows all students in the course, as described in View a List of All Students and Faculty.
In the list of students, locate the one you want to remove from the course.
Click the corresponding Remove link.
The system removes the student from the course—but note that the student’s name with a status of Non-roster, Withdrawn. The student will no longer see the link to this course under My Courses, and will not be able to display the course’s content.
In the faculty view of the Coursework and Gradebook features, the student’s work and scores are still saved, but they are moved to a section labeled Withdrawn students.
If you need to reactivate this user’s student status, you can do so. For details, see Reactivate a Withdrawn Non-Roster Student.
If you have removed a non-roster student from a course and you want to add the user back, you can do so. When you do this, the student’s Coursework (if any) will be restored for him or her to view. The student’s overall grade sheet will also display as it last did for the student before being removed.
Navigate to the Permissions screen that shows all students in the course, as described in View a List of All Students and Faculty.
In the list of students, locate the one you want to reactivate.
Click the corresponding Reactivate link.
The system adds the student back to the course the course. If the student previously had received grades for any assignments, then within the Faculty view of the Coursework and Gradebook features, the system moves the student’s records from the withdrawn students’ section back to the list of active students.