Email Provider Setup
Communication Management lets you work with emails within J1 Web. Emails can be sent on-demand and included with other interactions in an automation plan that gets sent at a scheduled time. To utilize these features, an email provider is needed to send, receive, and store emails. You can use Jenzabar’s Client Application Services or Twilio SendGrid, Jenzabar’s integrated solution.
Client Application Services is a Windows service that runs scheduled J1 processes and relays emails to recipients. It can be used with the Base and Licensed versions of Communication Management; although, Jenzabar recommends using Twilio SendGrid with the Licensed version.
Client Application Services only supports outbound communications. When a user replies to an email in J1 Web, the response goes to the email of the address of the person the email is from and not back into J1 Web.
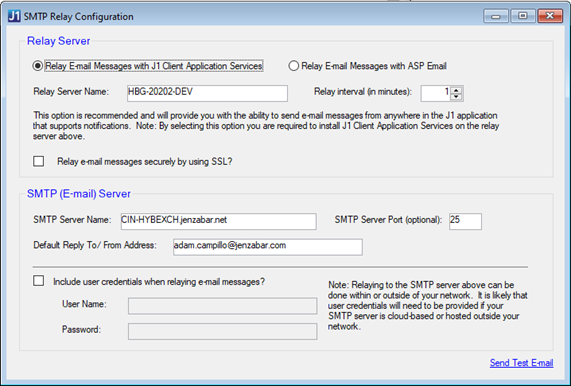
If your school is already using J1 Web, it is likely you have Client Application Services installed. If your school is just starting to use J1 Web, work with your IT staff to ensure it is installed and SMPT Relay Configurations set up to send emails.
Client Application Services and Twilio SendGrid Comparison
Feature | Client Application Services | Twilio SendGrid |
|---|---|---|
Basic Email | ✓ | ✓ |
Real-time bidirectional emails | ✓ | |
Plain text email formatting | ✓ | ✓ |
HTML template email formatting | ✓ | ✓ |
Analytica (e.g., how many emails were opened, forwarded, bounced back, etc.) | ✓ |
Note
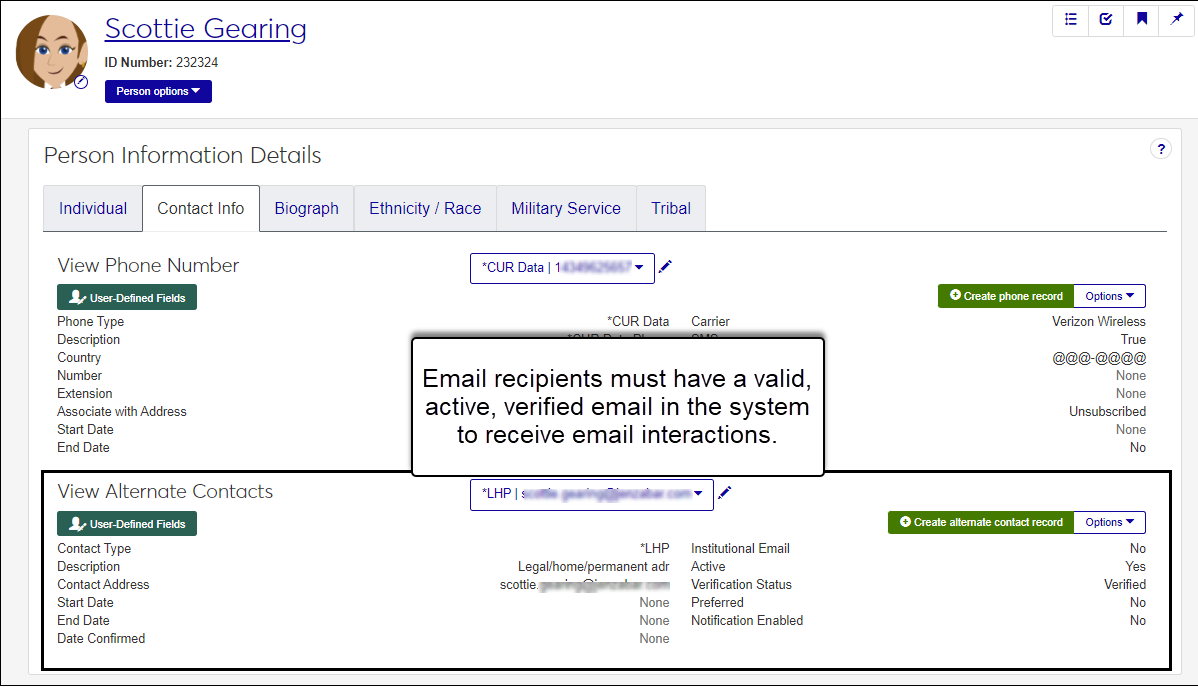
Recipients must have a valid, active, verified email address in the system. They are not limited to using their institutional email address; personal email addresses are also acceptable.
Recipient Email Addresses
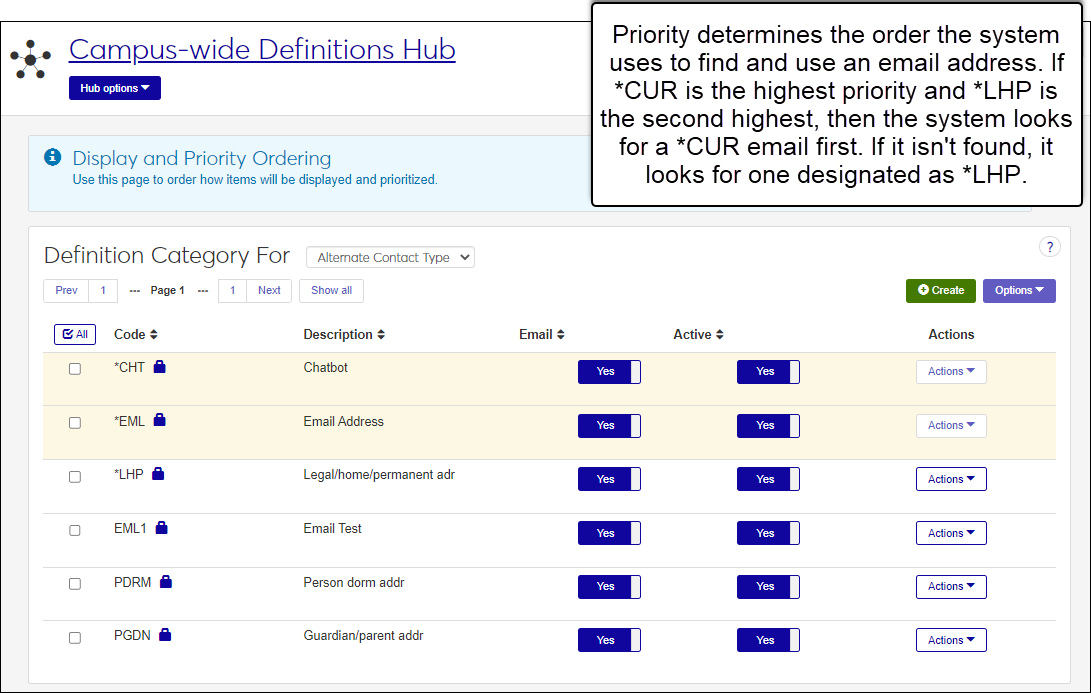
For recipients to receive email interactions, they must have a verified, valid email address in the system. J1 Web looks for email addresses on the Person Information Details page in the order that they are prioritized on the Data Definitions page.
Notice
If you have identified *CUR as the highest priority and *LHP as the second highest priority, then the system will look for a *CUR email address first. If no *CUR email address is found, it will look for one identified as *LHP.
When a recipient clicks an unsubscribe link in an email interaction, their Verified Status is automatically changed to Unsubscribed and they no longer receive email interactions at that email address. For more information about opting in and out of interactions, see Recipient Opt In and Out.
Warning
Your school may already be using Client Application Services for relaying emails with the Desktop application. Contact your System Administrator or Customer Success Representative for more information.
Base Communication Management uses Client Application Services (CAS) SMTP relay to send outbound emails. Schools already using J1 Web or Desktop are likely using Client Application Services for other features.
Client Application Services supports outbound communications only. Email replies are sent to the sender's email address and are not routed back into J1 Web.
Client Application Services doesn't provide analytic data. Dynamic WYSIWYG email formatting is available, but only to schools licensed for Communication Management Plus.
Access the Desktop application.
Access the SMTP Relay Configuration window.
Select the Relay E-mail Messages with J1 Client Application Services option.
From the Relay Server Name, select the server you want to use.
Note
J1 Client Application Services must be installed on the relay server machine you select in this step.
Click Save.
Create and Configure a SendGrid Account
Communication Management Plus integrates with Twilio SendGrid to provide enhanced emailing capabilities. Twilio SendGrid is a communication platform that facilitates real-time, bi-directional emails.
Allows your school to send, receive, and save email messages, which are then associated with the appropriate records in the system.
Provides informative analytics.
Includes robust content editing features.
When you set up Twilio SendGrid for the first time or change your email provider to Twilio SendGrid in System Settings, the system creates email assignments in Communications Management for all active J1 Web users. These email addresses append the inbound subdomain configured to send and receive emails to the username your users enter to log in to J1 Web (i.e., the value in the USER_ID field of the APP_USER table).
For example, if a J1 Web username is ted.lasso and your inbound subdomain is inbound.school.edu, the J1 Web email address will be ted.lasso@inbound.school.edu. Email assignments can be reviewed in J1 Web on the System Administration, Communication Settings page, Email Assignments tab.
Note
These steps reflect Twilio's interface and workflow as of July 2026. Twilio is a third-party service and its pages, menus, and processes may change without notice. If a step no longer matches what you see in Twilio, refer to Twilio's current documentation or contact Twilio support.
If you plan to set up a test/play environment to work with Communications Plus, Jenzabar recommends creating two entirely different environments with unique DNS entries for each.
Access https://www.twilio.com/en-us/sendgrid and click Start for free.
Create an account.
From the account dashboard, click your name in the top, left corner and choose Account Details.
Click the Your Products tab.
Choose an email API plan.
Jenzabar recommends the Pro 100K subscription at a minimum. This plan provides a dedicated IP address for your account and ensures your email success is not impacted by other users in the Twilio SendGrid ecosystem.
Eventually, Twilio SendGrid will direct all inbound emails destined to your subdomain to the J1 Web server. To avoid disruption to your normal .edu services, Jenzabar recommends creating a new subdomain that will be used exclusively for communication to and from J1 Web. mail.jenzabaruniversity.edu would be used for emails@mail.jenzabaruniversity.edu.
If your school utilizes separate live/production and test/play environments, use the primary J1 Web subdomain for your live environment and create a subuser account for your test environment. This lets you have distinct environments that share billing resources.
Cannot be your regular email domain or an email domain used anywhere else
Cannot be the same as any of your web URLs
Jenzabar recommends creating the following:
j1mail.schoolname.edu for your live/production environment
J1mailtest.schoolname.edu for your test/play environment
Your school may want to use the primary J1 Web subdomain for your live environment and a subuser account for your test environment. This lets you maintain distinct environments that share billing resources.
Log in to your Twilio SendGrid account. The Welcome page appears.
Click Authenticate domain. The Authenticate Your Domain page appears.
From the Which Domain Name Server host do you use? drop-down, select your domain name server (DNS) host. If you are using one that is not listed or your own DNS, select Other Host.
Note
If you select a cloud DNS host provider, most of the configurations are completed for you.
From the Would you also like to brand the links for this domain options, select:
Yes to ensure links look like they came from within your school (Jenzabar recommended).
No to make links in emails look like they came from somewhere outside of the school. For example, they'll include sendgrid.com in them. When a recipient clicks a link, they'll be routed through Twilio SendGrid before reaching the link you provide.
Click Next.
Enter your sending domain. To avoid disruption to your normal day-to-day .edu email services, Jenzabar recommends creating two new subdomains that will be used exclusively for communication to and from J1 Web. One for your production environment like J1mail.school.edu or J1.school.edu and one for your test environment like j1test.school.edu.
Click Advanced Settings. Advanced Settings options appear.
Select Use automated security checkbox and click Next. The Install DNS Records page appears.
Note
This setting ensures DKIM keys are automatically rotated and communications remain secure.
Keep Twilio SendGrid open and access the application, tool, or service your school uses to manage your public DNS configurations.
Enter the CNAME entries provided by Twilio SendGrid in your DNS provider in order to authenticate your domain.
Add the following MX record for your domain to support inbound emails:
Note
The MX record reroutes inbound communications to Twilio SendGrid.net for authentication.
MX 10 yourinboundsubdomain mx.sendgrid.netSave your changes.
Access the MX Lookup tool (https://dnschecker.org/mx-lookup.php).
Verify your subdomain MX record is correctly pointing to mx.sendgrid.net.
Return to Twilio SendGrid.
Select the I've added these records checkbox and click Verify. An email is sent to your designated testing recipient. The email includes a link that verifies your domain.
Note
Do not click the link more than once because the values will change.
Be sure you enter the authentication information exactly as it appears in the email. Periods and spaces in the wrong place can invalidate your credentials.
If Twilio SendGrid does not return a successful verification, adjust your DNS until it properly verifies. If you need assistance with Sender Verification, log a ticket with Twilio SendGrid Customer Support (https://support.sendgrid.com/hc/en-us).
From the left-hand menu, click Settings and then API Keys . The API Keys page appears.
Click Create API Key. The Create API key page appears.
In the API Key Name field, enter J1 Web Production and select the appropriate API Key Permissions.
From the Key type drop-down, select Main. This allows J1 Web to manage your account via the API, which enables endpoints configuration and statistic collection.
Click Create. The API Key Created page appears and shows your API key.
Warning
API keys are only shown once so copy and paste them somewhere like Notepad where you can access them for entering into J1 Web. If the API Key is lost and the configuration needs to be re-entered into J1, you will have to create new API keys.
Select the Got it! I have saved my API key SID and secret in a safe place to use in my application checkbox and click Done.
Click Done.
Repeat Steps 18 -23 to create the following additional keys:
J1 Production Email Address (validation access)
J1 Web Test (main access)
J1 Web Test Email Address (validation access)
If you are using a subuser account for your test environment, create the API keys from that account.