Mass Add/Remove/Delete Holds
Important
Information and features vary according to the roles to which you belong and the permissions associated with those roles. For more information, contact your module manager or your campus support team.
Note
From the J1 Web navigation menu, select Core, then Processes, then Definitions, and then Mass Add/Remove/Delete Holds or use the Find a Page search.
The Mass Add/Remove/Delete Holds page lets you manage holds for a selected group of people. You can select one or more individuals or use a predefined data set.
Holds indicate an issue exists with a record in the system. They are typically associated with students for matters related to unresolved balances, unpaid fines, discipline, and academic standing.
Your school sets up hold categories and types to determine what impact a hold has on records. For example, a student could be prohibited from registering for courses, enrolling in campus housing, receiving financial aid, graduating, etc.
Contingent on how hold codes are configured, other system users may see a message notifying them about the hold or prohibiting them from taking certain actions. Also, depending on how the code is defined in the definition table, the message is either a warning or a hold. Holds also impact the display of information in the Campus Portal for students and advisors. For example, if a hold is defined as a Registration Hold, the student will see the hold and will be prevented from registering. If a hold is defined as a Registration Warning, a student will see the hold as a warning, but will be able to register for courses. For more information about warnings, holds, and creating related messages to persons involved with them, take a look at the Hold Codes topic.
While the hold process is flexible and applicable across campus functions, overuse may result in adverse or overwhelming impacts for students, parents, and other stakeholders, including faculty, advisors, and administrative units responsible for managing, communicating, and resolving holds. For this reason, institutional areas should give thought to designing and applying holds, weighing both operational needs and the potential effects on the student experience as well as database performance.
Tip
Here are a few examples of how Mass Add/Remove/Delete Holds might be used.
The Academic Dean may want to add a hold to all students who have a GPA lower than 2.0 after grades have been entered for the spring term. This hold would prevent the students from registering for any future term until the student meets with the Registrar to resolve the hold.
Students might be required to attend one convocation in a semester, so a hold would be placed on all part-time and full-time students until proof of attendance is provided. In this scenario, after the convocation, you will need to remove or delete the hold from the students who attended the event. Then, after the last convocation of the semester, you can create a report of the students who did not attend, and apply a declared fine for non-attendance.
The Business Office may want to add a hold when students have a past due payment. Using this process, you can add a particular hold to those students while preventing students with this hold from registering for, dropping, and/or withdrawing courses.
The library might want to place a hold on students who have an overdue item that needs to be returned. A query can be created to add this kind of hold to student records. Once the item is returned, then the hold can be removed or deleted from the student's record.
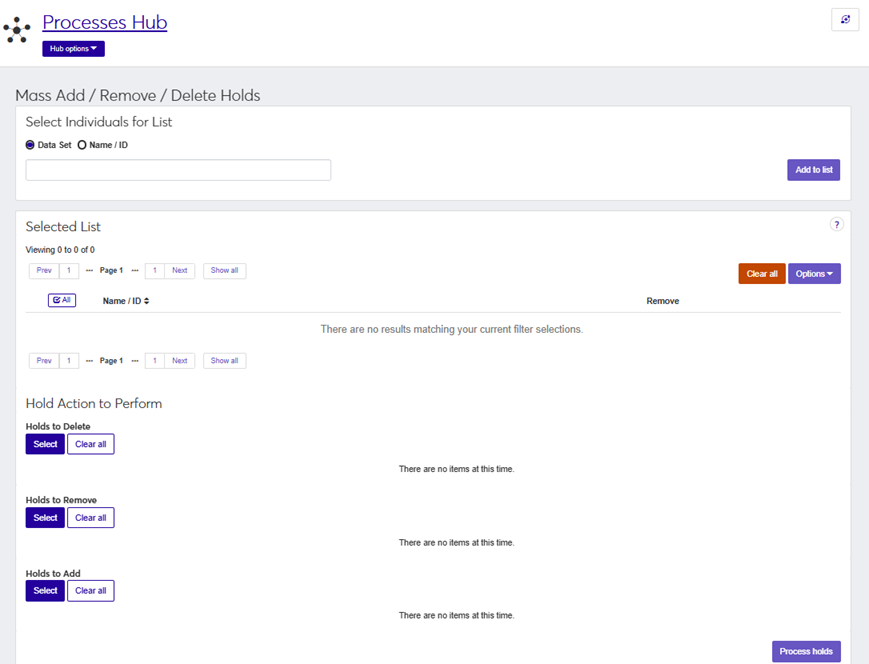
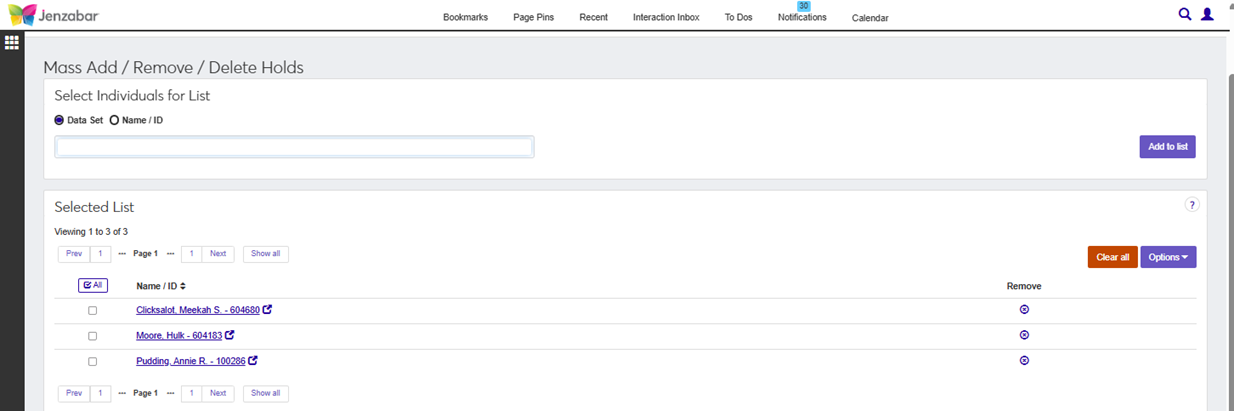
The Mass Add/Remove/Delete Holds page essentially has three sections:
Select Individuals for List - allows you to create your list from an existing data set or manually search for and select one or more individuals.
Selected List - displays the name of the person or people you have selected. In the list, records appear 15 to a page. You can use the Prev and Next buttons to navigate through the pages. You can also click Show all to see all records at once.
Hold Action to Perform - gives you the flexibility to add, remove, or delete one or more holds. Multiple actions may be performed simultaneously (for example, adding the LO (Library Overdue) hold while removing the LT (Late Tuition) hold).
To work with the Mass Add/Remove/Delete holds process, there are specific roles and permissions required.
To manage holds, you will need to belong to the Processes role or a customized version of this role created by your school with the "Can mass add/remove/delete holds" permission enabled.
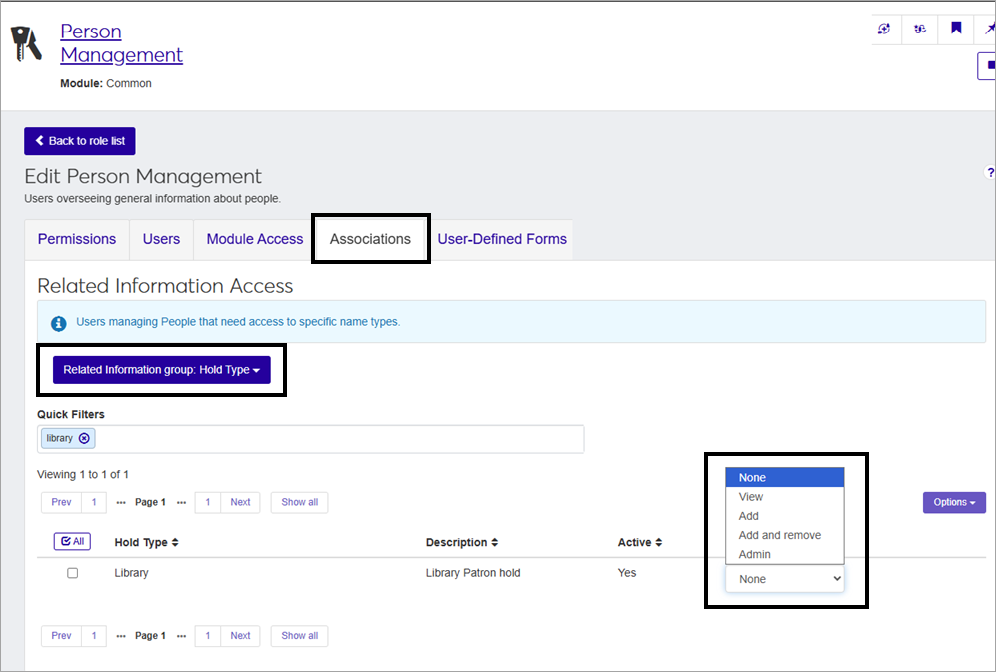
To access data sets that will determine who the hold will be applied to, you will need to belong to the Person Management role or a customized version of this role with Associations enabled for at least one hold type. If your school utilizes data sets to populate the list of individuals as part of the Mass Add/Remove/Delete process, ensure that you have Module Access enabled for the relevant modules linked to these data sets.
To access hold types, you must belong to a Person Management role or a customized version of it with the appropriate hold type associations enabled on the Associations tab then Related Information group: Hold Type. You can assign specific levels of access to Hold Types from the Associations tab in the Person Management role or a copied version of this role. The access options are None, View, Add, Add and Remove, and Admin. The permissions granted on the Permissions tab are only available for the hold types that have been enabled on the Associations tab.
Note
For more information about how Associations are used for hold access, see Working With Associations.
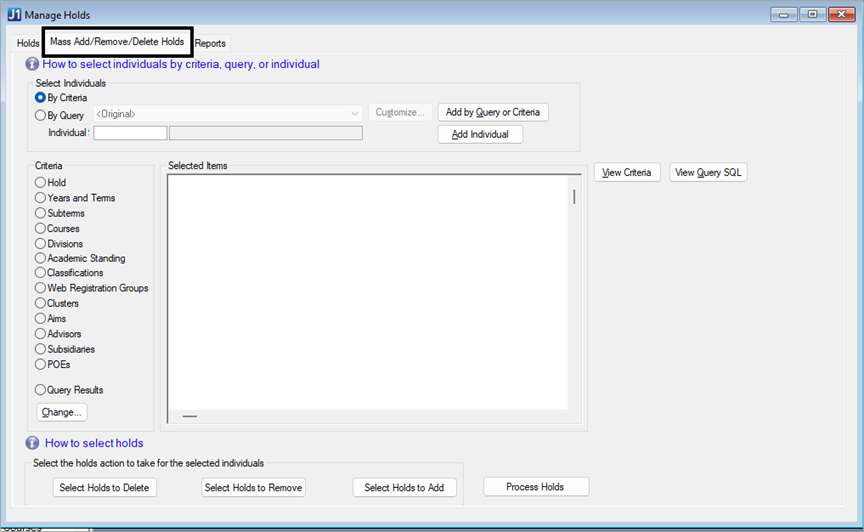
Holds can be managed in batches within J1 Desktop from within the Manage Holds window using the Mass Add/Remove/Delete Holds tab.
Use one of the paths below to find the Mass Add/Remove/Delete Holds functionality.
Register Students activity center, then Manage Holds, and then click the Mass Add/Remove/Delete Holds tab.
Work with NT Students activity center, then Manage Holds, and then click the Mass Add/Remove/Delete Holds tab. For this option, you must be licensed for Non-Traditional Student.
Work with Students activity center, then Manage Holds, and then click the Mass Add/Remove/Delete Holds tab.
Updates made using the Mass Add/Remove/Delete Hold process are saved to the HOLD_TRAN, APPLICATION_LOG, and APPLICATION_LOG_DETAIL tables.
How To
Before performing bulk hold actions, determine which individuals or groups will be affected.
Tip
Run this process in a test environment prior to implementing in a production environment to confirm that the correct hold information has been applied to individuals as expected.
From the J1 Web navigation menu, select Core, then Processes, then Definitions, and then Mass Add/Remove/Delete Holds or use the Find a Page search.
In the Select Individuals for List section, select the Data Set or Name/ID radio button to add the individual or group of people you want to add one or more holds to and add them to the Selected List.
If you choose Data Set:
Type at least two characters of the Data Set name you plan to use to initiate a search. The Add to List button is disabled until a data set is selected from the drop-down.

Select your choice from the drop-down list. This will enable the Add to list button.
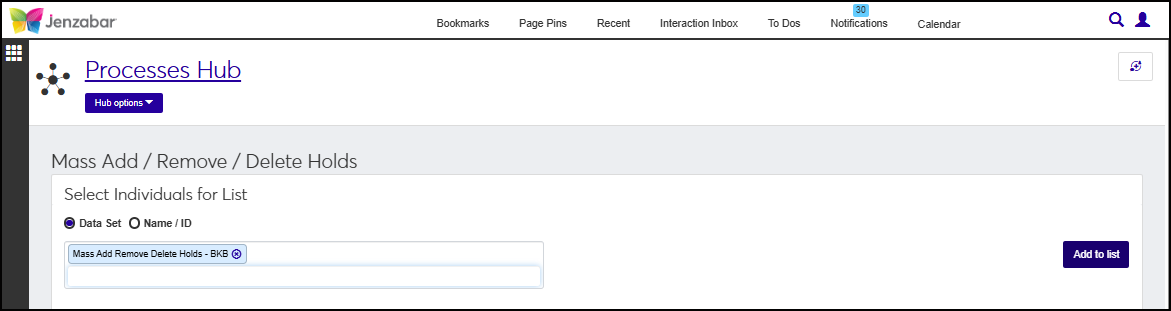
Repeat steps i-ii if you want to add additional data sets to your list.
Click Add to list. This will execute the InfoMaker or SQL query associated with the Data Set and add the people to the Selected List section of the window.
If you choose Name/ID:
Type at least two characters of the last name of the person you want to add or enter the person's ID number to initiate a search. The Add to List button is disabled until a name or ID is selected from the drop-down.
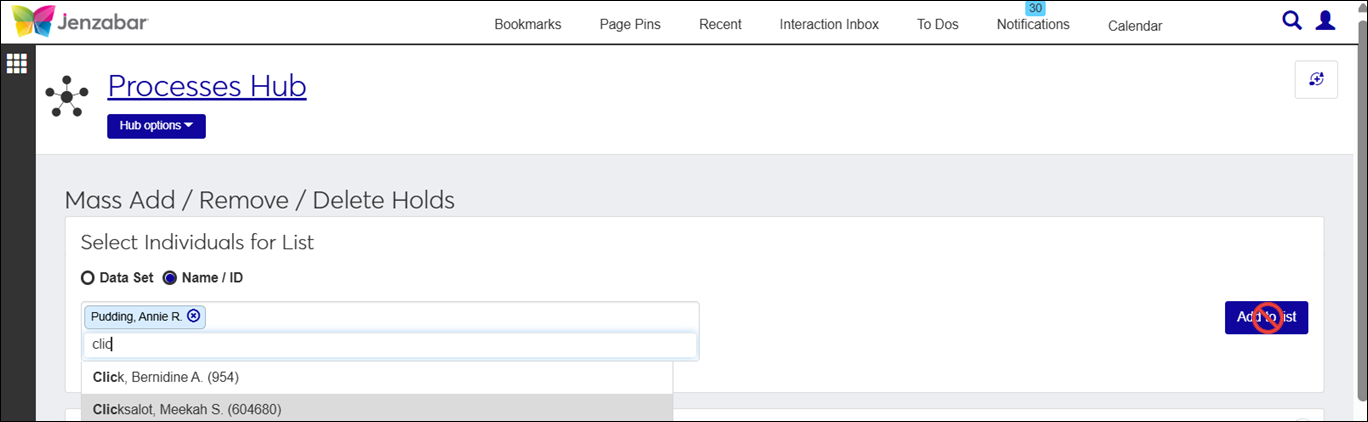
Select your choice from the drop-down list. This will enable the Add to list button.
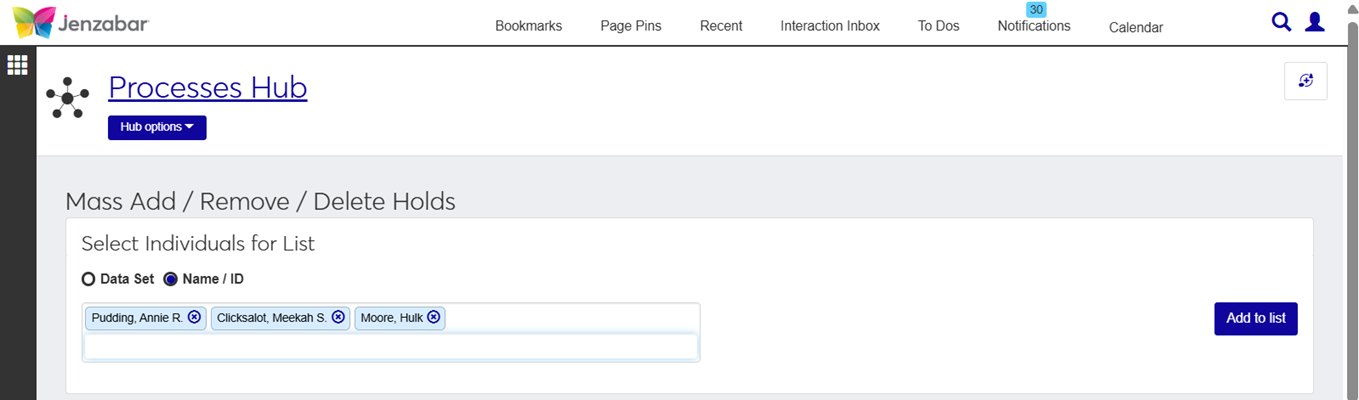
Repeat steps i-ii if you want to add additional people to your list.
Click Add to list. This will add the people to the Selected List.
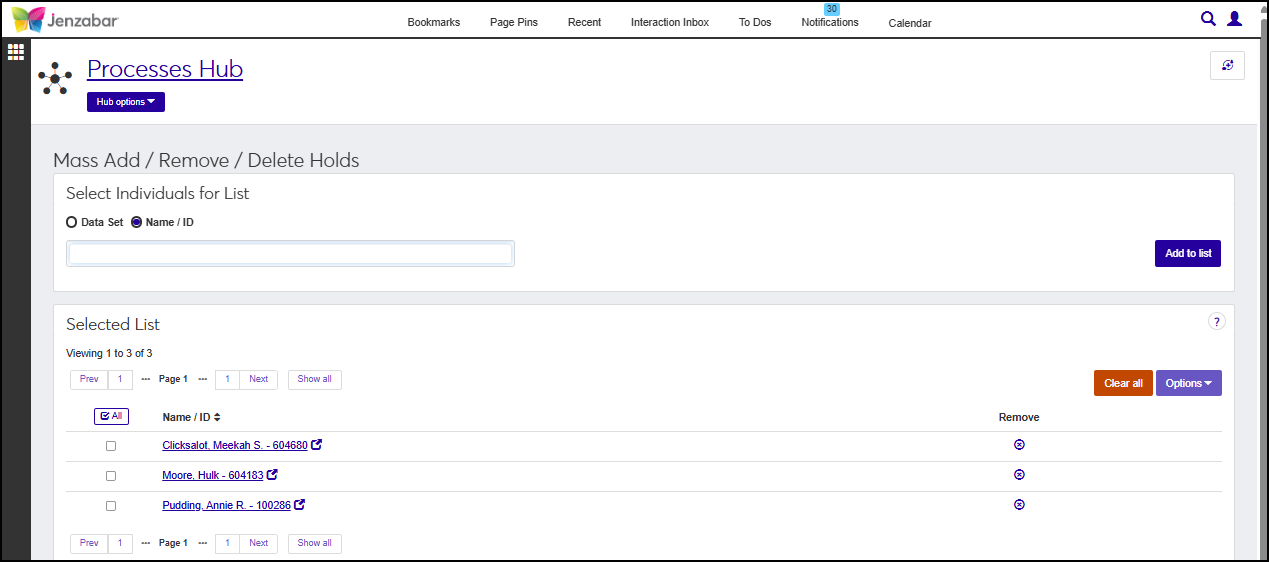
Once you add people to your Selected List by data set or Name/ID, you can move forward in working with the holds. The names will appear in alphabetical order, but you can sort by the ID number by clicking Name/ID. You'll notice that there are two buttons available in the Selected List section of the page:
Clear all - allows you to remove all the names from the Selected List without selecting the checkbox associated with a row.
Options - this menu is disabled by default. To enable this button, at least one row will need the checkbox next to a row selected.
Remove - allows you to remove only rows with the checkbox selected from the Selected List.
Download to Excel - allows you to download the name and ID information for individuals in your selected list.
From time to time you may find the need to remove one or more individuals from the Selected List. When this happens, there are three methods you can choose from:
Click the x icon
 in the Remove column for the person you want to remove.
Click Clear All to remove everyone from the selected list.
Select the checkbox next to the row you want to remove, then from the Options menu select Remove.
If you want, you can download a list of the people in your selected list to Excel for a record of the individuals to be affected by the mass add, remove, or delete hold process.
Tip
Run this process in a test environment prior to implementing in a production environment to confirm that the correct hold information has been applied to individuals as expected.
From the J1 Web navigation menu, select Core, then Processes, and then Mass Add/Remove/Delete Holds or use the Find a Page search.
Using the Select Individuals for List functionality at the top of the page, choose a data set or manually add individuals that you want to add holds to.
Evaluate the individuals in the Selected List and determine if you need to add more people or remove anyone.
Determine if you need to download the list of people to Excel.
Scroll down the page and find the Hold Action to Perform section.
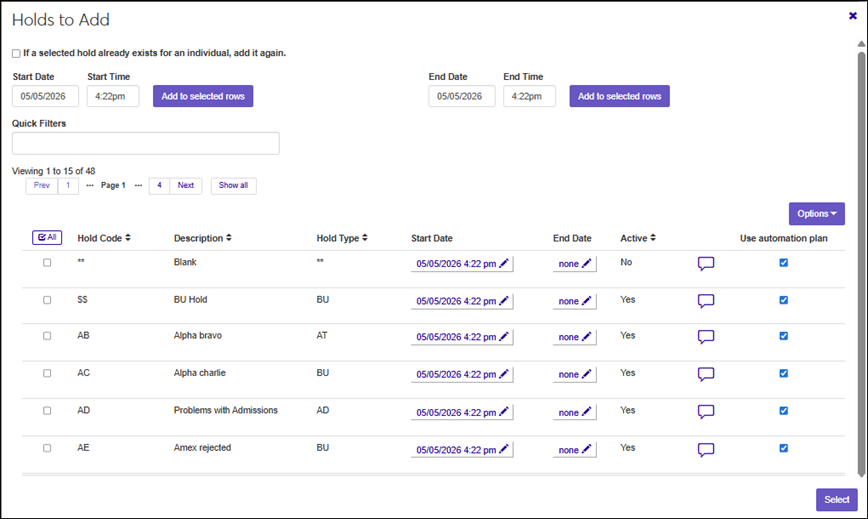
From the Holds to Add category, choose Select. The Holds to Add pop-up window opens.
Determine the course of action for an existing hold by configuring the If a selected hold already exists for an individual, add it again. checkbox. When the system detects that an individual on your list already has the hold you are attempting to add, two options are available:
 - Add another instance of the hold for that person by selecting the checkbox.
 - Skip adding the hold. This checkbox is unchecked by default; if you do not select it, the system will not add a new instance of an existing hold.
Select the checkboxes next to the rows of the holds you want to add. If your system has a large list of hold codes, you can use the Quick Filters to simplify the results.
Select Active to see only active hold definitions.
Select Inactive to see only inactive hold definitions.
Note
Inactive hold definitions should not be used when Mass Adding holds to individual records.
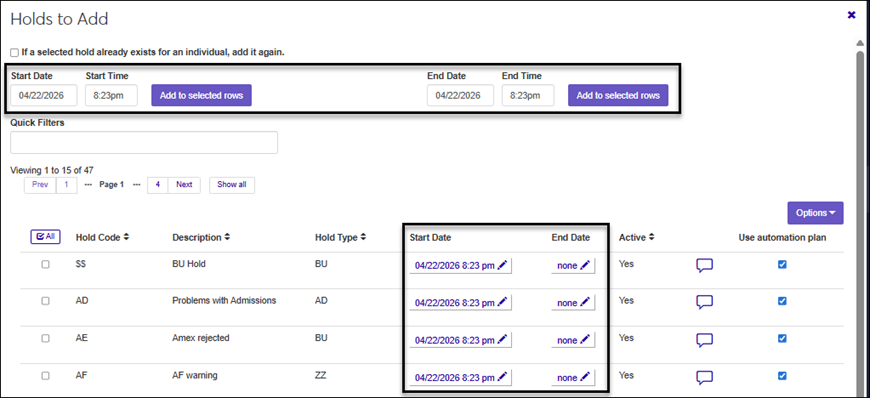
Enter Start/End Dates/Times. There are two options:
If each hold should have the same start/end dates/times, then enter the information in the upper portion of the Holds to Add window in the Start Date, Start Time, End Date, and End Time fields. The system defaults to today's date and time when the pop-up window was originally opened.
If you want the hold deactivated on a certain date and time, enter the date/time when the hold should end for the person. If you do not want to specify an end date, remove the date value from the End Date field. Once you enter the start date, start time, end date (optional), end time (optional), and select the checkboxes next to the rows of the holds you want to add, click Add to selected rows.
In the middle of the page you will see a tabular list of hold codes with related data columns. The system defaults to today's date and time when the window was originally opened. If you are working with multiple hold codes, you can opt to use the default start/end dates/times or change the values for each hold code by clicking the pencil icon
 .
.
Add a comment (optional) to provide additional context about the hold by clicking the comment icon
 . There is a 1000 character limit.
If the hold should work in conjunction with an automation plan, select Use automation plan. If the hold should not work in conjunction with an automation plan, do not select the checkbox. This configuration was introduced in j1 Web 2024.3.
Click Select. The Holds to Add window closes and you are returned to the Mass Add/Remove/Delete Holds page.
The Hold Code options you selected will appear under the Holds to Add category. If you want to remove a selected code, click the x icon
.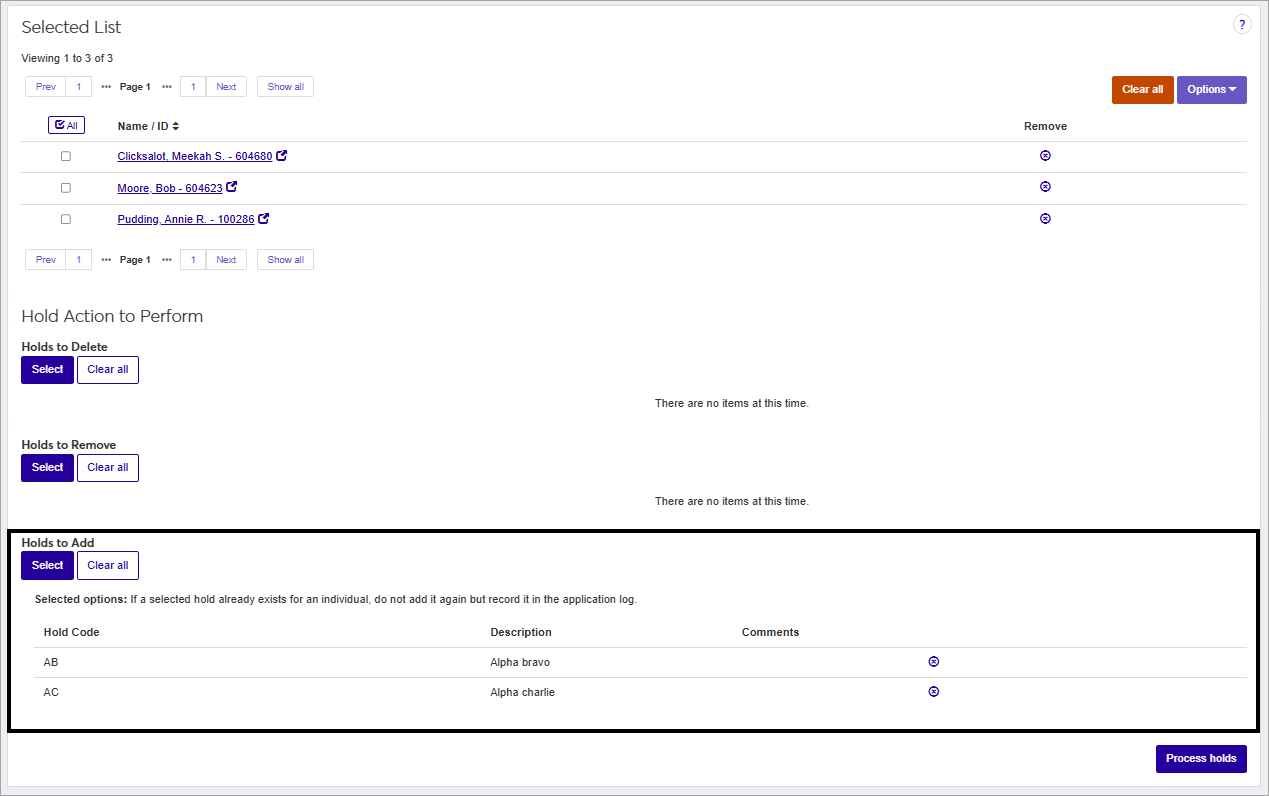
When you are ready to add the selected hold code(s) to the people in your selected list, click Process Holds.
Note
The Process Holds procedure will process the hold codes for every individual on the selected list, regardless of whether the corresponding checkbox is checked or unchecked. If someone on the selected list should not have the hold added, you will need to remove the person from the list.
When the Process Holds? pop-up window appears, evaluate the holds to add as well as the selected options for the hold. If you need to make a change, click Cancel. If the details are what you expect, click Process Holds. When the process completes without issue, a message will appear stating “Holds processed successfully”. Afterwards, you can spot check records to ensure the holds were added as you expected.
Tip
Run this process in a test environment prior to implementing in a production environment to confirm that the correct hold information has been applied to individuals as expected.
From the J1 Web navigation menu, select Core, then Processes, and then Mass Add/Remove/Delete Holds or use the Find a Page search.
Using the Select Individuals for List functionality at the top of the page, choose a data set or manually add individuals that you want to remove holds from.
Evaluate the individuals in the Selected List and determine if you need to add more people or remove anyone.
Determine if you need to download the list of people to Excel.
Scroll down the page and find the Hold Action to Perform section.
From the Holds to Remove category, choose Select. The Holds to Remove pop-up window opens.
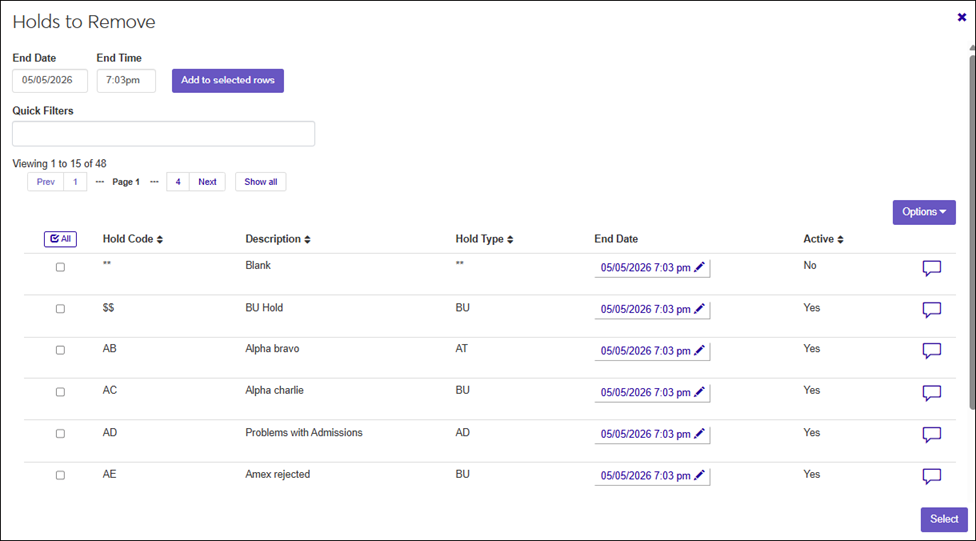
Select the checkboxes next to the rows of the holds you want to remove. If your system has a large list of hold codes, you can use the Quick Filters to simplify the results.
Select Active to see only active hold definitions.
Select Inactive to see only inactive hold definitions.
Note
Inactive hold definitions should not be used when Mass Removing holds to individual records.
Enter Start/End Dates/Times. There are two options:
If each hold that you have selected should have the same end date/time, then enter the information in the upper portion of the Holds to Remove window in the End Date, and End Time fields. The system defaults to today's date and time when the pop-up window was originally opened. Then, click Add to selected rows.
In the middle of the page you will see a tabular list of hold codes with related data columns. The system defaults to today's date and time when the window was originally opened. If you are working with multiple hold codes, you can opt to use the default end dates/times or change the values for each hold code by clicking the pencil icon
.
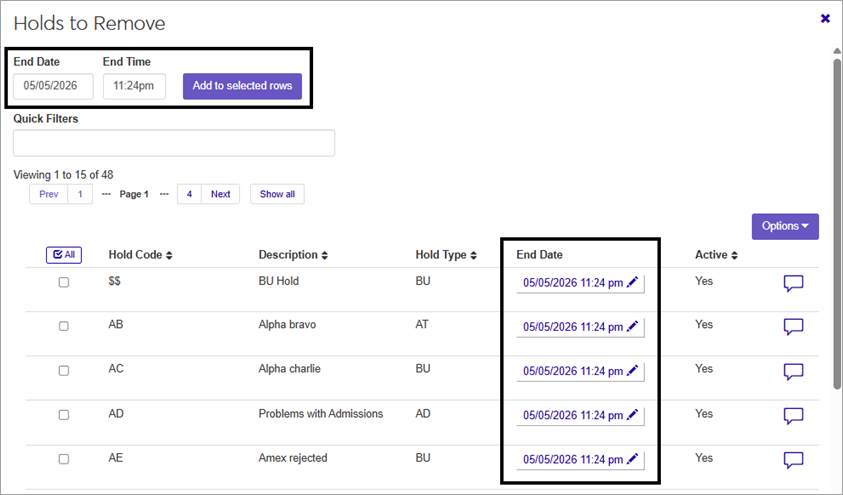
Add a comment (optional) to provide additional context about the hold by clicking the comment icon
. There is a 1000 character limit.If the hold should work in conjunction with an automation plan, select Use automation plan. If the hold should not work in conjunction with an automation plan, do not select the checkbox. This configuration was introduced in J1 Web 2026.1.
Click Select. The Holds to Add window closes and you are returned to the Mass Add/Remove/Delete Holds page.
The Hold Code options you selected will appear under the Holds to Remove category. If you want to remove a selected code, click the x icon
.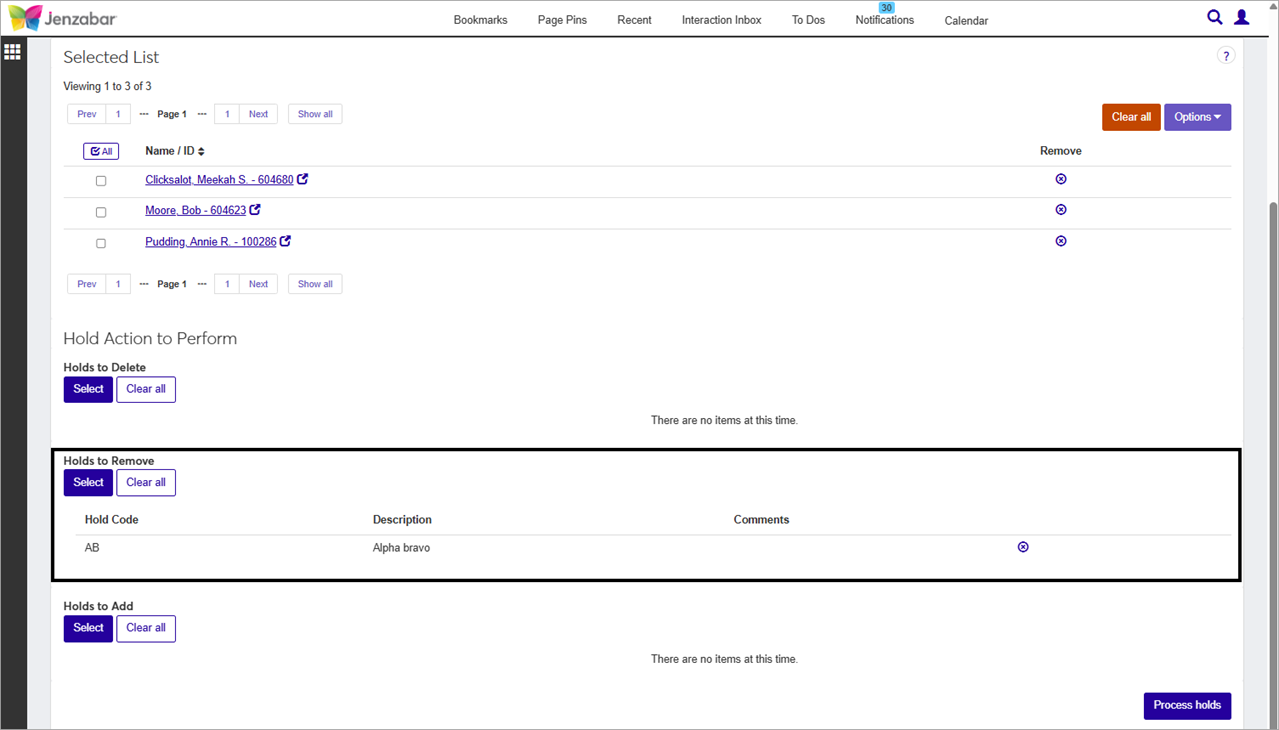
When you are ready to add the selected hold code(s) to the people in your selected list, click Process Holds.
Note
The Process Holds procedure will process the hold codes for every individual on the selected list, regardless of whether the corresponding checkbox is checked or unchecked. If someone on the selected list should not have the hold removed, you will need to remove the person from the list.
When the Process Holds? pop-up window appears, evaluate the holds to add as well as the selected options for the hold. If you need to make a change, click Cancel. If the details are what you expect, click Process Holds. When the process completes without issue, a message will appear stating “Holds processed successfully”. Afterwards, you can spot check records to ensure the holds were added as you expected.
Tip
Run this process in a test environment prior to implementing in a production environment to confirm that the correct hold information has been applied to individuals as expected.
From the J1 Web navigation menu, select Core, then Processes, then Definitions, and then Mass Add/Remove/Delete Holds or use the Find a Page search.
Using the Select Individuals for List functionality at the top of the page, choose a data set or manually add individuals that you want to delete holds from.
Evaluate the individuals in the Selected List and determine if you need to add more people or remove anyone.
Determine if you need to download the list of people to Excel.
Scroll down to find the Hold Action to Perform section the page.
From the Holds to Delete category, choose Select. The Holds to Delete window opens.
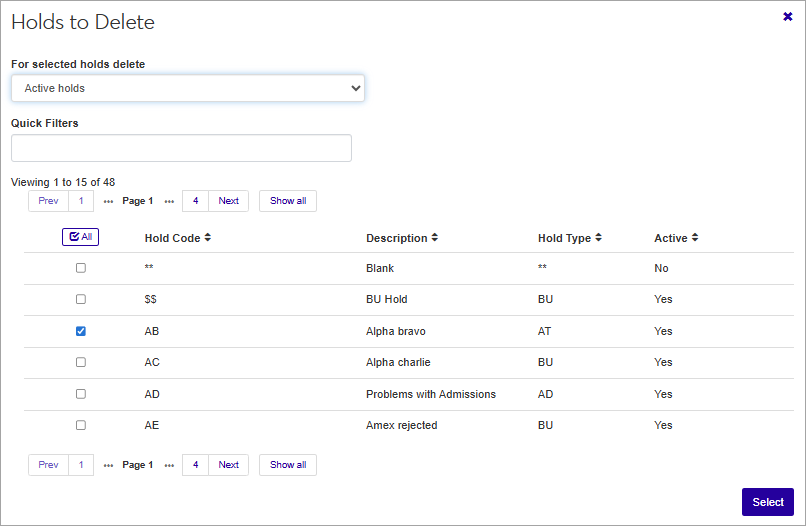
From the drop-down list choose what kind of holds to delete. The default option is Inactive holds.
Inactive holds - Holds that are in the past.
Active holds - Holds that are currently active or pending.
All holds - Holds that are in the past, currently active, and pending.
Select the checkbox for one or more hold codes that you want to remove from the people in your selection list. If your system has a large list of hold codes, you can use the Quick Filters to simply the results.
Select Active to see active hold definitions.
Select Inactive to see inactive hold definitions.
Note
Inactive holds should not be used when Mass Deleting holds from individual records.
If the hold should work in conjunction with an automation plan, select Use automation plan. If the hold should not work in conjunction with an automation plan, do not select the checkbox. This configuration was introduced in J1 Web 2026.1.
Click Select. The Holds to Remove window closes and you are returned to the Mass Add/Remove/Delete Holds page.
The Hold Code options you selected will appear under the Holds to Delete category. If you want to remove a selected code, click the x icon
.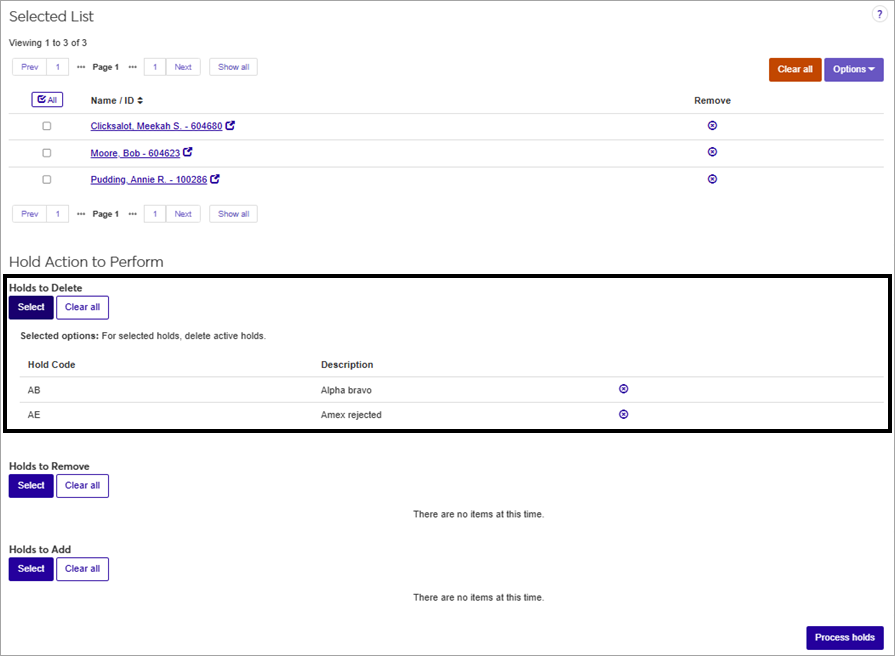
When you are ready to delete the selected hold code(s) from the people in your selected list, click Process Holds.
Note
The Process Holds procedure will process the hold codes for every individual on the selected list, regardless of whether the corresponding checkbox is checked or unchecked. If someone on the selected list should not have the hold deleted, you will need to remove the person from the list.
When the Process Holds? pop-up window appears, evaluate the holds to add as well as the selected options. If you need to make a change, click Cancel. If the details are what you expect, click Process Holds. When the process completes, a message will appear stating “Holds processed successfully”. Afterwards, you can spot check records to ensure the holds were removed as you expected.
If you want to provide additional context about a hold, a comment can be added. There is a 1000 character limit. Comments can be added in two different ways using the Mass Add/Remove/Delete Holds process for Adding or Removing holds:
On the Mass Add/Remove/Delete Holds page look find the Hold Action to Perform section of the page.
Choose Select on either the Holds to Add or Holds to Remove category. The Holds to Add or Holds to Remove pop-up window will open.
Select the checkboxes next to the rows of the hold codes you want to use for mass adding or mass removing.
Once you have selected the hold codes that you want to add or remove, select the Options menu or select the Comment icon
on each row associated with a hold that you have selected.If you choose the Options menu route:
Select Add Comments.
The Add Comments to Selected Holds pop-up window will open. Click New Comment.
Type the comment in the New Comment field.
If you have an attachment to add, click Attach, then navigate to find the file you want to add. Once you find the file, select it, and click Open.
Click Add.
If another comment is necessary for the hold(s), repeat steps ii-v. If you are finished with adding comments, close the comment pop-up window.
If you choose the Comment icon
route:For each of the holds that you have selected, perform the following steps. On one of the rows for a hold that you have selected to add or remove, click the Comment icon
.A new pop-up window will appear. The Hold code will display at the top of the window. Click New Comment.
A pop-up window with the hold name will launch. Click New Comment.
Type the comment in the New Comment field. There is a 1000 character limit.
If you have an attachment to add, click Attach, then navigate to find the file you want to add. Once you find the file, select it, and click Open. Repeat this step to add additional attachment files.
Click Add.
If another comment is necessary for the hold, repeat steps ii-vi. If you are finished with adding comments, close the pop-up window.
If you have another hold selected and need to add comments or attachments, repeat steps i-vii.
Tip
If you decide that you no longer want to add comments to a hold as part of the Mass Add or Mass Remove hold functionality, you can use the Options menu and select Remove all comments. Optionally, you can click on the comment icon
and remove each comment individually from the respective hold.
FAQ
Yes, individuals can be notified when a hold is applied or removed from their record, but you will need to ensure that an active system event interaction exists (J1 Web Interactions) such as "Add Hold" or "Remove Hold". Then, you will need to create an active automation plan (J1 Web Automation Plans) to incorporate the interaction for the system event Holds process. Once these steps have been put into action, add a hold to or remove a hold from a student's record, then an email should be sent.
Tip
Run this process in a test environment prior to implementing in a production environment to confirm that the correct hold and interaction information has been applied to individuals as expected.
Yes, individuals can have more than one hold on their record at the same time.
If your goal is to see an audit trail for a small number of people, then you can use the Manage Holds page for each person to see the complete audit trail of the hold information. If you want to create an audit trail report for a larger group of people, here is a sample query that will retrieve hold information for individuals for a specific date range. You can modify the query to fit your needs.
SELECT j1formattednames.id_num,
         j1formattednames.impersonal_short,
         hold_tran.hold_desc,
         hold_tran.hold_cde,
         hold_tran.display_text,
		 hold_tran.start_dte,
		 hold_tran.end_dte,
		 hold_tran.added_by,
		 hold_tran.removed_by
         FROM hold_tran,
         j1formattednames
   WHERE ( j1formattednames.id_num = hold_tran.id_num ) and
         END_DTE between '01/01/2026' and '05/15/2026'
		 order by ImpersonalLFM, END_DTE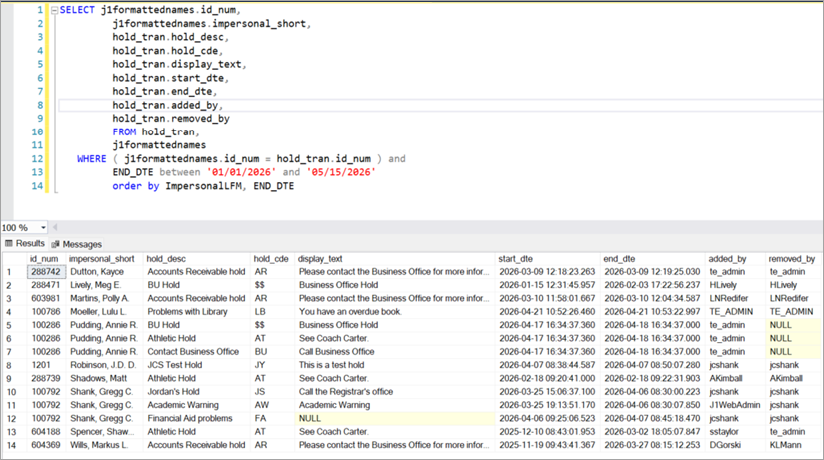
A comment associated with a hold is connected to various tables such as SECURITY_OWNER, ConversationComment, and Conversation. For reporting purposes you can use the Comment view to obtain comment information.
Here is a sample query that will retrieve comments associated with individuals having the hold code of LO or AD.
SELECT j1formattednames.id_num,
         j1formattednames.impersonal_short,
         hold_tran.hold_desc,
         hold_tran.hold_cde,
         hold_tran.display_text,
		 hold_tran.start_dte,
		 hold_tran.end_dte,
         comment.commenttext,
		 comment.changetime
    FROM comment,
         hold_tran,
         j1formattednames
   WHERE ( j1formattednames.id_num = hold_tran.id_num ) and
         ( hold_tran.goid = comment.commentparentgoid ) and
		 HOLD_CDE in ('LO', 'AD')
		 order by comment.ChangeTime desc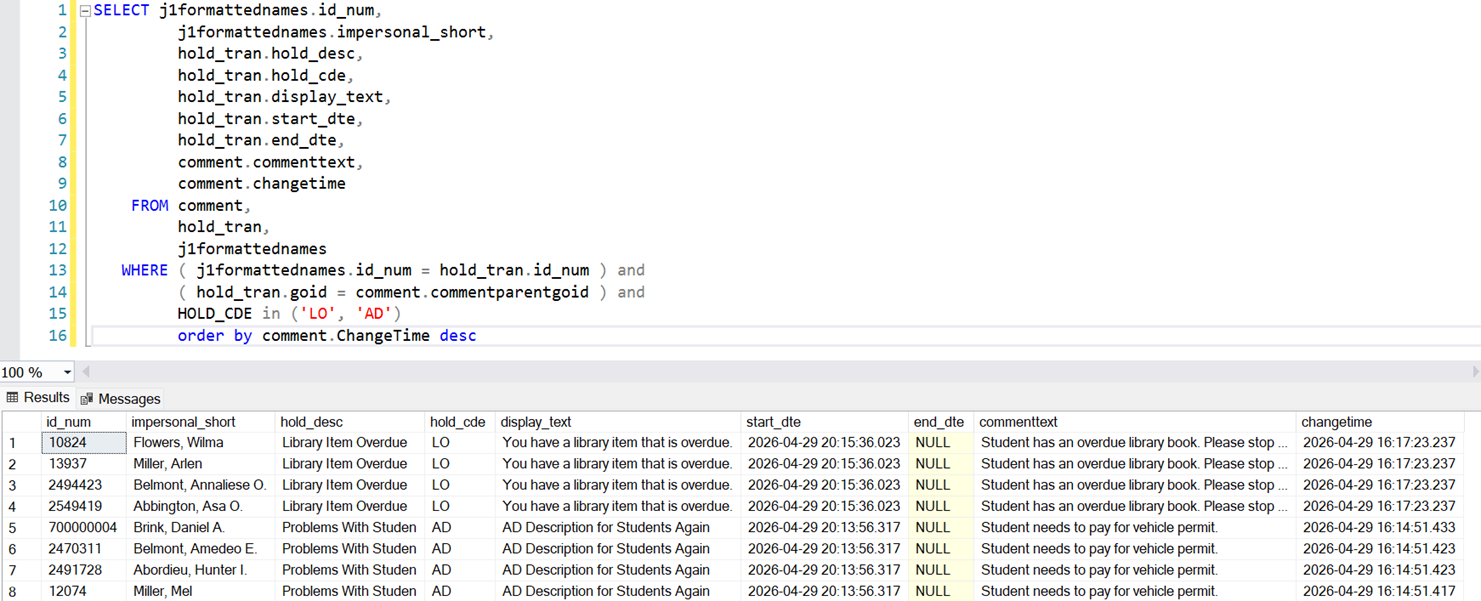
Absolutely! There are two ways to determine if a hold has expired on an individual.
Perform a Person Search
 to find and select the individual in the system.
When the page loads, you should see the individual's name at the top of page. If the person has a current hold, the software will provide an alert beside the name. If there is an alert for a current hold, You can click Holds to open a Holds window.
Select Person options, then Person, then Manage Holds.
With either option you can use the filter to look for Inactive holds which will show the expired holds. You will be able to confirm that a hold is expired by looking at the Start/End Date values.

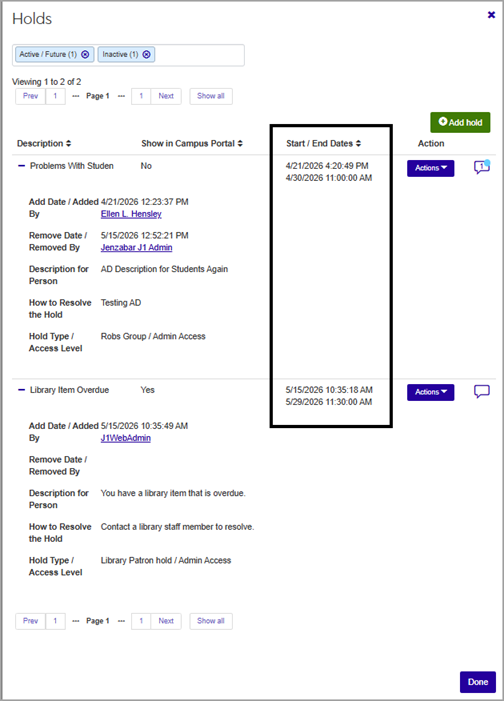
Figure 1. Example of step 1(a), showing the individual’s name and the hold alert displayed at the top of the page followed by the Holds pop-up window showing the details of the existing hold information.
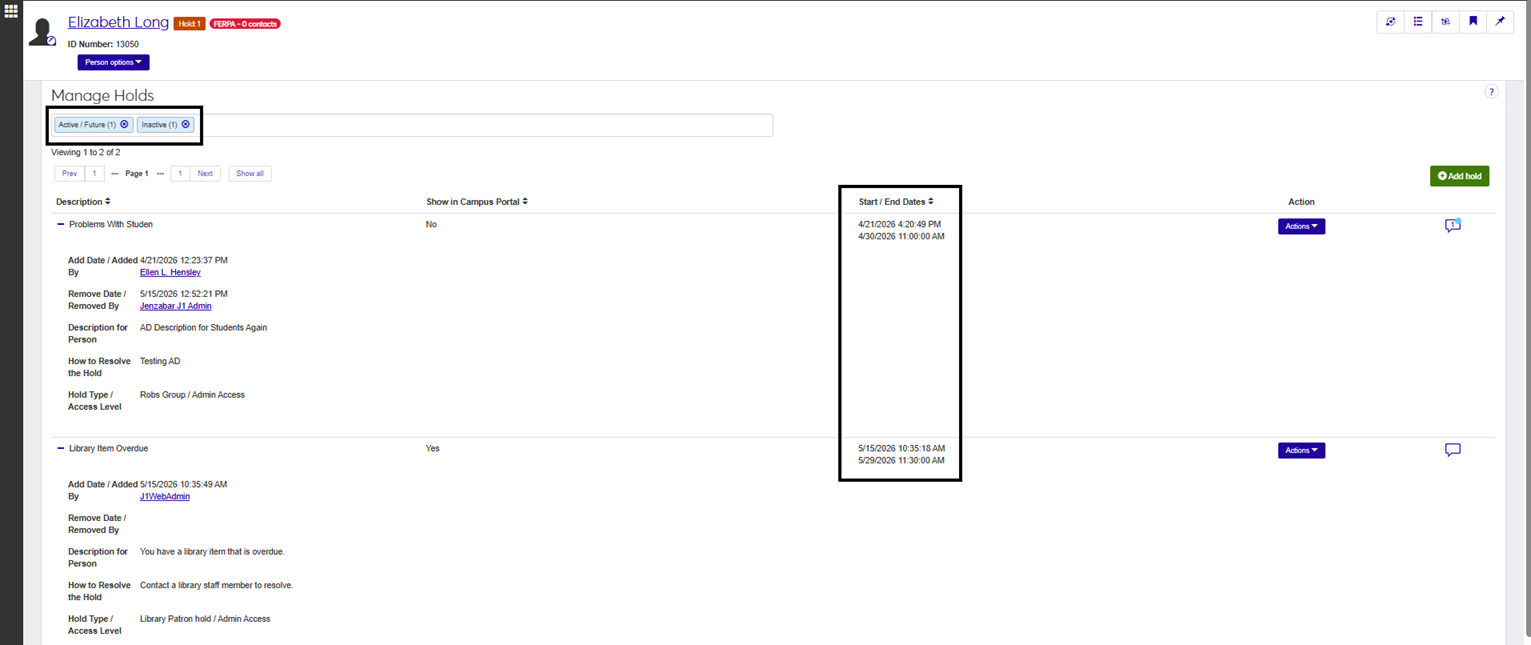
Figure 2. Example of step 1(b), showing the individual's name and the hold alert, but this time focusing on the Manage Holds window and the details of the existing hold information.
Find the location of the cmwebreport.pbl on your network.
Right-click on the cmwebreport.pbl and choose Set as working library.
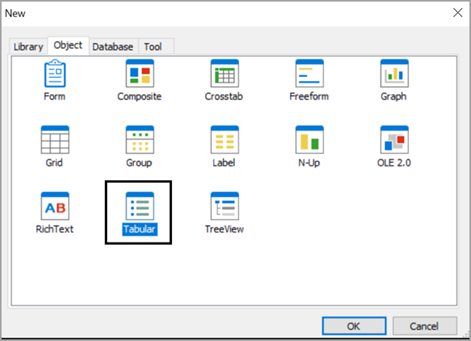
Select File, then New, then Tabular, then click OK.
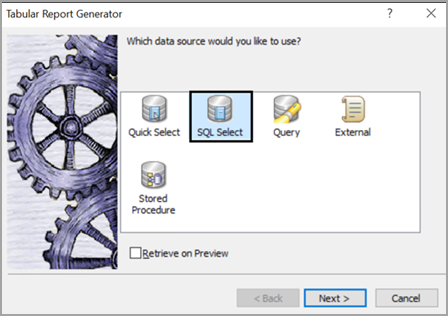
On the Tabular Report Generator window, select SQL Select.
Click Next.
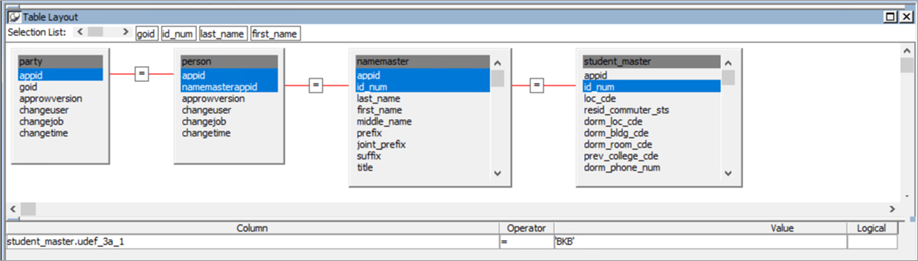
From the Select Tables window, choose the tables and views that you want to use for your data set. In my example I chose Party, Person, NameMaster, and STUDENT_MASTER.
In InfoMaker, configure the WHERE statement with the criteria for your data set.
Tip
The SQL syntax used in this example is:
SELECT party.goid
    FROM person,
         party,
         name_master,
         student_master
   WHERE ( person.appid = party.appid ) and
         ( person.namemasterappid = name_master.appid ) and
         ( name_master.id_num = student_master.id_num ) and
         ( ( student_master.udef_3a_1 = 'BKB' ) )
Important
People/Organization List queries must include a GOID.
From the File menu select Return to DataWindow Painter. A Tabular Report Generator pop-up window appears.
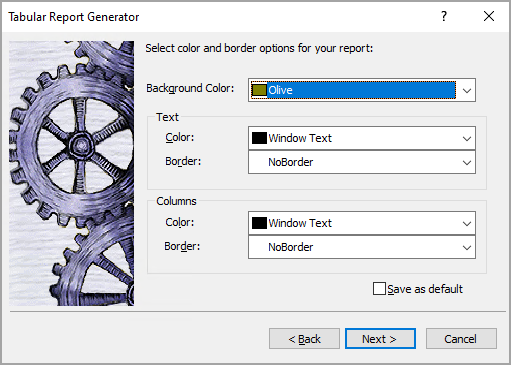
Select the default options and click Next.
On the Ready to Create Tabular Report pop-up window, click Finish.
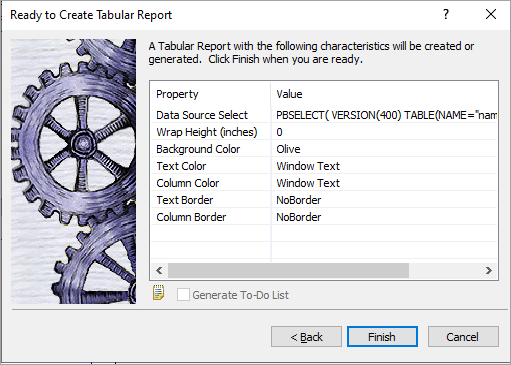
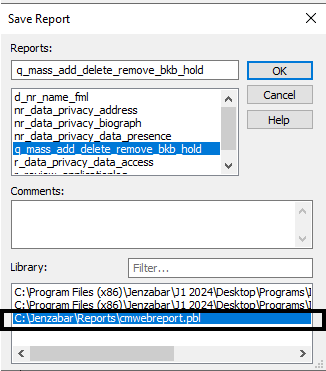
On the Save Report pop-up window, enter the name of your report. The report name in this example is q_mass_add_delete_remove_bkb_hold. Ensure that you are saving the report in the right location. The library name should be cmwebreport.pbl.
Important
When saving the InfoMaker report, you need to save the report name with the prefix of q_. This will ensure that J1 Web will display the report name in the Query drop-down list in the Create Data Set window as well as available as a Data Set option in Select Individuals for List section of the Mass Add/Remove/Delete Holds page.
Now that the InfoMaker steps are complete, you are now ready to create a data set for the Mass Add/Remove/Delete Holds process in J1 Web.
In J1 Web navigate to Core, then Campus-Wide Definitions, then Data Sets.
From the Queries for drop-down list, choose People/Organization Lists.
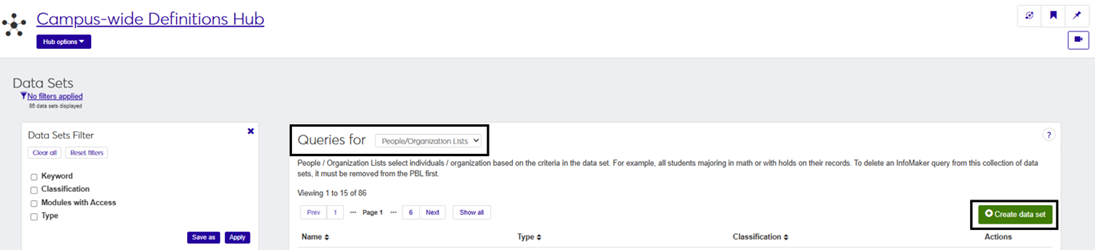
Click the Create data set button.
On the Create Data Set pop-up window, add a Name of Data Set.
For Classification, select Holds.
Specify which modules you want to grant access to this data set in the Select Modules Allowed Access to the Data Set field.
In the Type field, select InfoMaker.
In the PBL field, choose Common.
From the Query field, choose the query, which is actually an InfoMaker report that begins with q_ from the drop-down list.
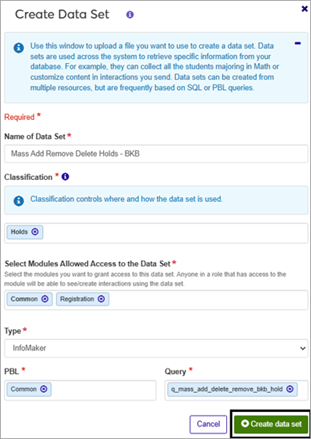
Click Create data set.