Batch Import
Important
Information and features vary according to the roles to which you belong and the permissions associated with those roles. For more information, contact your module manager or your campus support team.
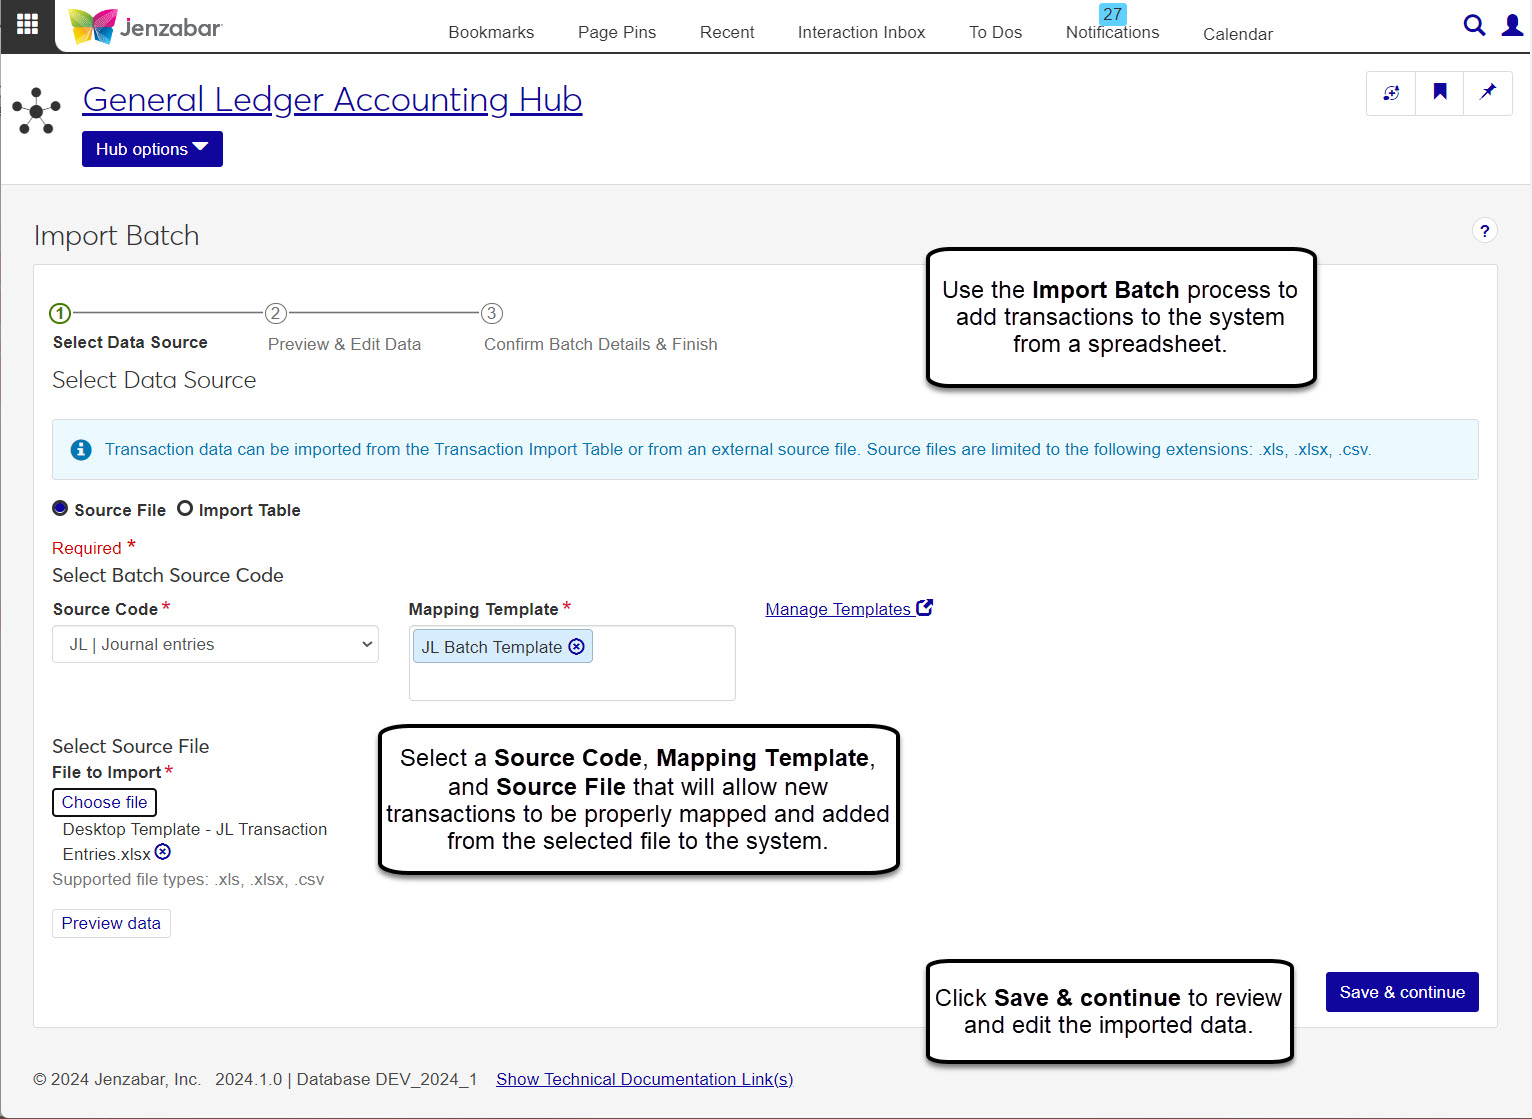
From the Import Batch page, transaction data can be imported from the Transaction Import Table or from an external source file.
Select Data Source. Select the file and mapping template, then preview the data to be imported.
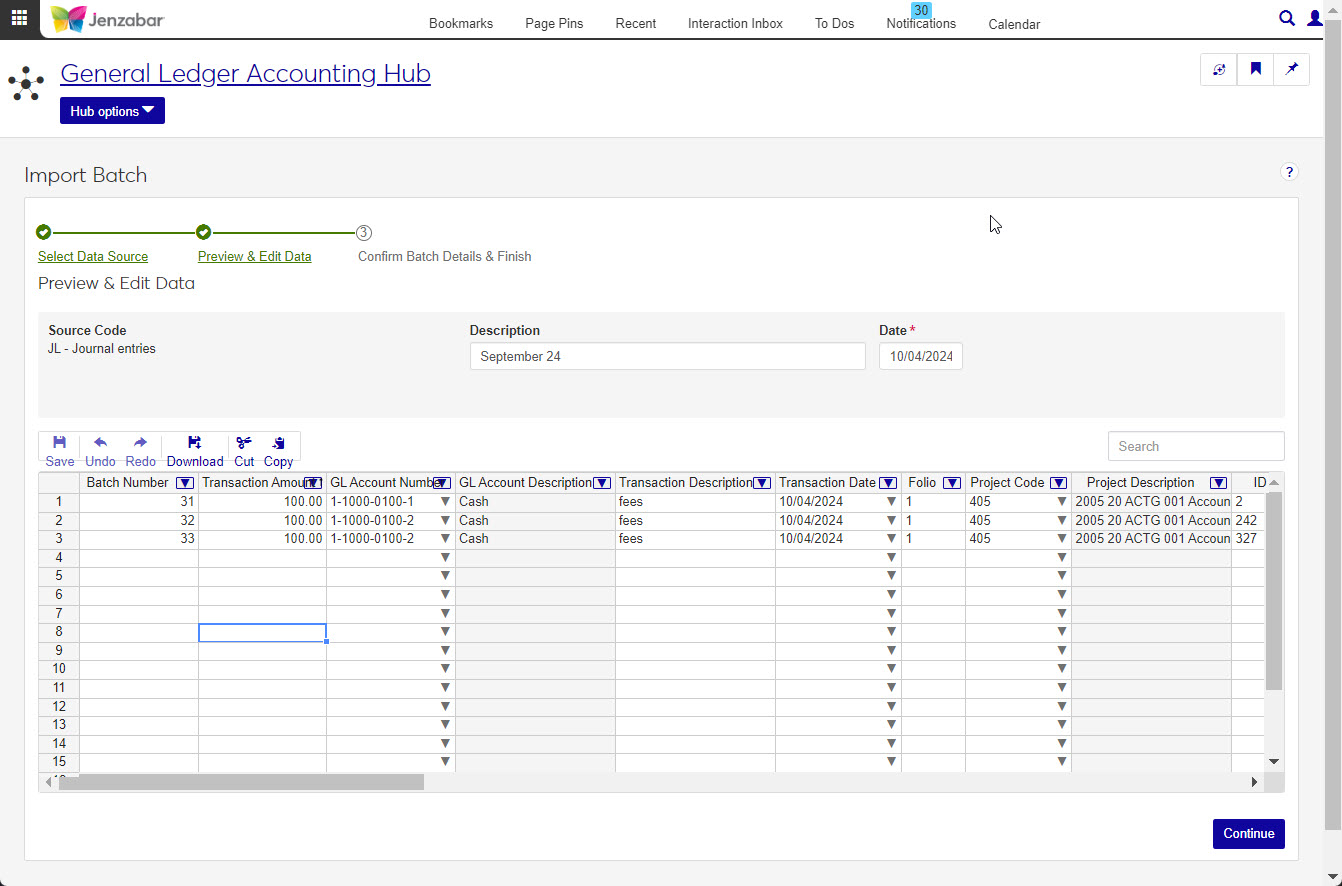
Preview & Edit Data. Review the imported data, enter the batch description and date, and make updates to any rows with errors.
Confirm Batch Details & Finish. Review a summary of the batch to be created and start the import process. The process runs in the background, so you can continue working in J1 Web. You'll receive a notification when the process is complete and batch is created.
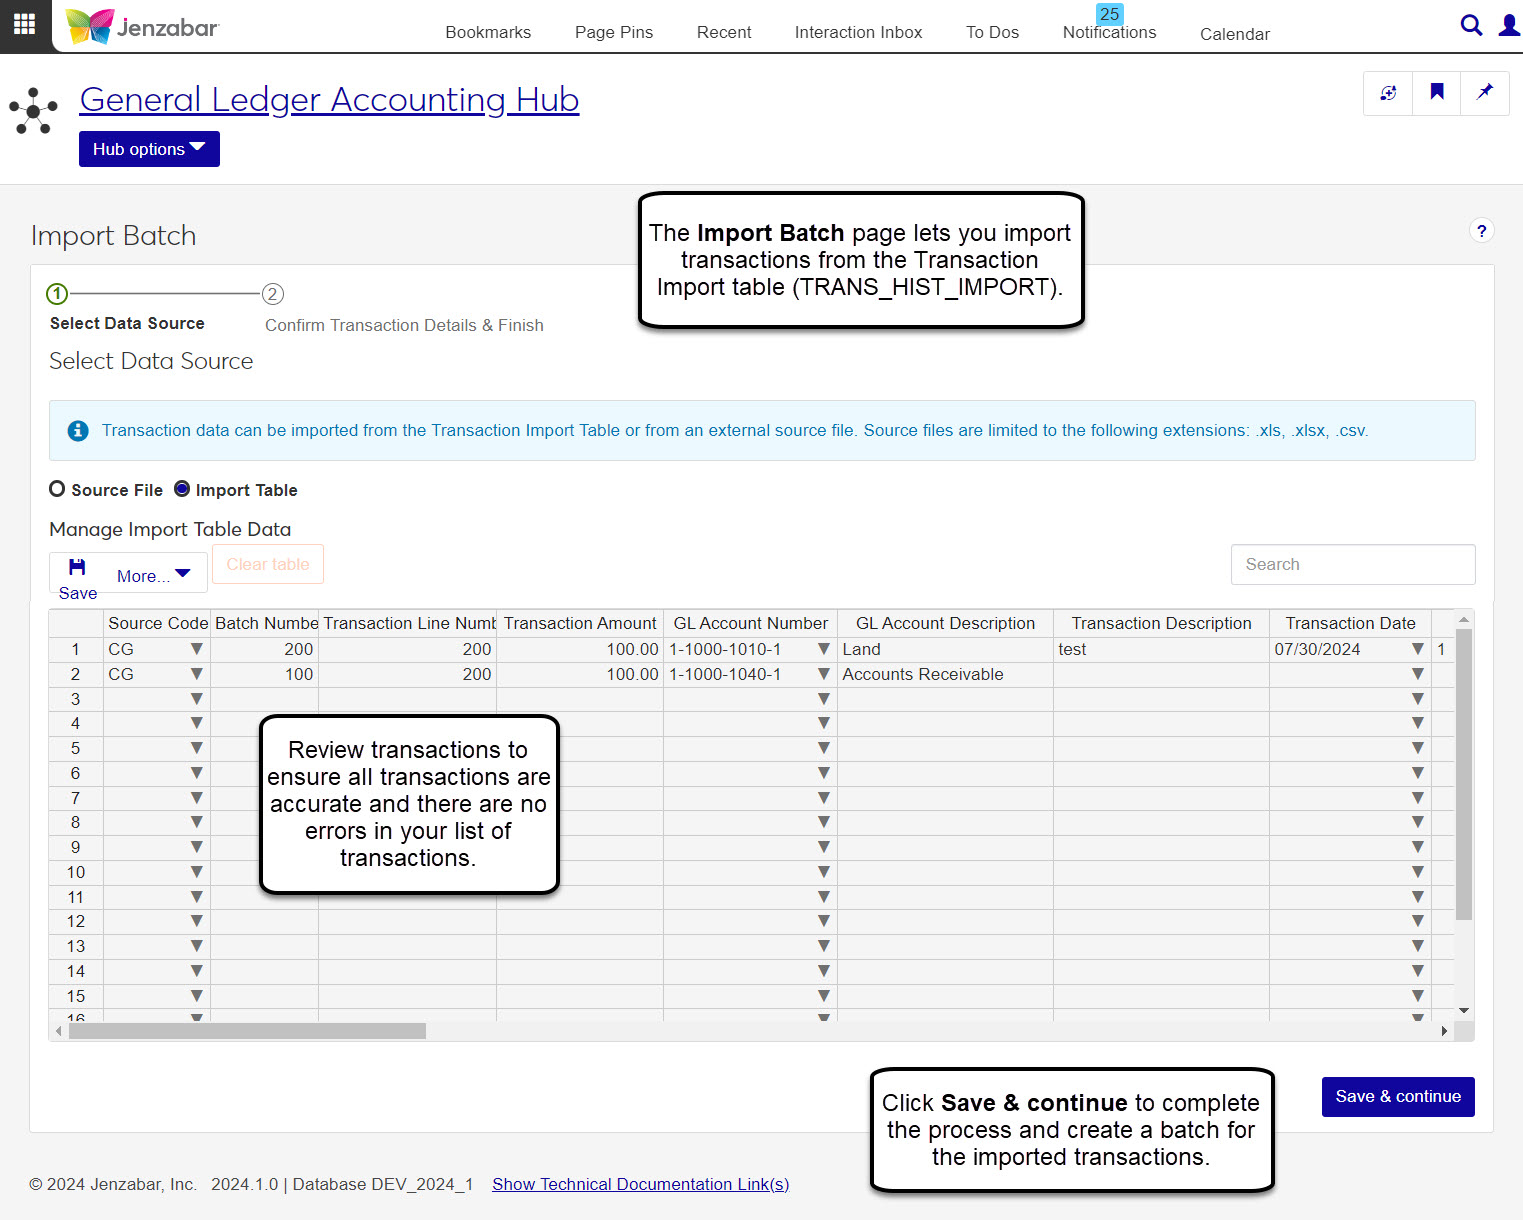
Select Import Table. Use the worksheet to add individual transactions to create the batch you want to import. Review the imported data and make updates to any rows with errors before continuing.
Confirm Transaction Details & Finish. Review the import settings and options and start the import. The process runs in the background, so you can continue working in J1 Web. You'll receive a notification when the process is complete and batch is created.
Roles and Permissions
For users to be able to import a batch, they must have the Can create and import batches on the role for each type of batch the user should have access to.
There are two options for this process. You can upload a file containing the transactions you want turned into a batch, or you can manually add transactions to the worksheet and post the batch.
J1 Web uses data mapping templates to import data from external files such as Excel spreadsheets. The template tells the system which database fields are to be populated with the imported data. Only templates associated with batches can be selected during the import batch process.
Note
Your school may create Excel templates that you can use for the import process. That Excel template should have all the required columns to import data. If you have issues importing data with your file, contact your IT administrator.
After selecting a template, choose the file to upload. The file you import into the system must contain all the columns defined in the selected template and the column names must match exactly.
Tip
Source files are limited to the following extensions: .xls, .xlsx, .csv.
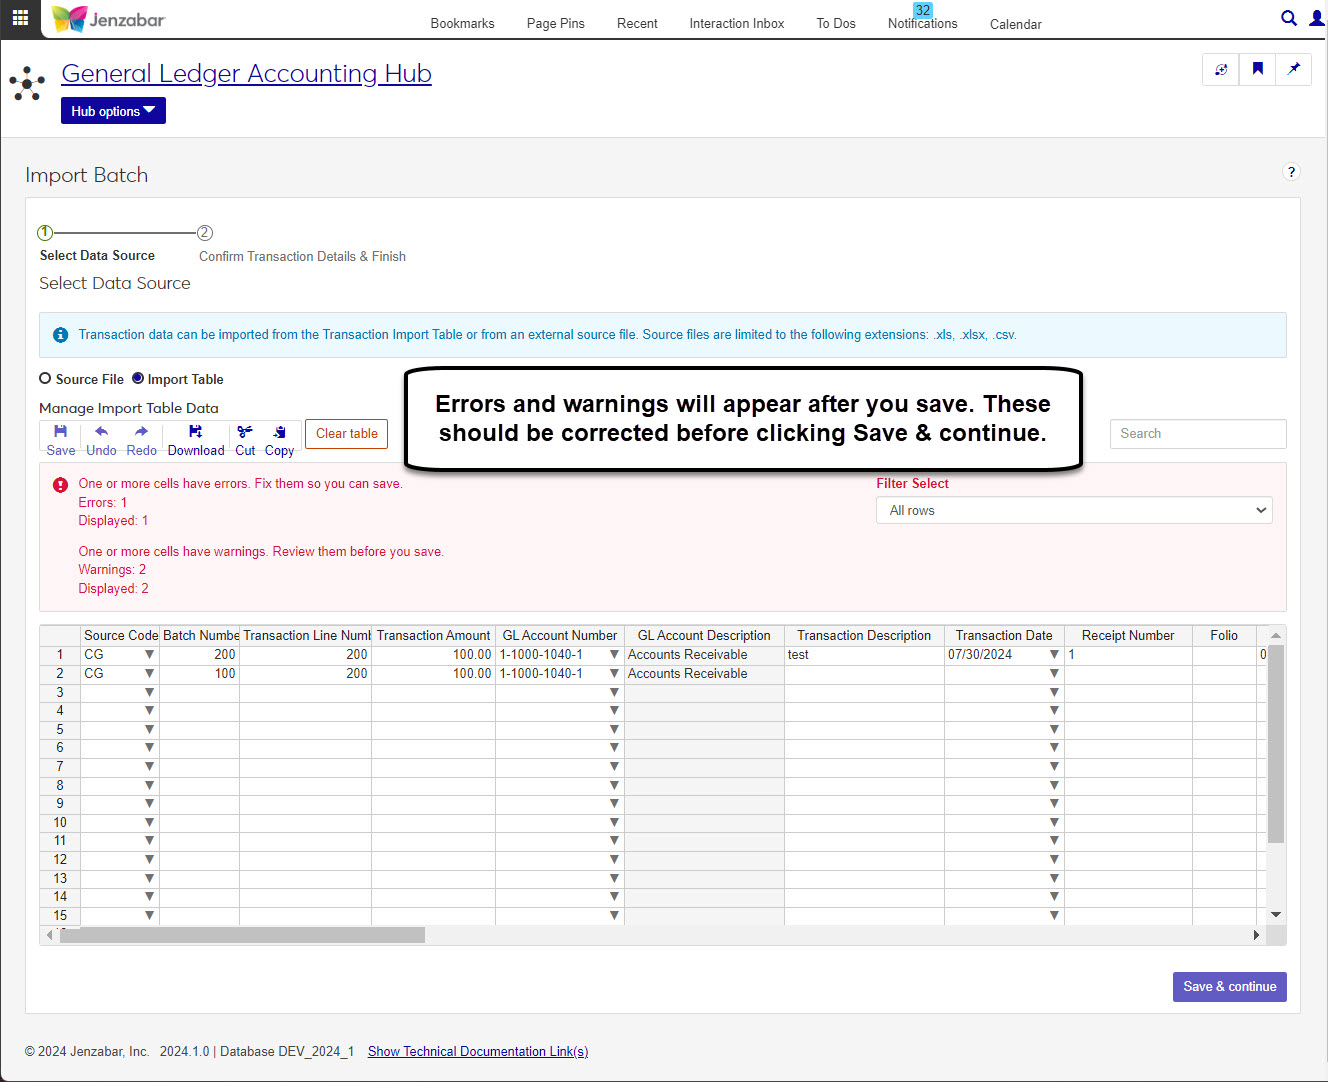
When you choose the Import Table data source, you will need to work on the spreadsheet to enter transactions. You can use the copy/paste options or enter data into the fields manually. Any errors or warnings will appear in red and must be fixed before clicking Save & continue.
Warning
If you choose the Import Table data, you will skip Step 2. Be sure to review and update the transactions entered on the worksheet before continuing to the Confirm Batch Details & Finish step.
After the batch file has been uploaded and validated, you can make updates to the data on the Preview & Edit Data step of the wizard. On this step, you'll also enter the following information.
Description: this description is used for the batch that is created when the imported transactions are created.
Date: this date is assigned to the imported batch and to any transactions that didn't have a date when they were imported into the system.
The columns visible on this step may vary based on the mapping template selected in Step 1. The system validates the imported data and highlights fields that need to be corrected. You must complete the corrections before continuing.
This final step allows you to view and select options for how your batches will be imported into the system. Depending on the options you selected in Step 1, you will either see the Confirm Batches or Confirm Transactions options.
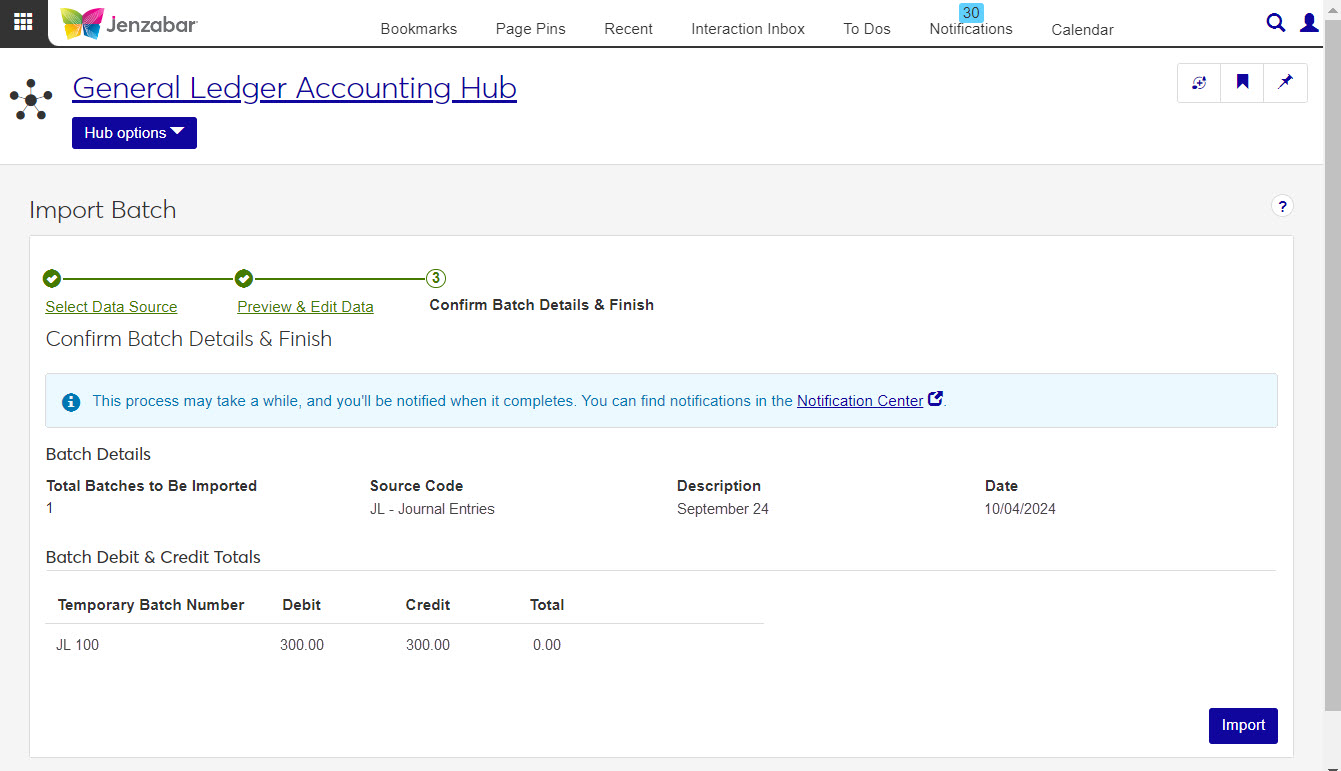
The Confirm Batch Details & Finish step displays a summary of the transactions that will be included in the batch created during the process. You can view the number of batches that will be created and total amounts for each.
When you click the Import button to start the process, the system performs a final validation to confirm all required information was entered. The process runs in the background so you can keep working in J1 Web. You'll receive a notification when it's complete with links to view the batches and batch details.
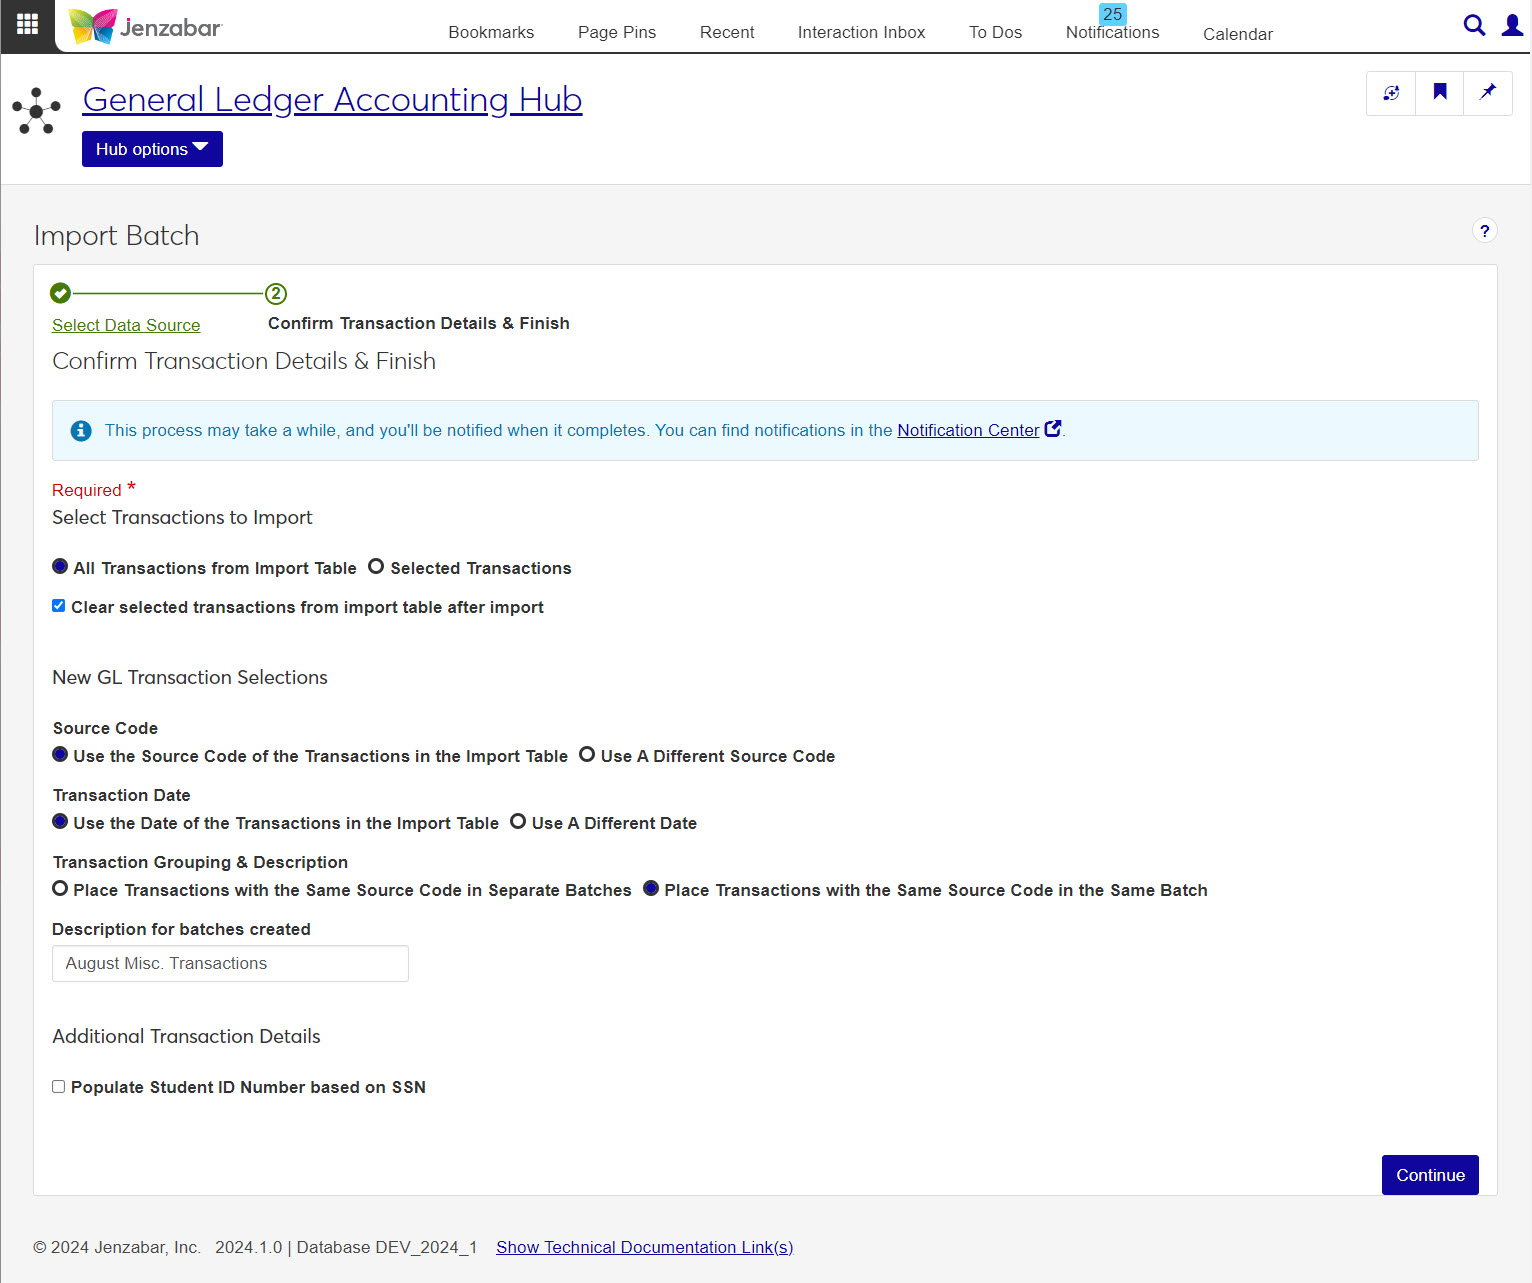
The Confirm Transaction Details & Finish step displays options so you can determine how the batches will be imported during this process.
When you click the Import button to start the process, the system performs a final validation to confirm all required information was entered. The process runs in the background so you can keep working in J1 Web. You'll receive a notification when it's complete with links to view the batches and batch details.
Choose which transactions will be included in the import:
All Transactions from the Import Table: each row you enter on the Import Table will be imported in the system.
Selected Transactions: this option allows you to select a Source Code and Batch Number to limit the transactions included in the import.
If you want the transactions you added to the Import Table to be cleared after the import process is run, select the Clear selected transactions from import table after import checkbox.
Choose how the transactions will be added to the system during the import process:
Source Code: Do you want the source code of the new transactions to remain as you entered them into the table, or do you want to change all of the incoming transactions to have a new source code? If you select Use A Different Source Code, you will be able to select a code from a drop-down.
Transaction Date: Would you like to keep the the transaction dates as they were entered into the table, or would you like to make all transaction have a new date? If you select Use A Different Date, you will be able to choose a date from the calendar drop-down.
Transaction Grouping: Would you like to have all transactions with the same source code grouped into the same batch or would you like them in separate batches?
Description: Write a brief description for the batch that is created when they are imported to the system.
If the transactions being imported are connected to your students, you can make sure the Populate Student ID Number based on SSN checkbox is selected so the correct student IDs are added to the transaction details.
How To
Import Batches
From the Finance General Ledger Accounting Hub options, select Import batches. The Import Batches page opens.
From the Select Data Source options, select Source File.
Select a Source Code. Required.
Click in the Mapping Template field and select an option from the list. Only templates associated with the selected source code are available for selection. Required.
Under the File to Import section, click the Choose file button.
In the pop-up, navigate to and select the import file (allowable file types are .xls, .xlsx, and .csv), then click Open.
To view the imported data:
Click the Preview data button below the imported file. A pop-up opens with a read-only table of the header and columns from the imported file.
Click the Close button or the x in the top right corner to close the pop-up.
Click Save and continue to move to the Preview & Edit Data step.
On the Preview & Edit Data step, review and update imported data. All the columns from the selected mapping template are displayed in the details spreadsheet. Most can be edited and some are required.
Tip
Required fields will depend on the type of batches you're importing. As you review the content, any errors will appear in red along with a highlighted area above the spreadsheet with a count of the errors.
Enter a Description (up to 40 characters). The system uses this description when batches are created in the final step. Required.
The Date defaults to today's date and can be changed if needed. This date populates the Transaction Date column in the details spreadsheet if a transaction date wasn't included in the import data and is used as the batch date. The date must be within the current or future fiscal year. Required.
Make updates to any of the editable columns in the details spreadsheet.
Click the Save & continue button to move to the Confirm Batch Details & Finish step.
In the Confirm Batch Details & Finish step, review the batch summary information.
Review the information in the Batch Debit & Credit Totals section. If there are any issues, click the Preview & Edit Data link to go back and make changes.
Click the Import button. The process runs in the background so you can continue working in J1 Web. When it's complete, a notification appears with links to access the batch details and the details for each batch that was created.
From the Finance General Ledger Accounting Hub options, select Import batches. The Import Batches page opens.
From the Select Data Source options, select Import Table.
Use the worksheet to add transactions that you would like imported into the system as a batch. You can manually enter data or copy and paste.
Click Save
 .
. Data entered into your worksheet will be validated and any errors or incorrect entries will be highlighted red. Be sure to review and update your data accordingly.
Click Save & continue to move to the Confirm Transaction Details & Finish step.
On the Confirm Transaction Details & Finish page, review the options for the transactions you want to import.
Select Transactions to Import: this section allows you to choose which transactions entered in the table will be imported into the system. You can also choose to clear the table when the process is done to avoid including processed transaction in another batch.
New GL Transaction Selections: use these settings to choose how the transactions will import into the system. Source codes, transaction dates, groupings, and descriptions can be updated in this section.
Additional Transaction Details: select the Populate Student ID Number based on SSN checkbox if the transactions being imported are connected to students.
Click Continue. The process runs in the background so you can continue working in J1 Web. When it's complete, a notification appears with links to access the batch details and the details for each batch that was created.
Tip
Permissions to view and manage mapping templates are typically reserved for IT administrators and those who manage the database.
On the Import Batches page, click the Manage Mapping Templates link. The Data Mapping Templates page opens with a list of templates for the selected source code.
To view and edit details about an existing template:
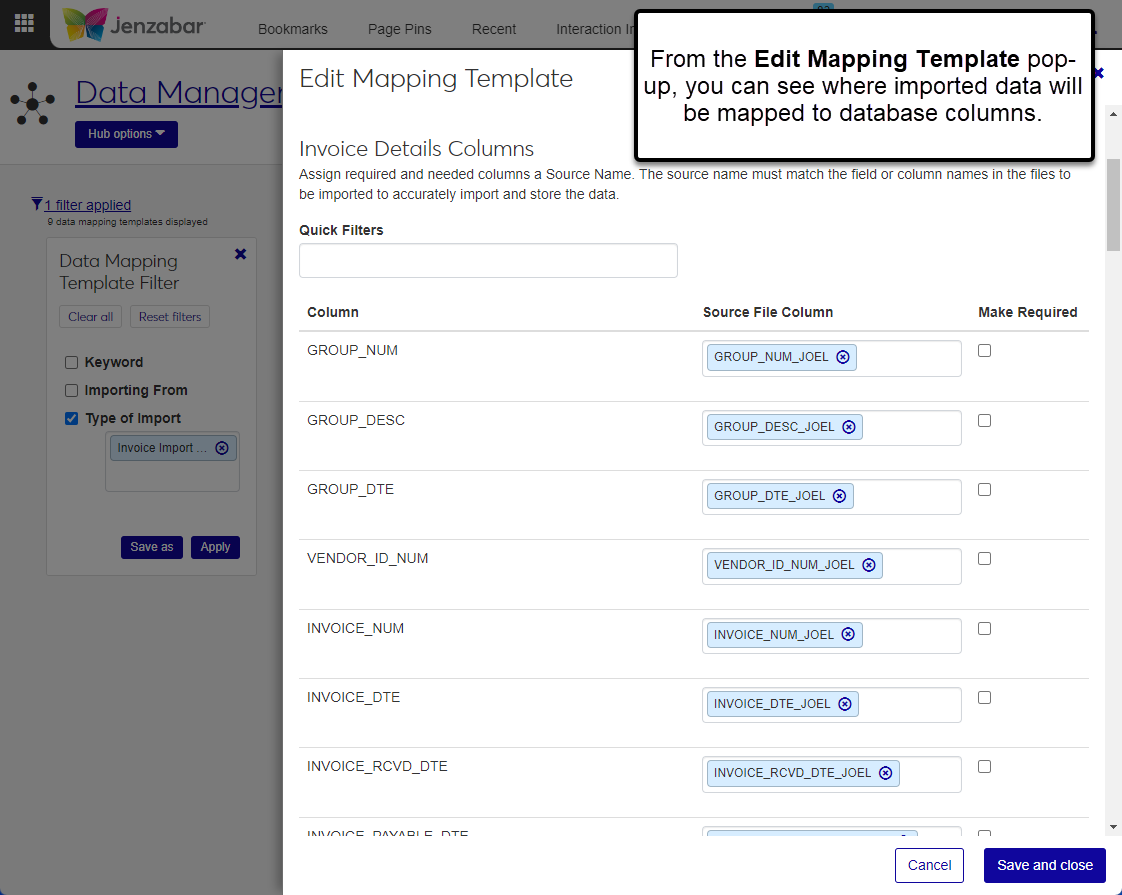
Click the Actions button for a row and click Edit. The Edit Mapping Template pop-up opens.
In the Batch Details Columns section, you can remove and select new values in the Source File Column to map data from the imported file to the database Column.
Select the Make Required checkbox for columns that must contain a value.
Click the Show details button at the top right of the pop-up to view and update the template Name, Description, or Modules allowed access.
Click Save and close or click the x at the top right corner.
To create a new data mapping template, see Data Mapping Templates.
FAQ
The file you import must have the same columns as the selected mapping template and the column names must match the template exactly. Your school creates customized data mapping templates, so contact your module manager or IT administrator if your file doesn’t match the mapping template parameters.
After the process is complete, you can click the link in the notification to access batch details. You can also access the Notification Center from the universal toolbar and enter "Import batches" in the Keyword filter to access links to batches. Open the notification and click the link to the batch. From the batch, you can open the individual transaction details.
Mapping templates are defined and managed in the Campus-wide Definitions Hub, usually by your school's IT administrator. If you have permission and access, a Manage Mapping Templates link on the Import wizard page lets you access the Data Mapping Templates page to view, add, or update templates. The Edit Data Mapping Template pop-up shows which database columns the imported values are mapped to. The file you import into the system must contain all the columns defined in the selected template and the column names must match exactly.
For more information about mapping templates, see Data Mapping Templates.