Step 2: Set Up USPS Zip Code Look Up (Optional)
Important
Information and features vary according to the roles to which you belong and the permissions associated with those roles. For more information, contact your module manager or your campus support team.
Note
With J1 2026.2, FormFlow – Forms is called Forms and FormFlow – Workflow is called Form Approvals.
Important
The USPS Zip Code Lookup feature is only available for schools licensed to use Candidate features.
USPS retired their older version of Web Tools API in January 2026 and replaced it with a new set of APIs. Jenzabar clients using this feature will need to complete the following:
Note
Detailed steps for each of the following is available in the How To section below.
Log in to your USPS Business Account and use those credentials to create a Developer Account if you do not already have one.
With your Developer Account, access the Customer Onboarding Portal (COP) dashboard and add Jenzabar as an app. Once Jenzabar is added as an app, you'll be provided with your new Consumer Key and Consumer Secret credentials.
Copy your new Consumer Key and Consumer Secret credentials for adding to the Campus Portal database.
Enter your new USPS credentials and the updated API URL in the Campus Portal database (FWK_ConfigSettings table). With 2026.1, the following API URL is available: https://apis.usps.com.
Sample script to update the FWK_ConfigSettings table with your updated credentials and the new API URL.
Note
No INSERT is needed because the Category and Key rows are created when you upgrade to Web Application Services 2026.1.x or higher.
This SELECT statement gives the Category and Key rows to update:
SELECT *
FROM FWK_ConfigSettings
WHERE Category = 'C_USPS'
ORDER BY Category, [Key]
These are the update statements:
UPDATE FWK_ConfigSettings
SET Value = ''
WHERE Category = 'C_USPS' and [Key] = 'API Url'
UPDATE FWK_ConfigSettings
SET Value = ''
WHERE Category = 'C_USPS' and [Key] = 'ConsumerKey'
UPDATE FWK_ConfigSettings
SET Value = ''
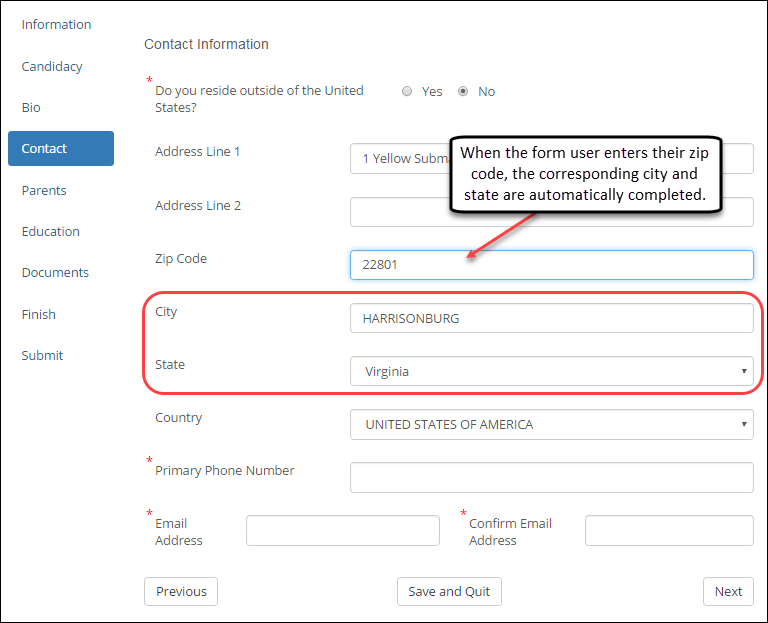
WHERE Category = 'C_USPS' and [Key] = 'ConsumerSecret'The USPS Zip Code Lookup feature lets users enter a zip code and auto-complete the corresponding city and state fields. Using USPS city and state information reduces data entry errors, ensures the information follows the same USPS-standardized format, and makes form completion easier.
Once the USPS Zip Code Lookup feature is set up, it does not have to be set up again for other forms.
To facilitate this feature, Jenzabar integrates with USPS Web Tools API, which requires a free registered USPS Business account.
Setup for this feature has five steps:
Create USPS accounts.
Create a USPS Business account and using your Business account credentials, sign up for a Developer account. Both are free and only need to be created one time.
Add your Jenzabar App and generate your USPS credentials.
Enter your USPS credentials in the Campus Portal Database configuration settings.
Add and configure the Zip Code and City/State Fields on your forms.
Set up Zip Code data validation (optional).
Note
URLs provided in this section were available with the 2026.1 release. USPS may update these links in the future.
Access the Create Your USPS.com Account website.
Sign up for a Business Account and then enter and verify your email address.
Users are sent an email with a Click here to complete your e-mail validation link that must be clicked to complete the process.
Once validated, you'll be asked to enter your school's address and contact information, and then verify the account. After validation, create a username and password.
To create your Developer Account, click this link: https://developers.usps.com/.
Click Sign Up. The Profile Details page appears.
Access the USPS Customer Onboarding Portal (COP) dashboard: https://cop.usps.com/cop-navigator?wf=API&showCC=false. The Terms and Conditions page appears.
Agree to the Terms and Conditions and click Continue. The USPS COP dashboard appears.
From the top menu options, click My Apps.
Click the Developer Apps tab.
Click the Add App button and complete the setup.
USPS shows the Consumer Key and Consumer Secret credentials you need to add to Jenzabar.

Copy the Consumer Key and Consumer Secret. You will enter these values in Campus Portal configuration settings later.
Verify the USPS API URL to enter in the Campus Portal configuration settings later.
Production Base URL: https://apis.usps.com
Testing (TEM) Base URL: https://apis-tem.usps.com
Tip
The following steps involve updating the configuration table. You may need to work with your IT administrator to make these updates.
Access your school's Campus Portal database.
Access the dbo.FWK_ConfigSettings table.
In the C_USPS API Url row, enter the USPS-provided API URL.
Notice
With 2026.1, the following API URLs are available:
Production Base URL: https://apis.usps.com
Testing (TEM) Base URL: https://apis-tem.usps.com
Previous versions used the following URL; however, it was retired in January 2026: http://production.shippingapis.com/ShippingAPI.dll
In the C_USPS Consumer Secret row, enter the USPS-provided consumer secret you copied in a previous step.
In the C_USPS Consumer Key row, enter the USPS-provided consumer key you copied in a previous step.
Click Save.
Restart the IIS (IISRESET) to apply the changes.
Tip
Jenzabar recommends performing this step outside business hours because restarting the IIS temporarily disconnects all active Campus Portal users.
Tip
If your form does not yet include a Zip Code field, you can return to these steps later.
Log in to the Campus Portal as an administrator and access Forms.
Click Manage Forms.
Click on the form you want to update. The admin view of the form displays.
Right-click on the Zip Code question and select Properties to open the Edit Item pop-up.
Click Settings.
From the Validation drop-down, select ZipCode.
Click Address Tools.
From the Populate City drop-down, select the Unique ID for your City form question. (The Unique ID appears in the question's Properties.)
From the Populate State drop-down, select the Unique ID for your State form question. (The Unique ID appears in the question's Properties.)
Click Save.
Tip
Jenzabar recommends setting up a zip code validation as a best practice. This ensures the user enters a valid zip code format; otherwise, the API cannot use it to find the corresponding city and state.
Log in to the Campus Portal as an administrator and access Forms.
Click Manage Forms.
Access the Data Validations page in one of the following ways.
Click Site Administrators. When the Site Administrators page appears, click Data Validation.
Click on the name of the form you are working with. When the form appears, select Data Validation from the Tools menu.
From the Tools menu, select Data Validation.
Select ZipCode from the Validations drop-down.
Note
Jenzabar provides a default pattern and error message for invalid zip code formats. You can customize the invalid message as needed.
Click Save Validation.
This feature is provided free of charge by USPS. You only need to create the needed USPS accounts.