Single Sign-On (SSO) Authentication
Important
Information and features vary according to the roles to which you belong and the permissions associated with those roles. For more information, contact your module manager or your campus support team.
Jenzabar supports single sign-on (SSO) for J1 Web and JICS, which lets users securely access multiple websites in your campus computing environment without having to log in separately to each. This eliminates the need for users to remember multiple passwords and once logged in, lets them switch between campus web resources.
J1 Web follows the SAML 2.0 standard and operates as a service provider in a SAML 2.0 environment.
“SAML 2.0 is an XML-based protocol that uses security tokens containing assertions to pass information about a principal (usually an end user) between a SAML authority, named an Identity Provider, and a SAML consumer, named a Service Provider.” (Wikipedia Contributors. “SAML 2.0.” Wikipedia. Wikipedia.org, 16 January 2019, en.wikipedia.org/wiki/SAML_2.0. Web. Accessed 28 June 2019.)
In the Jenzabar SSO environment, users are authenticated via web browser redirection. If the user is not authenticated in J1 Web, the web browser is redirected to a login page from the SSO identity provider. Once a user is authenticated via the SSO provider’s site (e.g To., by entering a valid name/password, following a biometric process, etc.), the web browser redirects back to J1 Web and the user is successfully logged in. The scenario may change when JICS is involved, or if the user already has SSO authentication.
Without SSO, there are separate sign in pages and sign out procedures. With SSO, the sign in and out pages and procedures are more streamlined. Depending on how your school sets up SSO, session timeout processes may use a single launch page and /or related sign in page to manage access. For example, users might be directed to the launch page or immediately redirected to J1 Web or JICS.
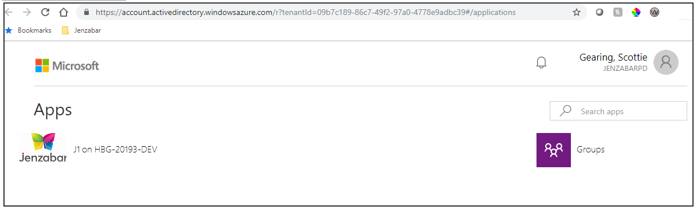
Session Sign-In
When are the sign in and launch page accessible to users?
When your school links directly to the launch page. When the user enters or clicks the direct link, they are directed to the sign in page. Once their credentials are verified, they see the launch page where they have quick access to J1 Web and JICS.
When a user accesses J1 Web using the base J1 Web URL or a specific J1 Web page (via bookmark, email link, desktop shortcut, etc.) and the SSO session has not yet been established. Typically users are immediately routed to the J1 Web or JICS page, but if the session isn’t established, they see the sign in page first.
When the user selects sign out from J1 Web, they are routed to the launch page where they can complete the sign out process.
When the user’s session times out, they are routed to the sign in page. Once they sign in, they can see the launch page where they can regain access to J1 Web and JICS.
Session Monitoring
Occasionally, when transitioning between J1 Web pages, an SSO provider page may briefly appear. With some providers like Azure SSO, this might briefly show up as a blank page.
If a user stays on a J1 Web page beyond the SSO recheck period, a modal prompts them to verify their SSO session. Due to browser security policies and the SAML SSO standard, this verification must be completed by the user rather than automatically from the system.
Session Logout
User Sign Out
Users can choose to sign themselves out. A sign out confirmation pop-up window appears and, if they proceed, they are directed to the landing page where they can log out.
SSO Checking
Jenzabar periodically checks users’ SSO session in case the provider doesn't support single logout (SLO), or it isn't working properly. You can use the reauthentication interval settings to determine how frequently J1 Web verifies a user's SSO session with the identity provider. You can specify the minimum and maximum number of minutes between reauthentication checks. J1 Web will not verify the session more frequently than the minimum interval and will always perform a verification by the maximum interval. This time range allows the system to use page navigation checks as much as possible but still use pop-ups when necessary.
Users may momentarily see their SSO provider page or a blank page when navigating from one J1 Web page to another.
If users remain on one page longer than SSO recheck period, a pop-up window will appear asking them to click a button to proceed with the SSO session check. Due to browser security policies, this cannot be initiated from the software
Automated Logout Options
Schools using an SSO provider that supports an SLO can use the protocol to end the J1 Web session when the SSO logs out. While this automated process can be used to log the user out of the system, the SLO can be problematic, and the most reliable practice is to have the user completely close the J1 Web browser window when their J1 Web activity is complete to terminate all sessions.
Implementation Checklist
Set Up the SSO Application in Azure
Assign AD Users to the J1 Web Instance in Azure
Turn on SSO in Azure
Enable SSO in J1 Web
Test
Notify End Users
Important
Using J1 Web with Azure SSO currently requires an Azure Premium account.
Note
JICS settings may influence how you configure your system. Most schools need to have separate SAML app configurations in the identity provider for every application or website to be authenticated. This includes test/play and training environments in addition to live/production environments.
Note
Screenshots in this document may vary based on the applications you’re authenticating via Security Assertion Markup Language (SAML).
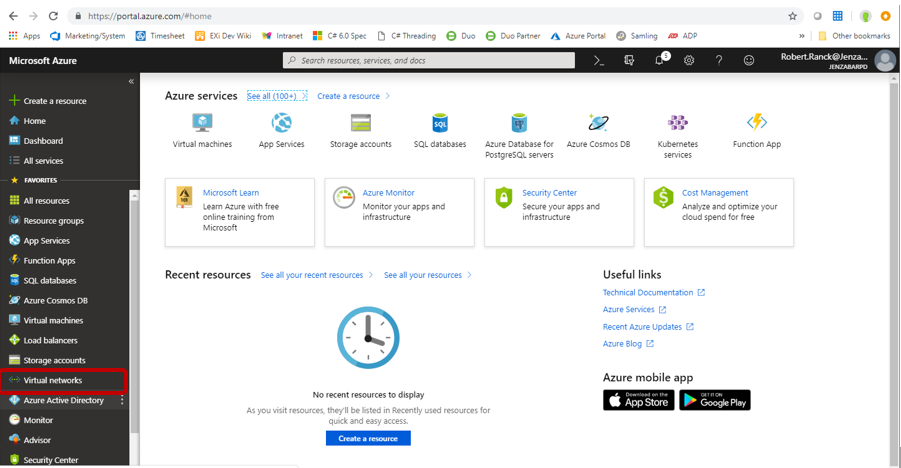
Access http://portal.azure.com.
Log in using your Microsoft credentials. The Welcome to Azure page appears.
Under Manage Microsoft Entra ID click the View button.
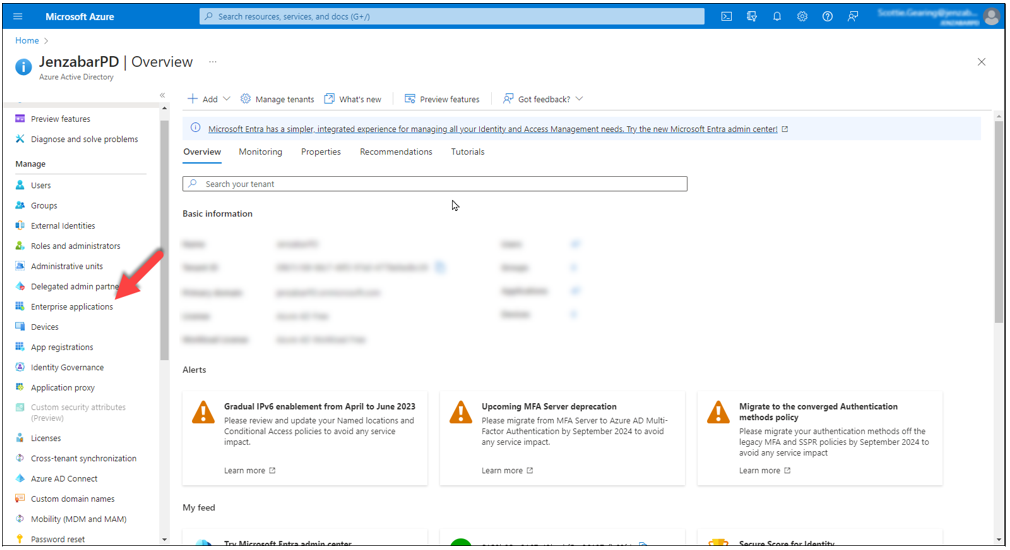
The Overview page for your Active Directory domain appears.
From the left-side menu, click Enterprise applications.
The Enterprise applications – All applications page appears.
Click New application.
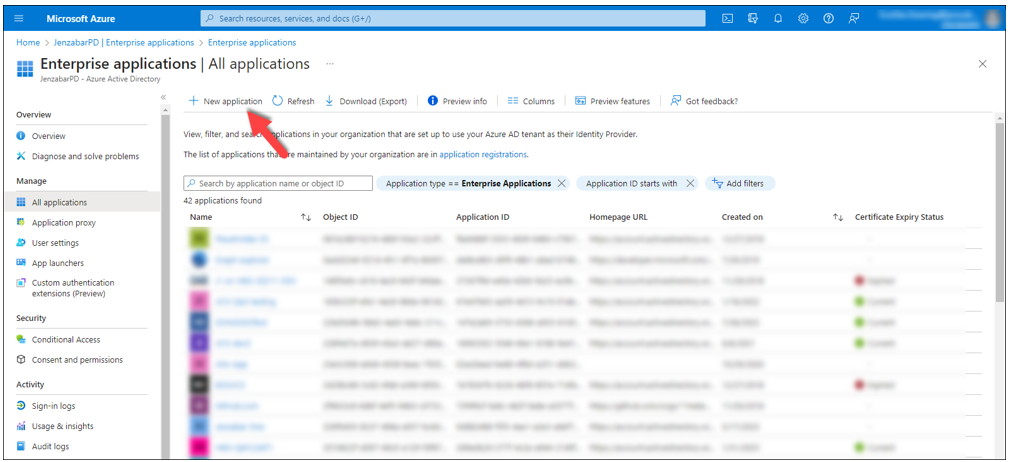
The Add an application page appears.
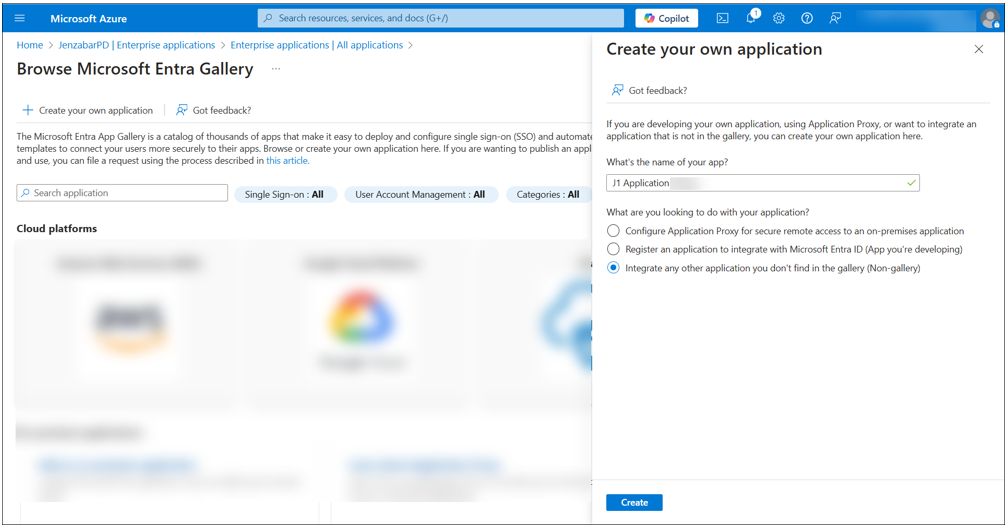
Click Create your own application.
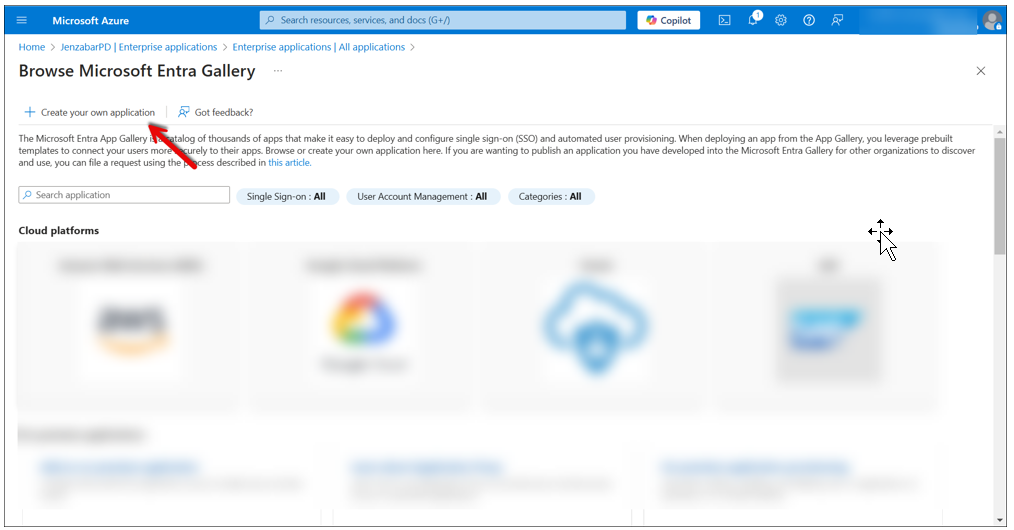
The Create your own application window appears.
Enter a name for your application.
Select the Integrate any other application you don’t find in the gallery (Non-gallery) option.
Note
The Non-gallery application option is only available with a Premium account. Other identity providers may refer to non-gallery applications as custom applications.
Click the Create button. The Properties page appears.
From the left-side menu, click Manage, Properties.
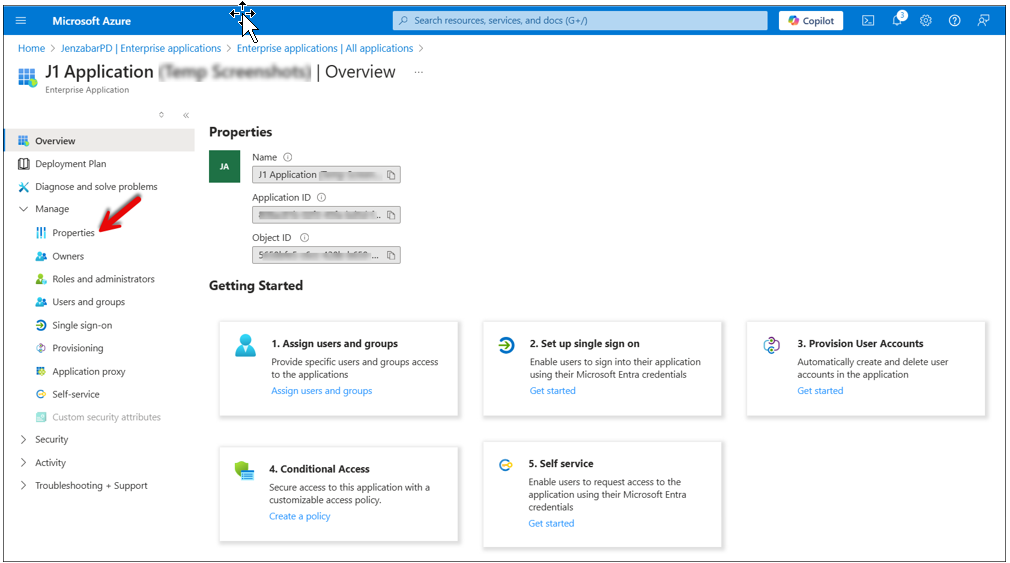
The Properties page appears.
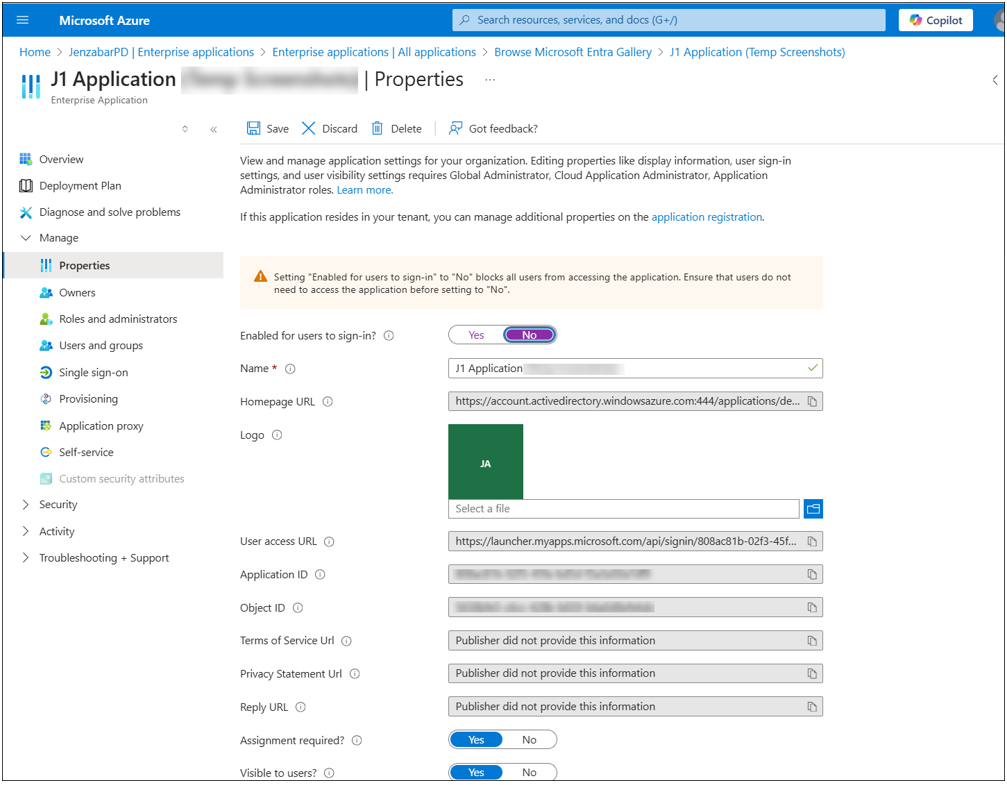
Change Enabled for users to sign-in? to No.
Note
Once the setup is complete, you’ll change this option to Yes. More information will be included later in the process,
In the Name field, enter the application name you want displayed to users when they sign in via SSO from the Azure launch page.
Note
You may need to set up two applications: one for your play/test environment and another for your live/production environment.
Use the Logo field to upload an icon or logo image that will appear on the launch page and within the Azure environment.
The Assignment required? option shows Jenzabar on the Azure page to Active Directory users. This is an optional setting, but Jenzabar recommends showing it. For this part of the process, it is set to No. Once setup is complete, the option is changed to Yes.
The Visible to users? option determines if users will go directly to the launch page or if they must know the URL. This is an optional setting, but Jenzabar recommends enabling it. For this part of the process, it is set to No. Once setup is complete, the option is changed to Yes.
Click the Save button at the top of the page.
Click the Enterprise applications – All applications link at the top of the page. The All Applications page appears.
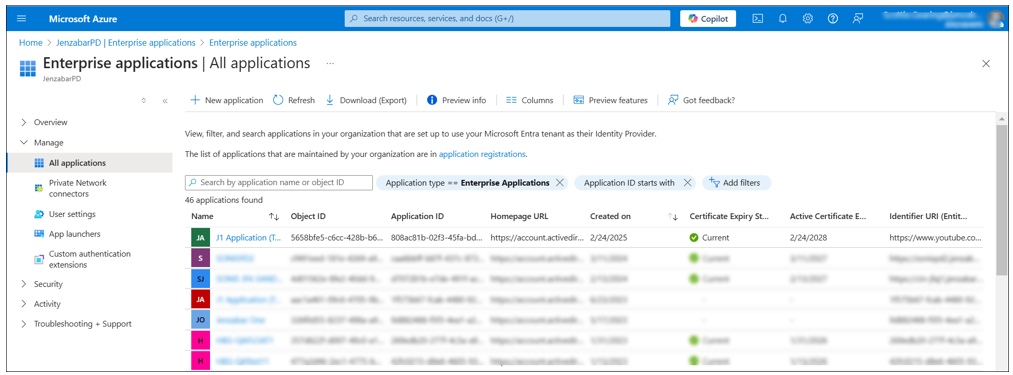
Find and select the application you just added. The Overview page appears.
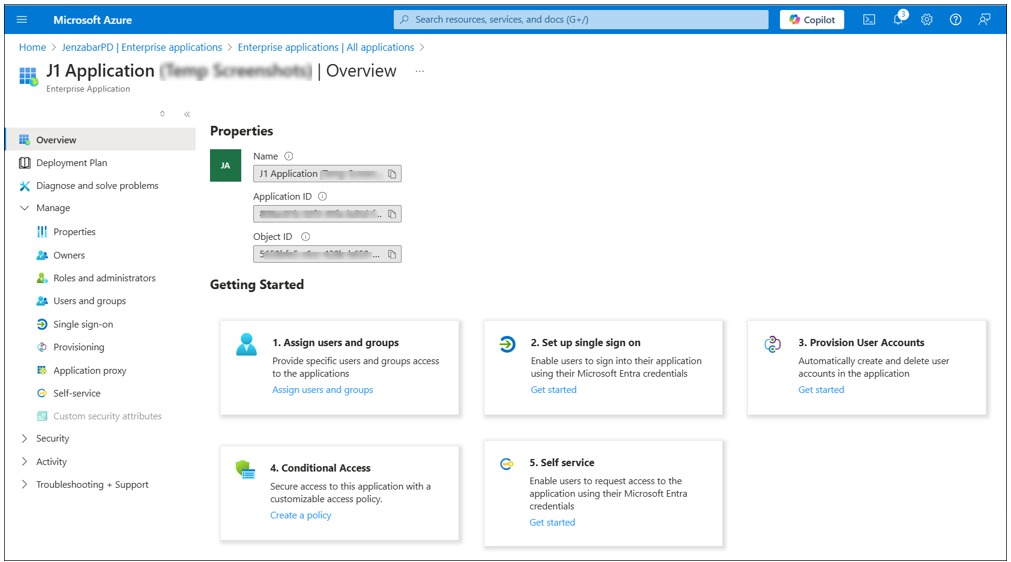
From the Set up single sign on block, click the Get started link.
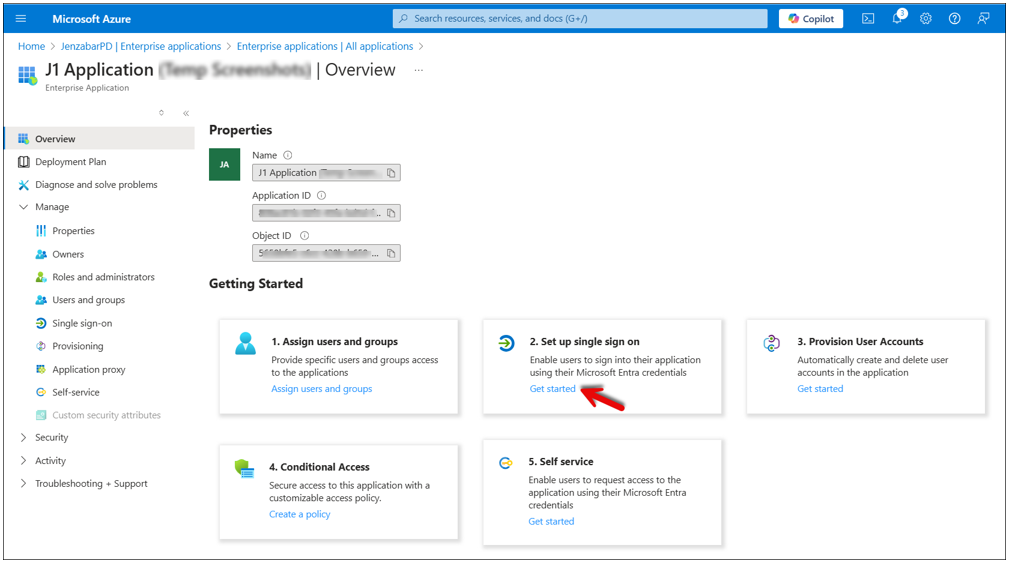
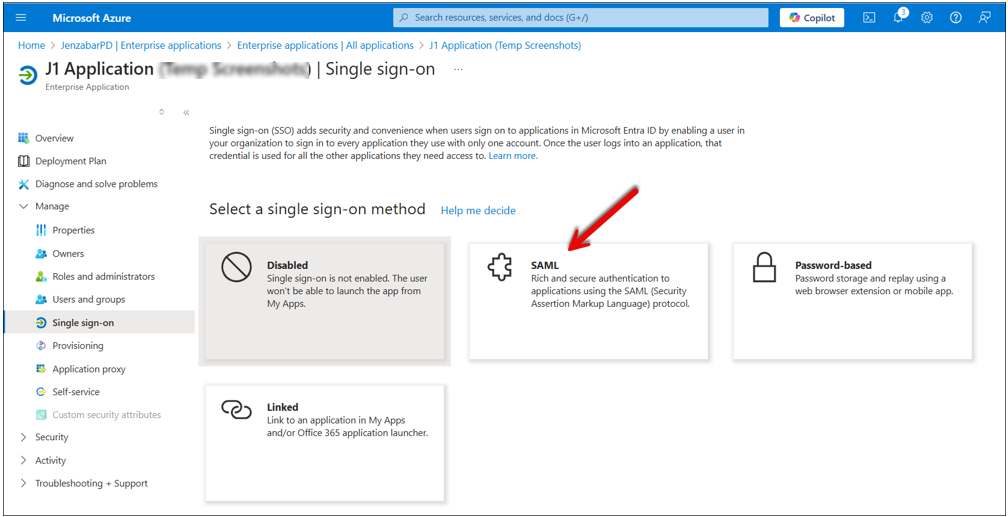
The Single sign-on page appears.
Click SAML.
The SAML-based Sign-on page appears.
From the Basic SAML Configuration section, click the pencil Edit icon.
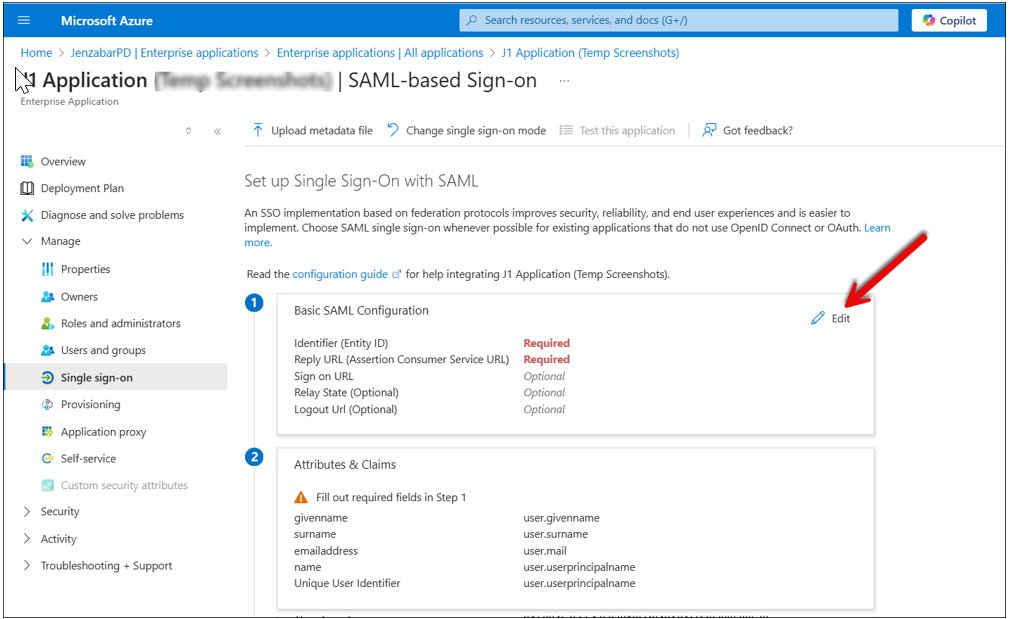
The Basic SAML Configuration window appears.
Click Add identifier.
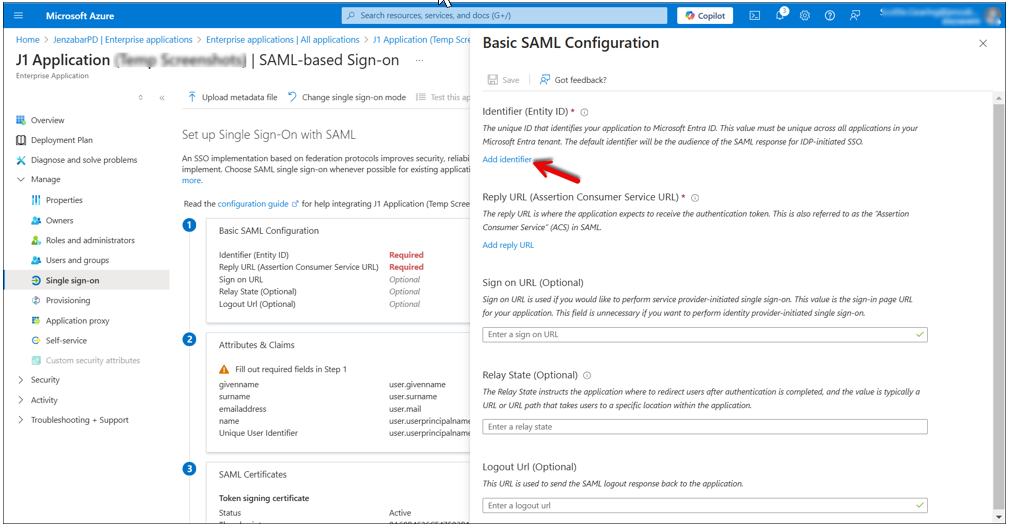
The identifier options appear.
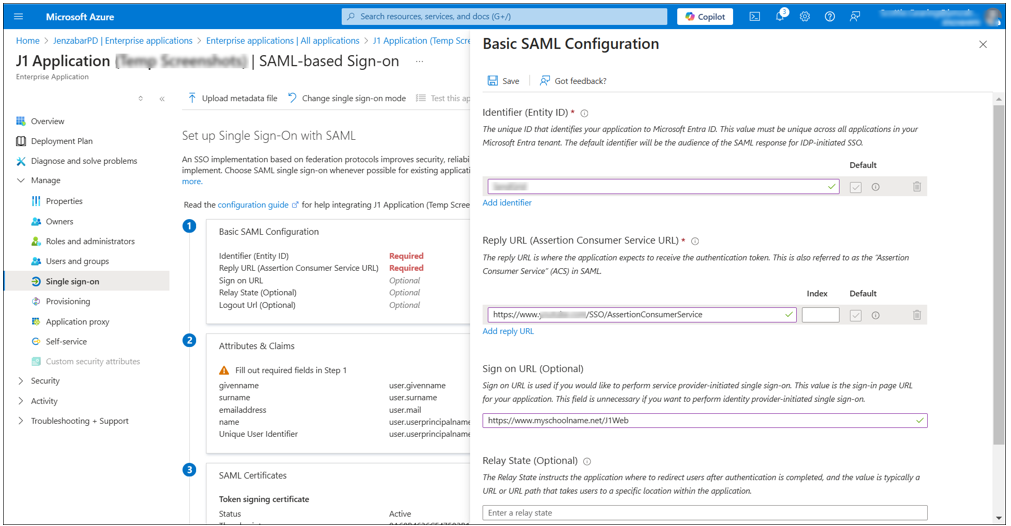
In the Identifier (Entity ID) field, enter a unique ID that identifies the J1 Web site and how Azure will know the J1 Web site should use this SAML app.
Note
You can use the J1 Web site’s base URL as the unique identifier, but it isn’t required.
Note the identifier’s exact spelling, capitalization, and punctuation so it can be entered the exact same way in J1 Web later in the process.
In the Reply URL field, enter the base J1 Web URL followed by /SSO/AssertionConsumerService. This URL is not visible to users.
Tip
https://myschoolname.net/J1Web/SSO/AssertionConsumerService
In the Sign on URL field, enter the J1 Web URL that will be visible to users. This is typically your current J1 Web site URL. For example, https://myschoolname.net/J1Web.
In the Logout URL (Optional) field, enter your base J1 Web URL followed by /SSO/SingleLogout. For example: https://myschoolname.net/J1Web/SSO/SingleLogout.
Click the Save button. The Base SAML Configuration window closes and the SAML-based Sign-on page appears.
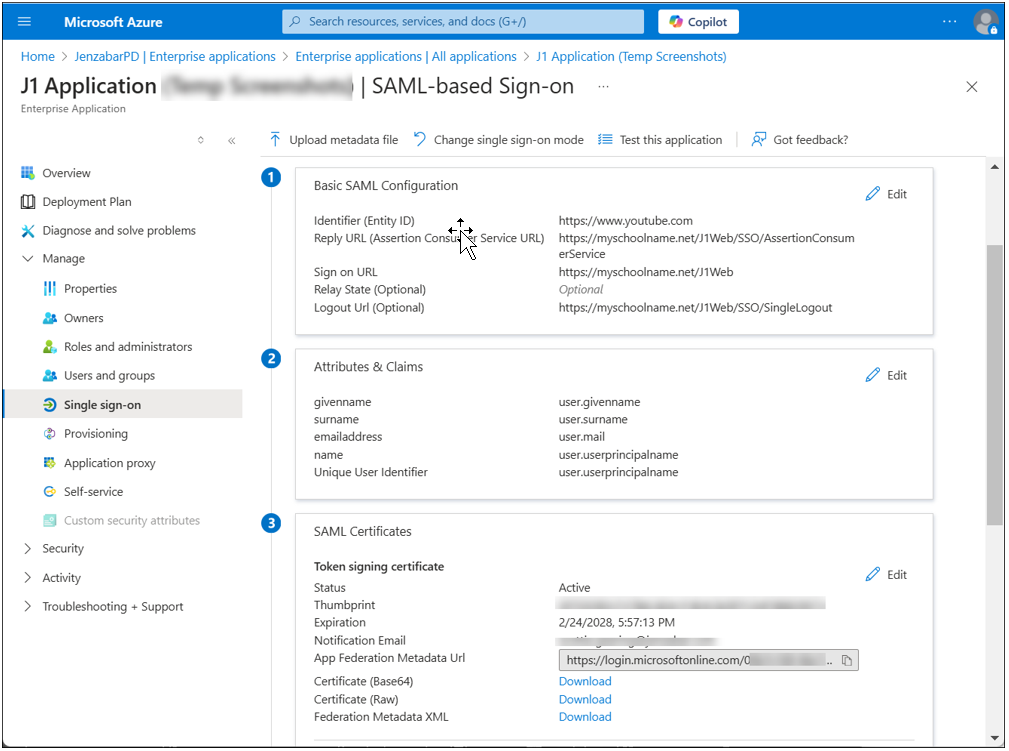
Review the information in the Attributes & Claims section.
If you plan to “"match” or uniquely identify users based on their user principal name (UPN), no changes are needed. By default, Microsoft uses UPN as default unique user identifier.
If you plan to identify users based on their J1 ID number:
From the Attributes & Claims section, click the pencil Edit icon. The Attributes & Claims page appears.
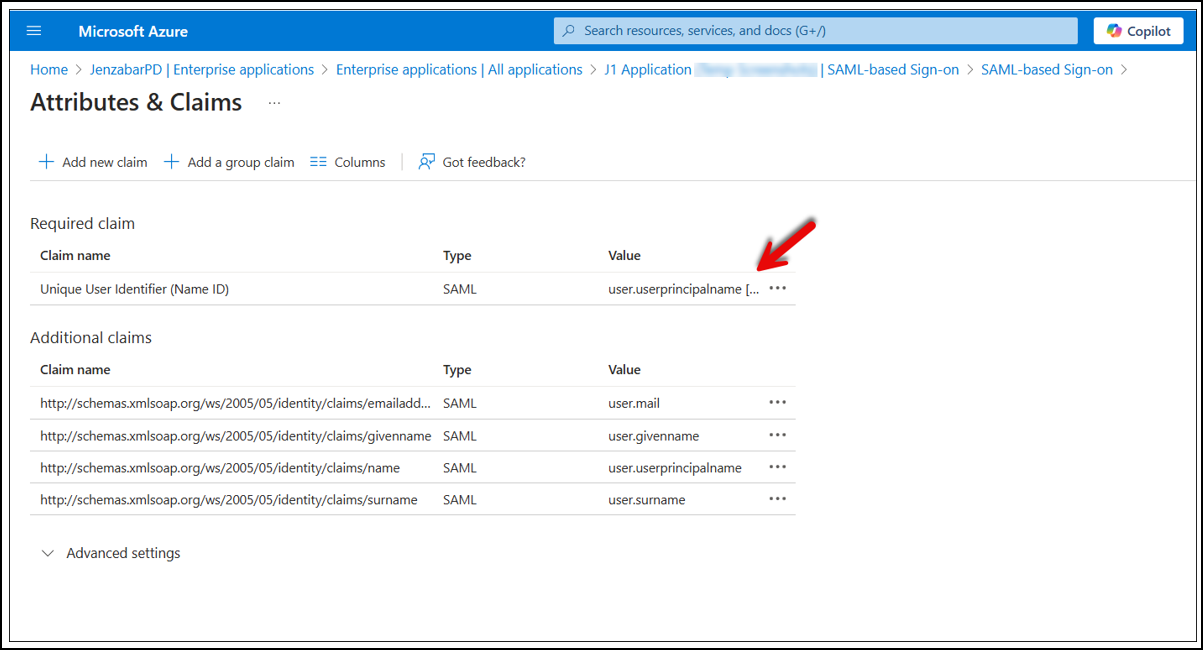
Change the Unique User Identifier (Name ID) claim from user principal name to the attribute in your AD information that holds the user’s J1 ID number. The number must be stored in the attribute by itself, with no other text or punctuation included. The identifier chosen does not affect the username users will use to login to the identity provider’s login page.
Note
If you choose to identify users based on UPN, you might need to insert this information for each user in the UserAuthentication table in the J1 database, depending on the kind of authentication your J1 Web site was configured for before enabling SSO. No records will need to be added to the UserAuthentication table when choosing to identify users on their J1 ID numbers.
Click the x icon in the upper right-hand corner. The Attributes & Claims page closes.
From the SAML Signing Certificate section, click the pencil Edit icon.
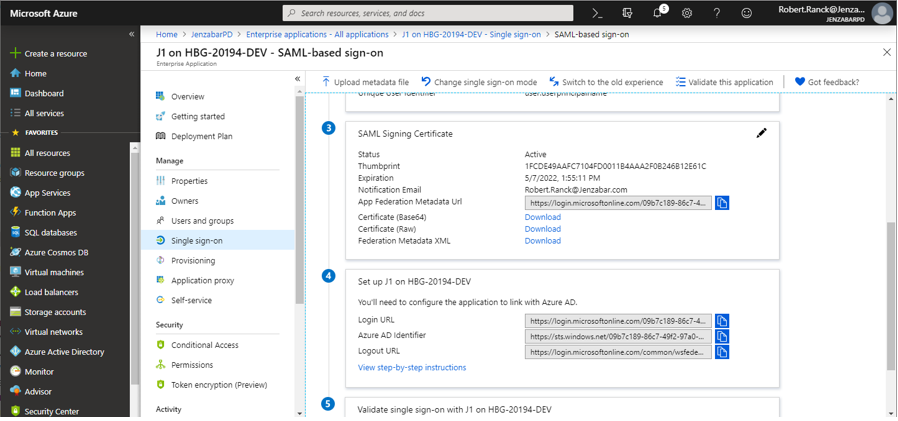
From the signing options, Jenzabar recommends selecting the following:
From the Signing Option drop-down, select Sign SAML assertion
From the Signing Algorithm options, select SHA-256
Click the Save button and then x icon in the upper right-hand corner. The SAML Signing Certificate window closes and the SAML-based sign-on page reappears.
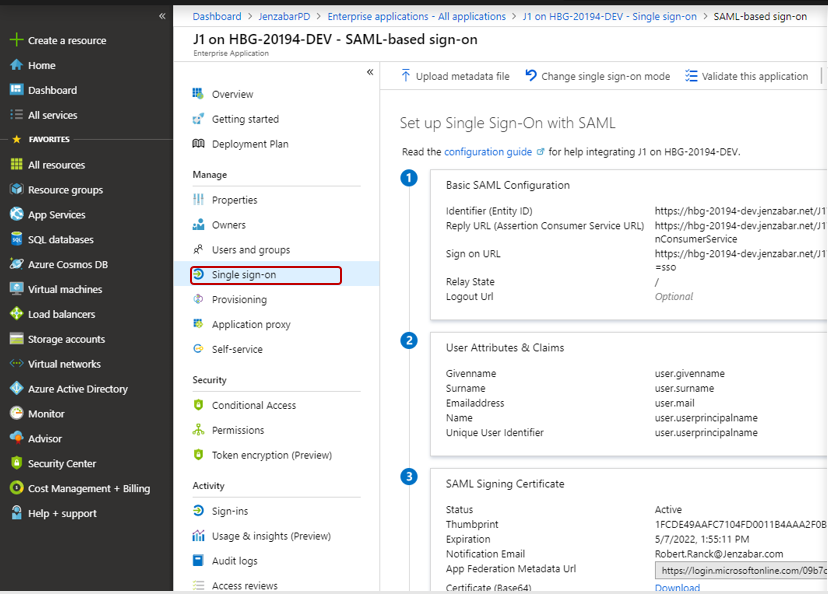
From the SAML Certificates section, click the Download link next to Certificate (Base64).
Note
Downloading steps vary according to your browser.
From the same SAML Certificates section, click the Download link next to Federation Metadata XML.
Locate the downloaded certificates and note their location. You will upload them into J1 Web later in the process.
Access http://portal.azure.com.
Log in using your Microsoft credentials. The Home page appears.
Under Manage Microsoft Entra ID, click the View button.
The Overview page appears.
From the left-hand navigation, click Enterprise applications.
The All Applications page appears.
Click the SAML app you created for your J1 Web instance in Step 1. The Overview page appears.
From the left-hand navigation, click Users and Groups.
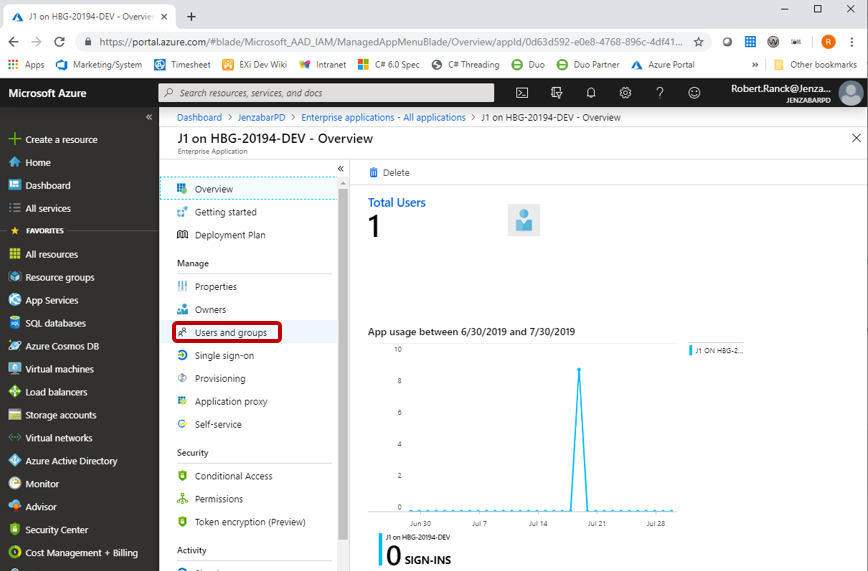
The Users and groups page appears.
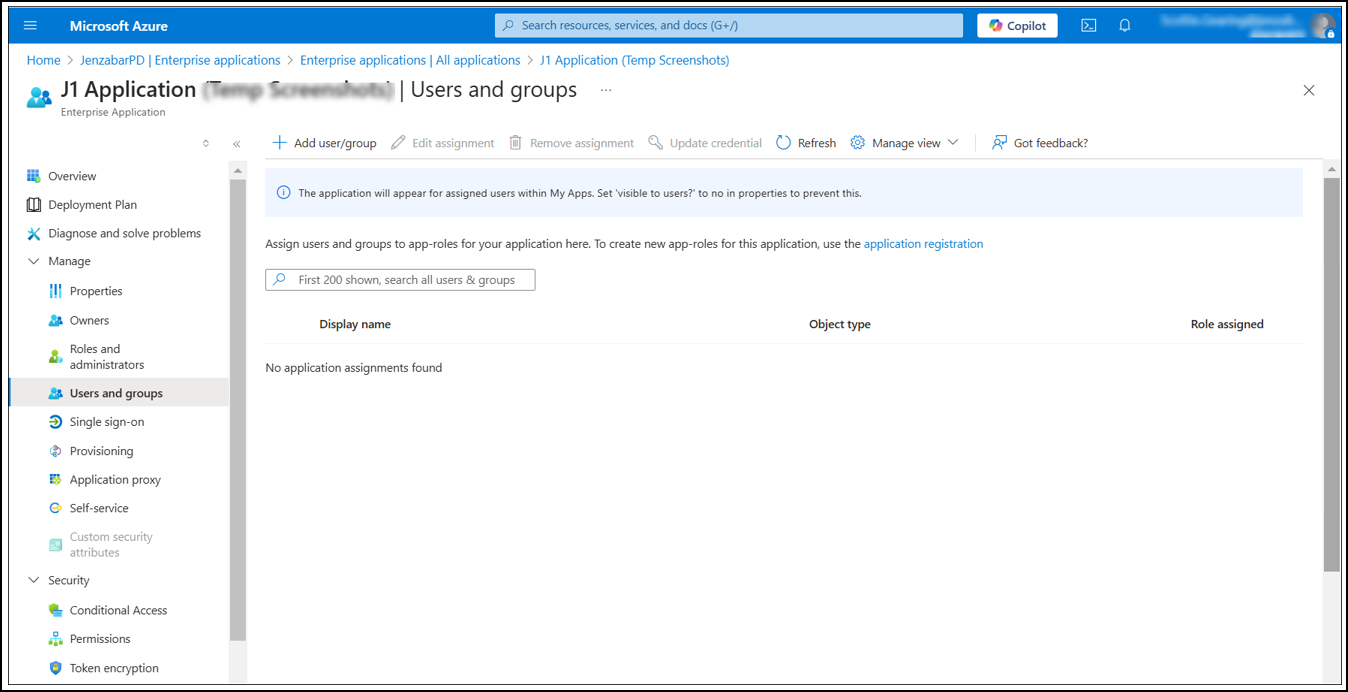
Use this page to associate your school’s Active Directory groups or individual users you want to be able to access J1 Web via SSO.
Access http://portal.azure.com.
Log in using your Microsoft credentials. The Home page appears.
Under Manage Microsoft Entra ID, click the View button.
The Overview page appears.
From the left-hand navigation, click Enterprise applications.
The All Applications page appears.
Click the SAML app you created for your J1 Web instance in Step 1. The Overview page appears.
From the left pane, click Properties. The Properties page appears.
Update the properties.
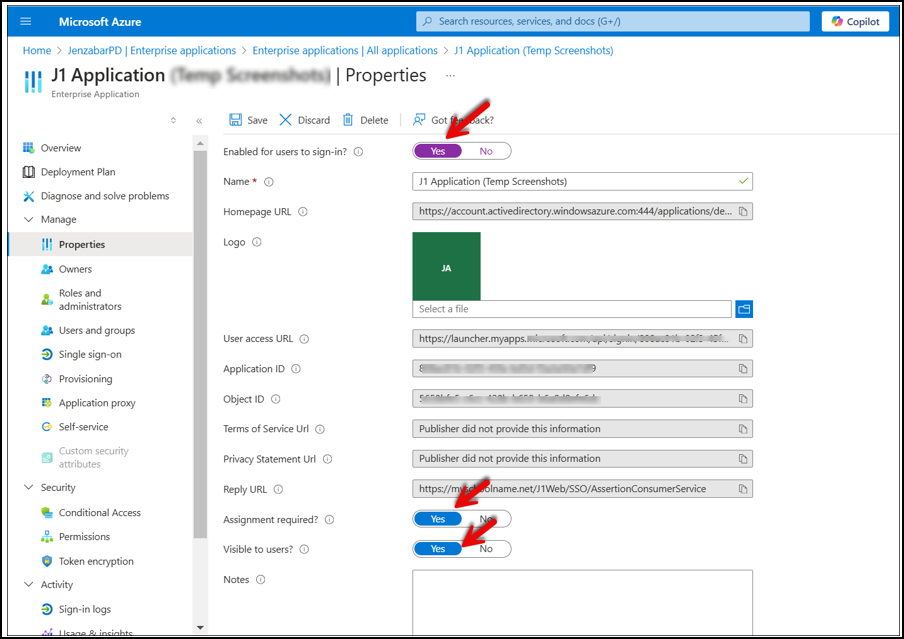
Change Enabled for users to sign-in to Yes.
Change Assignment required? to Yes.
Change Visible to users? to Yes.
Click Save.
This step configures SSO in J1 Web, System Administration.
Important
Once SSO is designated the J1 Web Sign In Method, it is immediately implemented and domain options are unavailable.
Please reference the JICS documentation for steps on how to set up your Campus Portal to work with an identity provider (JICS 2025.1 Admin Guide available on MyJenzabar).
Notice
You can assign an AD Group to your J1 users in Desktop as a convenient way of assigning users to J1 Web SSO. To do this, use the Desktop Group Definition window, Active Directory Group drop-down. Active directory groups are stored in the LDAP_GROUP_NAME table.
Log in to J1 Web as a user with System Administration Manager permissions.
Access the Core, System Administration hub.
From the Hub options under System Settings, select Product Installs and Sign In. The Product Installs and Sign In page appears.
Access the Sign In Method options.
From the Sign In Method options, select Single Sign On and click Save. The Options button appears.
Example
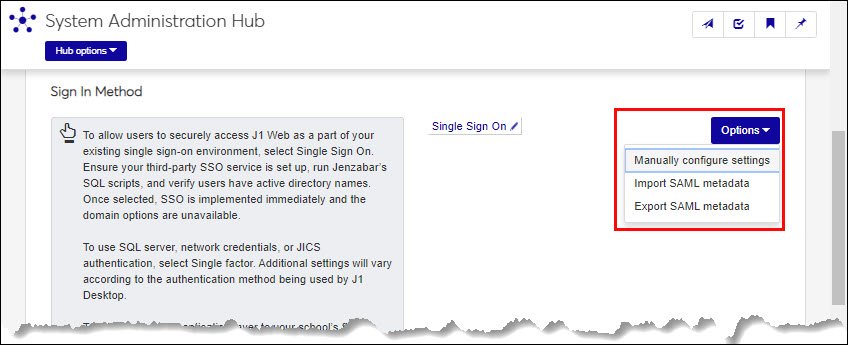
Click Options.
To import SAML communication settings and relevant URLs from an XML file, select Import SAML metadata and follow the steps below. To enter all configurations manually, proceed to Step 8.
From the Import SAML Metadata window, click the Import button. The Import SAML Metadata window appears.
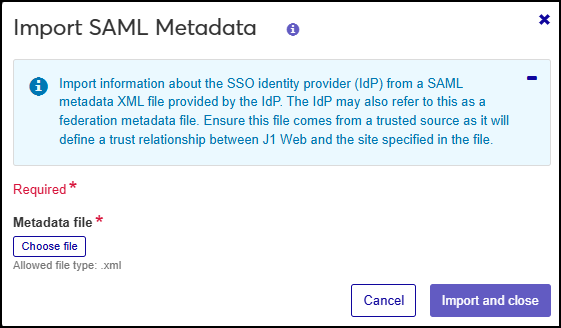
Click the Choose file button and browse to the location where your XML file is located.
Select the XML file and click Open. The Open window closes and the identity provider’s SAML communication settings and IP identifier, SSO, and launch page URLs are entered in J1 Web.
From the Options menu, select Manually configure settings. The Single Sign On window appears.
Verify the information imported correctly.
From the Signing Certification option, click Chose file.
Upload the Azure signing certificate file you downloaded in Step 1.
Click Save. The Single Sign On window closes, and the login method is updated immediately.
If you are uniquely identifying users by UPN, proceed to Step 9.
To enter SAML communication settings and relevant URLs, select Manually configure settings. The Single Sign On window appears.
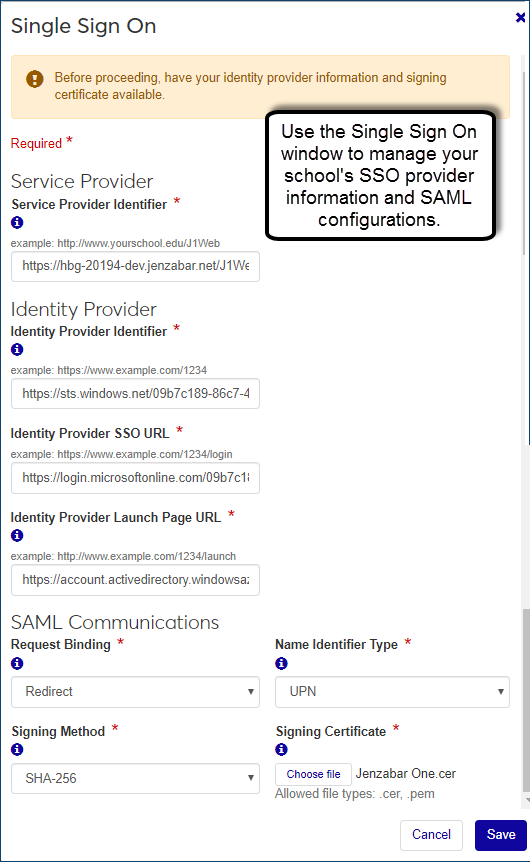
In the Service Provider Identifier field, enter the name you want to use to identify your J1 Web site in the SSO environment. This serves as the name your users will see in the SSO environment. This entry must match Step 20 in the "Set Up the SSO Application in Azure" section.
Caution
This must be spelled, capitalized, and punctuated exactly as it is in your identity provider’s configurations.
In the Identity Provider Identifier field, enter your identity provider’s name/identifier information. This establishes the identity provider and is commonly the identity prover’s base URL. You can copy and paste the Azure AD Identifier from the Azure portal Set up section.
Caution
This must be spelled, capitalized, and punctuated exactly as it is in your identity provider’s configurations.
In the Identity Provider SSO URL field, enter the URL your identity provider generated for redirecting J1 Web users. Logged in users are authenticated and redirected to J1 Web. Users that are not logged in are redirected to a sign in page.
In the Identity Provider Launch Page URL field, enter the URL your identity provider generated to appear when users sign out of J1 Web. This page typically shows the logged-in user links to all their SSO-enabled sites.
If your identity provider does not offer such a page, then this should be the URL for any identity provider page that offers a logout option.
From the Request Binding drop-down, select the SAML request binding method your identity provider is configured to use. If no default is provided, Post.
From the Name Identifier Type drop-down, select the type of SAML response that will be used to identify the authenticated user. This could be the J1 ID Number or UPN. If you choose to use UPN, make sure to review step e below.
Caution
This needs to match the information supplied by the identity provider as the user’s unique identifier (NameID claim).
From the Signing Method drop-down, select the hashing algorithm that will be used to sign responses. Jenzabar recommends SHA-256.
Caution
This must match the Azure configuration in "Step 1: Set Up the SSO Application in Azure".
Upload your Signing Certificate by clicking Choose file. This certificate validates signed information from the identity provider.
Note
This is the certificate downloaded in Step 31 of the "Set Up the SSO Application in Azure" section.
Click Save. The Single Sign On window closes, and the login method is updated immediately. If you are uniquely identifying users by UPN, proceed to Step 10.
Enter the SSO Reauthentication Interval configurations in the Minimum Reauthentication Level and Maximum Reauthentication Level fields. Authentication checks will happen no more frequently than the minimum and no less frequently than the maximum.

If you are uniquely identifying users by UPN, you must ensure the UPN information is in the J1 UserAuthentication table. When UPN information is entered in the APP_USER.DIRECTORY_SERVICE_USERNAME column, a trigger creates or updates the required row in the UserAuthentication table (the J1 LDAP Synch job).
If you are a Cloud Services client, they usually handle this verification for you.
If you are not a Cloud Services client, you can check the APP_USER.DIRECTORY_SERVICE_USERNAME field using the Desktop Users window.
If advanced authentication has not been previously configured for J1 Web, you must ensure the UPN information is also entered into the UserAuthentication table in the J1 database.
This must be done via SQL and requires the following:
ProviderAppID must be –35
ApplicationUserAppID field must have the user’s AppID
UniqueIdentiferString field must include the user’s UPN
Attempt to access your J1 Web environment with the following appended: ?ssoOverride=sso.
If the environment is configured correctly, you will be redirected to the SSO identity provider login page.
If you are already logged into the SSO environment in the current browser session, or if Azure is able to log you in based on the Windows environment, the login page will be bypassed and you can proceed to the next step.
Login using the appropriate AD credentials. If the logged-in J1 Web page appears, then the full SSO process was successful.
If an error page appears indicating there is a problem logging the user in, then the SSO communications likely succeeded, but there is an issue with the user’s configuration in J1 Web. To troubleshoot, verify the following on the Desktop Users window.
User information in the Active Directory column (Desktop Users window) is accurate.
Active Web Login checkbox is selected for the user.
Notifying your end users about the new SSO feature and changes in your school’s new sign and out processes helps eliminate questions. The following outlines information you may want to share with your users, but this is high-level information varies according to your school’s implementation.
Share information about the new sign in page to be used to verify their credentials
Detail how they sign in (e.g., bookmark, link, shortcut, link to the launch page, etc.) impacts whether or not they see the J1 Web or Campus Portal page they want to access or the new launch page where they can then access J1 Web and the Campus Portal
Describe the sign out process. Let users know the only completely reliable way to close down an SSO environment is to close the browser
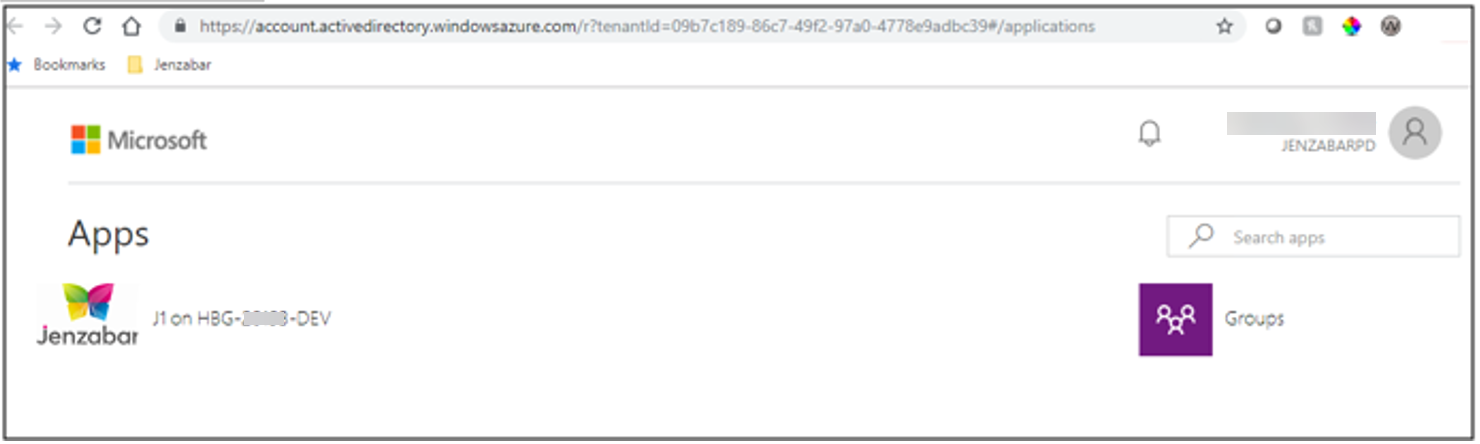
Sample login page:
SSO increases online security as users commonly use similar or identical passwords for J1 Web and JICS, which means both accounts are compromised if one of them is subject to a security breach. The SAML protocol allows for SSO communications that are not signed with a certificate. This approach is not secure, but SSO is secure when appropriate signing is turned on (as done in these instructions).
If the user receives a J1 Web or JICS login error message, you know the issue isn’t with the identity provider. Use standard J1 Web and JICS login troubleshooting techniques. If the log in issue is with the identity provider, review the login history. For additional help with login issues, contact the Jenzabar Services Team.
Browser requirements will vary according to your school’s identity provider. For a full list of Jenzabar J1 Web supported devices, please see the Jenzabar Device Support Statement (https://www.myjenzabar.net/ICS/icsfs/Jenzabar_Device_Support_Statement.pdf?target=0e84ef50-0944-4ee1-b02a-0c5f16169406) on MyJenzabar.
Usernames and passwords are still managed in your school’s active directory server.
They can log in to each role using separate user IDs and passwords, based on their current access as a staff or student accordingly.
If JICS and J1 Web use the same SSO provider and they tell the provider to log out, yes. Once a user logs out of the identity provider, JICS and J1 Web time out on their own (according to how a school sets them up).
From the Options drop-down, select Manually configure settings. You can see the communication information and URLs on the Single Sign On window that appears.
When you import SAML metadata, any identity provider information that already existed in the system is replaced by the information in the new XML file.
Verify the metadata file you're importing is in an XML format.
Verify your identity provider exports into the SAML metadata format.