The Institutional Research process allows you to collect and extract data for various reports required by your institution and the Federal Government. The process uses selection parameters to create a Snapshot of data for these various reports. The Create/Work with Snapshots window is the gateway to working with Institutional Research Snapshot of data already collected in the Registration module and to collecting data for a new Snapshot. Data collected in this process is used to generate data for IPEDS reporting. You can define snapshot parameters, collect student data, and access student data.
When the Create/Work with Snapshots window is opened, no Snapshots are displayed.
· If you want to work with a previously created Snapshot:
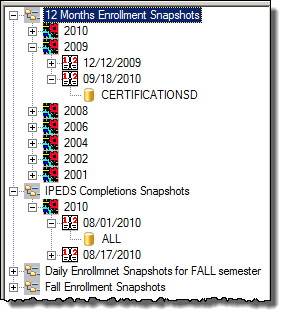
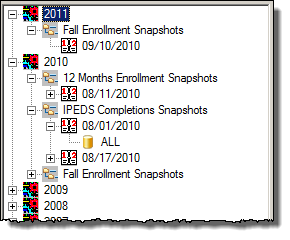
o You can click the Retrieve button to display all Snapshots in the Tree based on whether you select Purpose (default) or Report Year as Level 1 in the Tree.
o You can enter filter parameters to display particular Snapshots.
o When you click on a Snapshot Date in the Tree, the details of the Snapshot are displayed in a report format.
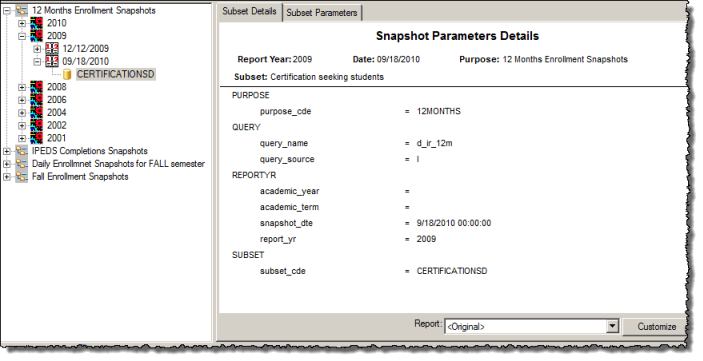
o When you click on a Subset in the Tree, the Subset Details tab displays the parameters used to create the selected Subset.
· If you want to create a new Snapshot:
o You can use the Step-by-Step Wizard. The Step-by-Step Wizard is used by selecting the Use Step-by-Step Wizard checkbox before you click the Create a New Snapshot button.
o You can use the Subset Parameters tab and subtabs on the Create/Work with Snapshots window. If you do not select the Use Step-by-Step Wizard checkbox when you click the Create a New Snapshot button, the Snapshot Subset tab and subtabs contain no parameter values, which allows you to select those values for the new Snapshot.
When you create a new snapshot, a row is created in the IR_SNAPSHOT_DEF table that stores the Report Year, the Snapshot Date, and the Purpose Code and generates a number (Snapshot ID) that is the key of the table and is a key to all of the data associated with this snapshot.
The Parameters are stored in the IR_COLLECTION_PARAMETER table. The keys to this table are the Snapshot ID, a Window Identifier Code (associated with each wizard prompt), Subset Code, and a Sequence Number. You can view the values stored in the IR_COLLECTION_PARAMETER table for each Subset Code on the Subset Parameters tab when a Subset Code is selected in the Snapshot tree.
When you click the Collect Student Data button, the student data is collected and stored in the IR_STUDENT_DATA table. For each row written in the IR_STUDENT_DATA table, a row is inserted into the IR_STUDENT_DATA_UDF table. The keys to this table are Snapshot ID and ID Number. For a Snapshot, only one row is written in each table for each student.
· If you are collecting Fall Enrollment data, the data for Part E and Part F is stored in the IR_IPEDS_SNAPSHOT_EXT table via the Additional IPEDS Data tab. You may use the Populate Part E button to collect data for Part E if you have a snapshot from the previous year to use; otherwise, enter the data manually. The data for Part F must be entered manually.
· If you are collecting GRS data on the Graduation Rate Survey subtab on the Additional IPEDS Data tab when a Snapshot Date is selected in the Snapshot tree, the GRS data is stored in the IR_IPEDS_GRS table and a row is inserted into IR_IPEDS_GRS_UDF.
· If you are collecting Completions data, the process inserts a row into the IR_STUDENT_DATA and the IR_STUDENT_DATA_UDF tables. Then the student Completions data is inserted into the IR_IPEDS_COMPLETIONS table. More than one row may be created in the IR_IPEDS_COMPLETIONS table for each student and Snapshot ID
The following options may be available in the Subset Actions group box, depending on the selection you made in the Tree and the tab/subtab on which you are working:
![]() Work with Student Data for the Selected Snapshot
link
Work with Student Data for the Selected Snapshot
link
![]() Delete Selected Snapshot button
Delete Selected Snapshot button
![]() Use Step-by-Step Wizard checkbox
Use Step-by-Step Wizard checkbox
You can determine how you want Snapshots displayed in the Tree by using the criteria and buttons in the header of this window.
· Level 1 is determined by the radio button you selected in the Level 1 in Tree group box (example). When you click on Level 1, no details are displayed.
· Level 2 is determined by the radio button you selected in the Level 1 in Tree group box (example). When you click on Level 2, no details are displayed.
· Level 3 is the Snapshot
Date. An associated green calendar con (![]() ) indicates
that data has been collected for the Report Date. If the associated calendar
icon is yellow (
) indicates
that data has been collected for the Report Date. If the associated calendar
icon is yellow (![]() ), no data
has been collected or no data is able to be collected.
), no data
has been collected or no data is able to be collected.
o If data has been collected, the report is displayed on the Details Report tab and the Report drop-down is populated with all report names like 'r_snapshot_details%. The following functionality may be available for your use in the Snapshot Actions group box: Delete Selected Snapshot, Copy Selected Snapshot, Use Step-by-Step Wizard, and Create New Snapshot. You can also Collect Student Data.
o The Additional IPEDS Data tab stores data that needs to be reported to NCES for the First-time Bachelor's Cohort Retention Rates (Part E) and the Student-to-Faculty Ratio (Part F). The following functionality may be available for your use in the Snapshot Actions group box: Delete Selected Snapshot, Copy Selected Snapshot, Use Step-by-Step Wizard, and Create New Snapshot. You can also Collect Student Data.
· Level 4 is the Snapshot Subset. When you click on a Snapshot Subset in the Tree:
o The Subset Details tab displays parameter details for that Snapshot. The following functionality may be available for your use in the Snapshot Actions group box: Delete Selected Snapshot, Copy Selected Subset, Use Step-by-Step Wizard, Create New Snapshot, and Modify Selected Subset. You can also Collect Student Data.
o The Subset Parameters tab displays the parameters on 3 subtabs that were used to collect student data for the Snapshot.
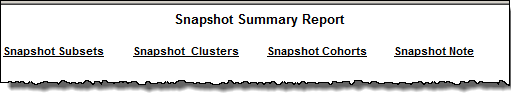
The Snapshot Summary Report is displayed when you select a Snapshot Date in the Tree. It displays Snapshot Subsets, Clusters, Cohorts, and any Notes for the selected Snapshot Date. Various options are available for your use.
If you select a Purpose of IPEDS Fall Enrollment/GRS and select a Snapshot Date in the Tree, the Snapshot Summary Report is displayed in the Details Report tab and the Additional IPEDS Data tab is available.
This tab is displayed and populated with data needed by IPEDS reports if you select a Purpose of IPEDS Fall Enrollment/GRS and select a Snapshot Date in the Tree. The IPEDS data is stored and displayed on the two subtabs: Fall Enrollment and Graduate Rate Survey.
When you click on a Snapshot Subset in the Tree, the Snapshot Details tab displays parameter details for that subset. Various options are available for your use.
This tab is available when you select a Subset
in the Snapshot Tree. The Subset Parameter
tab displays three subtabs. Each subtab parameters used by the Collect
Student Data process and the functionality of each is displayed when you
click the ![]() (information) button available
on each subtab. Each subtab corresponds to a part of defining a Snapshot
and selecting parameters for a Subset of that Snapshot:
(information) button available
on each subtab. Each subtab corresponds to a part of defining a Snapshot
and selecting parameters for a Subset of that Snapshot:
· Part I: Selecting Key Values
· Part II: Selecting Students for Processing
· Part III: Populating Student Data (Calculate Tuition and Fees and Calculate Financial Aid group boxes are available based on Tasklist security)
When you click an Edit button, a window is displayed that allows you to add or change a parameter. If an Edit button is not available, that parameter is not available for the selected Snapshot Purpose. When you click a Clear button, any selected parameters in that group box are cleared.
The subtabs on this window and the windows opened by clicking the Select/Edit buttons are the same windows and use the same logic as the Step-by-Step Wizard.
![]() Create parameters for a new Snapshot/Subset
Create parameters for a new Snapshot/Subset
![]() Modify parameters for an existing Snapshot/Subset
Modify parameters for an existing Snapshot/Subset
![]() Collect Student Data for a Subset
Collect Student Data for a Subset
![]() Work with Student Data for a Snapshot
Work with Student Data for a Snapshot
Collect data for IPEDS Fall Enrollment/GRS Reports
Collect Data for IPEDS Outcome Measures Reports
Generate an IPEDS 12-Month Enrollment Report
Generate an IPEDS Completions Report
Generate an IPEDS GR200 Report
Generate Data for the Gainful Employment Report
Generate an IPEDS Outcomes Measures Report
Institutional Research Process
IPEDS and Regulatory Reporting Setup
Institutional Research Student Data Records
Institutional Research Student Data Reports
Institutional Research Parameter Collection Windows