This subtab on the Course tab of the Courses (Non-Traditional) window is very similar to the Master 1 subtab on the Course tab of the Courses window. See that topic for details.
Short Title 1 and Short Title 2
This course is taught In-District (check box)
This is a CBE course (checkbox)
Available only for schools with the Competency Based Education (CBE) license. Turn on CBE on the Registration Configuration window.
Your school may use a different name for CBE. The name is set on the Registration Configuration window.
Grading Method: This display-only field shows how grades for competencies relate to the course grade.
Roll Down: The course grade is automatically copied to each of the required competencies.
Roll Up: Grades for the required competencies are used to calculate the course grade.
None: Course grades and competency grades are not related to each other.
The time spent on a course in a term. At some schools, this corresponds to 45 hours per credit hour, so a 3-credit course would be 135 clock hours. Federal or state guidelines may vary.
Number of Weeks this Course Meets
When this checkbox is selected, sections created from this catalog course are CBE sections by default. Users in J1 Web can assign CBE elements to CBE courses and CBE sections.
This checkbox is not editable here. To change this setting, use the Manage Course Details page | Course Demographics tab in the J1 Web Registration Administration hub.
This view-only field comes from the Manage Catalog Courses window in J1 Web: Grading Controls view, Grading Method field. There, you can select one of these options:
Roll Up: The instructor grades the required competencies. These grades are automatically averaged to calculate the student's section grade.
Roll Down: The instructor grades the section. The section grade is automatically applied to each competency, as well.
None: The competencies might or might not be graded, but their grades have no relationship to the section grade, to GPA, or to other calculations for a student's record.
State Location
Remote Location (appears for schools licensed for Texas State Reporting)
Course Exempt from Drop Limit (check box)
The course's availability for a term. The possible states are these:
· Draft
· Published
· In progress
· Pending completion
· Completed
· Canceled
![]() |
The Status column in the Courses (Non-Traditional) window???but not in the Courses window???previously also had values of 'Preliminary' and 'Delivered'. They're replaced in the Current State column with 'Draft' and 'Completed'. |
The values come from SECTION_MASTER_V.COURSE_STATE. Here, they're display only, and they're calculated from the SECTION_MASTER_V view using values that come from the YEAR_TERM_TABLE (the Year Term Subterm window) and SECTION_MASTER (the Courses or Courses Non-Traditional window).
![]() |
Previously, the values were in the Status (SECTION_STS) column along with the enrollment status values 'Full' and 'Open'. Today, they are in the Current State column. If anything depends on finding these values in SECTION_STS, you need to remap to the new location. The 'C' (Canceled) value is commonly used in custom work such as · Reports · Forms · Queries · Triggers · Stored procedures · SQL scheduled jobs · Third-party applications |
![]() |
Edit your custom reports, forms, queries, etc. so that instead of looking at SECTION_STS for the value of 'C', your code now looks at the CRS_CANCEL_FLG column for a value of 'Y'. The values are · Y (canceled course) · N (non-canceled course) |
![]() |
When you edit the Instructor column, a pop-up message asks you to confirm that you want the instructor to be flagged as Lead Instructor in the Faculty Load table. Your edits are reflected in the Schedule and Faculty tabs, too. |
If the instructor has a conflict, a pop-up window notifies you.
Course Planner (Name and ID)
Project Code: a number used by the General Ledger module to track information kept in the Transaction History table
Request Number - This column displays a system-generated number that is used by the Telephone Registration module.
Session
![]() |
A Project Code can be associated to one or more courses that will allow cost analyses to be performed on the entire project. When a course is created, a prompt asks if you wish to create a project code. If you click Yes, the Section Master Request Number will be used as the Project Code and the Year, Term, Course Code and Description will be used as the Project Code Description. If you decide to assign a Project Code after the course has already been created, choose Generate Project Code from the right-click or Options menu in the Project Code column. If Project Security has been activated in G/L Configuration and the user is not assigned to the appropriate security group, not all projects may be visible. |
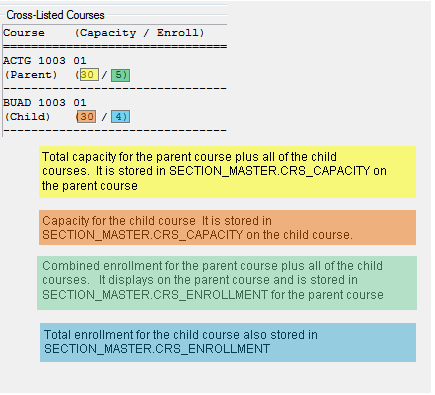
If this course uses a parent/child course
relationship, the Cross-Listed Courses
section displays information about that course. Click here
for an example.
![]() |
You may choose to have the Child course capacity equal to the Parent course capacity as shown in the example above. If you do that, it means that 30 students could register for BUAD1003 01 and there would be no seats available for a student attempting to register for ACTG 1003 01. If you wish to ensure that students can get seats in both sections, then make the course capacity of the Child course less than the course capacity you define for the Parent course. |
Select the checkbox to cancel the course section. You can edit the date, and you can add a reason. The course isn't canceled until you click Save on the main menu.
Students who have completed the course aren't affected by the cancellation.
If there are students enrolled who haven't completed the course, a pop-up asks whether you want to drop them.
Attendance reporting is a feature of J1 Web Registration. Faculty submit attendance reports, and the registrar processes the reports. On the J1 Web Registration Settings page, your school can turn on two categories of attendance reporting:
§ Census Date (who never attended or who is no longer attending as of the course census date)
§ Checkpoint (who is and is not present for a particular class meeting)
Here, you can exclude the selected course from either Census Date or Checkpoint reporting or both.
Checkboxes:
§ Exclude Course from Census Date Reporting
§ Exclude Course from Checkpoint Reporting
Status: (Display only) The enrollment status for this section of the course; that is, the current availability of seats. The possible values are 'Open' and 'Full'. The value is calculated from the current enrollment and the course capacity.
![]() |
If you need to declare a course full even though its capacity hasn't been reached, change the Course Capacity to match the current enrollment. Then the Enrollment Status will be 'Full'. |
Course Capacity: Enter the total number of students who can register for this course in the Course Capacity column.
Max Enrollment: Enter the Maximum number of students allowed in the course.
Min Enrollment: Enter the minimum number of students allowed for the course to be held.
Allow Waitlisting in this course: If your school uses waitlisting, this flag allows you to set individual courses to use or not use waitlisting. The column is selected by default. Clear the checkbox to deactivate waitlisting for this course. If you do not use waitlisting, this checkbox will not be available.
Allow course to be dropped: This is selected by default. If you wish to stop students from dropping courses online, you must clear this checkbox for the appropriate courses.
Estimated: Displays the figure from the Course Budget window (Projected). This number is used to calculate budget expenses and revenue when items attached to the course use "Enrollment" as the Basis.
Enrollment Type: If the Enrollment Type has been identified on the Table Detail (CRS_ENROLL_TYPE), the values will be available on the drop-down list from this column.
Enrollment Deadline: Enter a deadline date.
Use these controls to designate a course section as Open Entry. If you allow Open Entry, you can also allow Open/Early exit. Here you also set the Open Entry section's Registration Cutoff and Max Days Duration.
Allow Open Entry (checkbox): Select this to allow students to enter the course outside of the normal registration period.
Allow Open/Early Exit (checkbox available only if Allow Open Entry is selected): Select this to allow students to complete the course at a time other than the course end date.
Registration Cutoff: Select a number of calendar days before the term's end to cut off Open Entry. The Registration Cutoff must be less than the Max Days Duration.
Max Days Duration: Select a number of calendar days students can have to complete the course.
Once a catalog course or section has been designated Open Enrollment, it can be edited only in J1 Web. |
These columns are not editable since the details are obtained by counting all of the C (current), P (pre-registered), R (reserved), and H (history) rows from the Student Course History table. These are then added to create the course enrollment figure.
Total - This column displays the total number of students registered for the course.
Waitlisted - This column displays the number of students who are Waitlisted for this course.
Pre-registration - This column displays the number of students who are pre-registered for this course.
Reserved - This column displays the number of seats reserved for this course.
Current - This column displays the total number of current registrations for this course.
History - This column displays the total number students previously registered for this course.
First Begin Date - This column displays the beginning date of the course for the section.
Last End Date - This column displays the ending date of the course for the section.
Through this date, students can use the Student Registration feature on the campus portal to withdraw themselves from the course section. After this date, students can't withdraw themselves from the course section.
If the Last Student Withdrawal Date is blank, students can't withdraw themselves. |
|
If the Census Date is blank, the Last Student Withdrawal Date is automatically blank, too, and students are blocked from withdrawing themselves from the course section. |
Last Withdrawal Passing Date: The last date students can receive a withdrawn-passing grade.
Course Duration - The Course Duration is automatically calculated based on the earliest and latest dates for this section by using the Term Begin Date and Term End Date from the Year/Term Table.
If you use Census Dates but want this column to be empty for a particular course, select the Allow Census Date Changes on Section checkbox on the Registration Configuration window and delete the J1-generated Census Date for the selected course. However, if any changes are made to the course on the Schedule tab, a Census Date is again automatically created. You must return to the Master 1 tab and remove the date.
A census date is needed if you allow students to withdraw themselves from this course on the campus portal. A census date is needed also if you use attendance reporting for the course.
If the Census Percentage is 0.00 and the Census Date column is blank on the Year/Term/Subterm window, the Year Term Begin Date will default into the Census Date column on the Section Schedule window. If the Census Percentage is 0.00 and the Census Date column contains a date on the Year/Term/Subterm window, this value will be placed in the Census Date column on the Section Schedule window.
The First Begin Date and Last End Date cannot be altered on this tab; you must change these values on the Schedule tab of the Courses window. Similarly, the Credits column can only be altered if Credits are set to Variable.
You can assign census dates outside the term's start and end dates. You can also assign census dates to multiple rows at once. See the Census Date topic for details.
This course is state-funded (checkbox)
Cancel a Non-Traditional Course
On the Courses Non-Traditional window, Course tab, Master 1 subtab, find the Cancellation Information group box near the bottom of the center column.
Select the Canceled checkbox. (The course isn't canceled until you click Save.)
You can edit the Date.
You can select a Cancellation Reason from the drop-down or leave it blank.
If you're sure you want to proceed with canceling the course, click Save on the main toolbar. The course is canceled. Students who have completed the course aren't affected by the cancellation.
If there are students who haven't completed the course, a pop-up asks whether you want to drop them.
If you want to drop them, click Drop Students.
If you want to keep them, click Keep Students.