![]()
Consult with your IT staff to understand how these groups are managed.
J1 Desktop works with several third-party applications including InfoMaker, which requires access J1 database information. There are two ways to handle allowing third-party applications access to J1 databases:
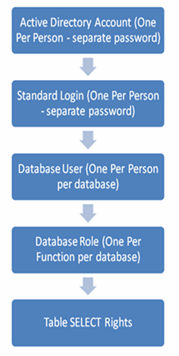
· With Standard Authentication, you can use the SQL Server login created for the user to access the J1 Desktop application. This login became a database user that you could give SELECT rights to tables directly (not preferable) or who could be made a member of a role with assigned rights (preferable). To review, the SQL Server login was mapped to a database user, which was mapped to a database role, which was mapped to SELECT rights on tables.
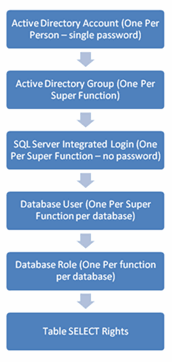
· With Integrated Authentication, you can replace or alter your security access as opposed to creating the SQL Server login and a database user for a new J1 Desktop application user. After the implementation of Active Directory with J1 Desktop, unless you removed them, your database roles and their assigned SELECT permissions remain intact. Create an Active Directory group that corresponds, one-for-one, with each database role. Review your Active Directory, you may already have such groups.
|
Consult with your IT staff to understand how these groups are managed. |
If you do not have such groups, we recommend starting each new group you create with the three letters “SQL.” This will let your IT staff know the purpose of the group is SQL Server access and that they should think carefully before adding users to the group for other non-SQL-related purposes. You may also consider creating these groups in another OU, which is created under the new J1 OU necessary for Integrated Authentication; however, be careful not to use a database name for this OU as these groups should not be database-specific.
Next, create a SQL login mapped to each of these Active Directory groups for your SQL Server. Map these new logins to your J1 databases (e.g., TMSEPRD, TMSEPLY) to create database users. Lastly, if you have been handling Standard Authentication utilizing roles, you would map the new database users to the existing database roles. Following this setup of this security infrastructure, you would add Active Directory users to the new Active Directory groups you created.
| Method | Advantage |
| Standard Authentication | The model is that it is already in place and may be viewed as a little simpler. |
| Integrated Authentication | · Once the system is set up, you never have to manage SQL Server logins again. Users have to manage one password, and this password management is moved back up to the IT staff. If a new person takes a position at your institution replacing an existing person who held that same position, all you have to do is copy the Active Directory account of the existing person to the new person. Their new account will have exactly the same group membership and privileges as the account of the existing person. As soon as the J1 synchronization job runs (by default every 5 minutes during working hours), the new person will have all the rights in the J1 Desktop application that the existing person has. · if you have two or more people doing the same function, the overhead is reduced. In the Standard Authentication model, you need a separate Active Directory account, SQL Server standard login, and database user for every person. In the Integrated Authentication model, you only need a SQL Server integrated login and database user for every function. With Standard Authentication, you needed to perform this setup for everyone needing to use the J1 Desktop application. With Integrated Authentication, you only need to perform this setup for anyone who runs InfoMaker reports. |
Integrated Authentication with Login Prompt