The Transcript Requests window allows you to enter and print manual/printed transcript requests and/or enter and send electronic transcript requests if your school is licensed for Electronic Transcripts.
The ability to generate and send electronic transcripts offers higher education institutions cost savings as well as security benefits. Several states and organizations recommend and/or mandate the use of electronic transcripts.
Two general standards have been developed for electronic transcripts:
· Electronic Data Interchange (EDI) standards were developed by the SPEEDE Committee of the American Association of Collegiate Registrars and Admissions Officers.
· XML standards were developed by the Postsecondary Education Standards Council (PESC). This standard is used by the Jenzabar J1 Registration module.
More information about both of these standards is available on the PESC website (http://www.pesc.org).
The Transcript Requests window is made up of a Student ID drop-down list, and the following tabs:
Enter or select the ID Number for which you are entering or viewing transcript requests.
Tab |
Column |
Notes |
Transcript Requests |
Displays the order in which transcript requests are generated in the system. Select this checkbox to generate this transcript request as an Electronic Transcript. If this checkbox is cleared, the transcript is generated as a printed transcript. This column is only available if the Electronic Transcript license has been applied to your machine. Displays hover text indicating whether the transcript has been generated and stored in Document Master. If stored, you can click the icon to view the transcript. This drop-down list is active if Etrans? is selected. Select the type of electronic transcript you wish to generate. This drop-down list allows you to change the transcript request status. The Status is updated automatically when a new transcript request row is created and saved and when a transcript is generated. Values are maintained on the Transcript Request Status Definition window, and can be further refined using the Transcript Request Status Reason Definition window. Displays the date and time of the most recent status change to the request. Indicates if the request is ready to print, based on the Status selection. Use the Transcript Request Status Definition window to set which statuses are ready to print. Select this checkbox if the transcript fee (if applicable) has been paid. Enter the number of copies of the transcript to be printed. Select the group of courses you want to include in this transcript. Define division groups as needed using the Division Group window. Make sure you include AL (All Divisions). Additional groupings you may wish to use are AG (All Graduate Divisions) and UG (Undergraduate Divisions), or you can create additional groups. Enter the ID Number of the school/organization/person to whom the transcript is to be sent. When the ID Number is entered, the associated Name is also displayed. Name of the destination and automatically displays once the Destination ID is selected. Destination Email Address: Enter an email address for the recipient. Not required, and the email address is not validated. Stored on the Transcript Request table (transcript_request.DestinationEmailaddress). Select the address code for the address you want to use for the Destination ID. You are also prompted to verify that you want to default this address and Organization Code into the Transcript Destination on the Transcript Generation Detail tab. |
|
Deleted Transcript Requests |
Displays the same information as the Transcript Requests tab, but only displays requests whose Status selection is "Deleted." Any applicable information on the tabs described below also appears when this tab and a deleted request is selected. |
With the exception of the Status drop-down list, updates cannot be made on this tab. This drop-down list allows you to change the transcript request status. The Status is updated automatically when a new transcript request row is created and saved and when a transcript is generated. Values are maintained on the Transcript Request Status Definition window, and can be further refined using the Transcript Request Status Reason Definition window. |
Transcript Request Detail |
Enter or select the ID number of the person or institution requesting the transcript. Requester Email Address: Enter an email address for the requester so they can be notified. Not required, and the email address is not validated. Stored on the Transcript Request table (transcript_request.RequesterEmailaddress ). Select the address type associated with the Requestor. A prompt appears asking if you want the address to appear under Requestor Address. Enter the requestor's address or choose to have it appear automatically after selecting the Address type. If appropriate, enter comments on the reason for printing the transcript. If appropriate, enter additional comments concerning the transcript. Each time the selected transcript request's status is changed, either manually with the Status drop-down list or automatically by the system, a row is added providing details about the change. |
|
Transcript Generation Detail |
Enter the destination address. You also have the option of having the address automatically appear here after selecting the Destination Address Code from the Transcript Requests group box. Enter the organization code associate with the transcript request. To look up an organization code, click the ellipses (...) button to open the Organization Master Lookup window.
Select the office sending the transcript (your office). To view or maintain the values in this drop-down list, click the ellipses (...) button to open the Electronic Transcript Source Organization Profile Definition window.
Select the appropriate contact in case there are questions. To view or maintain the values in this drop-down list, click the ellipses (...) button to open the Electronic Transcript Source Contact Profile Definition window.
Select the Source Organization Code Type to be associated with your sending organization (the one with the Organization Code of *LOCAL in the Maintain Organization Master window). If no values are displayed in the drop-down list, rows have not been created in the Organization Master Organization Code table. In that case, you should add the appropriate row in the Maintain Organization Master Organization Codes window. Click on the ellipsis (...) button to open the Maintain Organization Master Organization Codes window and add the appropriate row. This column displays the organization code (number) associated with the selected Organization Code Type for the source organization.
Select the Destination Organization Code Type to be associated with your receiving organization (the one identified by the Sent to ID Number). If no values are displayed in the drop-down list, rows have not been created in the Organization Master Organization Code table. In that case, you should add the appropriate row in the Maintain Organization Master Organization Codes window. Click on the ellipsis (...) button to open the Maintain Organization Master Organization Codes window and add the appropriate row.
This column displays the organization code (number) associated with the selected Organization Code Type for the destination organization. Select the stored procedure you wish to use to generate the transcript. If you customize the stored procedure, create a new version and append text to the name. J1 looks for stored procedures with names that start with the standard name.
Select this checkbox if you wish the destination organization to send you a TS 997 to let you know the transcript arrived. Not all institutions automatically generate and send these. |
*Appears only for electronic transcripts. **Appears only for printed/manual transcripts. ***Appears only for EDI transcripts. |
Electronic File Detail (EDI transcripts) |
This column displays a unique transcript identifier. It is also used as the file name of the EDI file created if an Official Transcript is successfully produced. The file name is populated by the Electronic Transcript process only if an Official Transcript was created and the user answered "Yes" to the prompt to mark the row as Printed?. Only those files with a value in this column (Document ID) should be regarded as Official. This column is populated with the path to the folder where the EDI file was created. It is populated if an Official Transcript is successfully produced. It is populated by the Electronic Transcript process only if an Official Transcript was created and the user answered "Yes" to the prompt to mark the row as Printed? These items are extracted from the generated transcript and saved here for reference in determining the exact transcript being referenced when the receiving institution sends an acknowledgement or when troubleshooting the transcript. o Interchange Control Number (ISA13) o Function ID Code (GS01) o Group Control Number (GS06) o Transaction Set ID Code (ST01) o Trans Set Control Number (ST02) o Beginning Segment Reference ID (BGN02) o Reference ID Qualifier (REF01) o Reference Identifier (REF02) o Course Segment Count o Degree Segment Count o Last SUM Segment Before LX o First IN2 Segment |
|
Electronic File Detail (XML transcripts) |
This column displays a unique transcript identifier. It is also used as the file name of the XML file created if an Official Transcript is successfully produced. The file name is populated by the Electronic Transcript process only if an Official Transcript was created and the user answered "Yes" to the prompt to mark the row as Printed?. Only those files with a value in this column (Document ID) should be regarded as Official. This column is available for you to enter any tracking ID that may be returned from the receiving organization. This column is populated with the path to the folder where the XML file was created. It is populated if an Official Transcript is successfully produced. It is populated by the Electronic Transcript process only if an Official Transcript was created and the user answered "Yes" to the prompt to mark the row as Printed? These items are extracted from the generated transcript and saved here for reference in determining the exact transcript being referenced when the receiving institution sends an acknowledgement or when troubleshooting the transcript. Displays the number of courses is the transcript. Displays the number of academic awards in the transcript. Displays the student's name.
Displays a summary of the information in the transcript. |
|
Process
and generate a printed transcript from a transcript request
The print transcript can be processed from the Transcript Requests window. It can also be generated from the Transcript Report window.
To Add/Process a transcript request:
1. Select the Student ID Number.
2. If necessary, right-click and select Add Row to add a Transcript Request row.
3. If a fee is charged and has been received, select the Paid? checkbox.
4. Enter the number of copies in the # of Copies column.
5. Select the Division Group to indicate the group of courses you want to include in the transcript.
6. Enter the Destination ID number (you can start typing the name to get the ID number in the drop-down list).
7. Select the address type from the Destination Address Code drop-down list. A prompt appears asking if you want the address to automatically appear as the Transcript Destination on the Transcript Generation Detail tab.
8. On the Transcript Request Detail tab, optionally, you may do the following:
a. Enter the Requestor ID Number (you can start typing the name to get the ID number in the drop-down list).
b. Select the requestor's address type from the Address drop-down list. A prompt appears asking if you want the address to automatically appear as the Requestor Address.
c. Enter an address, or edit the populated address, in the Requestor Address fields.
d. Enter the reason you are creating this transcript request in the Reason for Request box.
e. Enter any comments, in addition to system-generated comments.
Each time the selected transcript request's status is changed, either manually with the Status drop-down list or automatically by the system, a row is added to the Status Tracking grid providing details about the change.
9. On the Transcript Generation Detail tab,
a. Optionally, you may do the following:
i. Enter an address, or edit the populated address based on your Destination Address Code selection, in the Transcript Destination fields.
ii. If the Destination ID has an organization code defined, it will appear. To look up an organization code, click the ellipses (...) button to open the Organization Master Lookup window.
10. Save your changes.
11. Click
the Print Transcripts button
to generate the transcript.
To generate the print transcript:
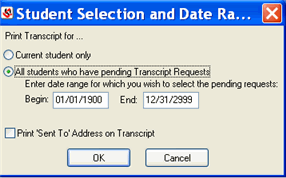
1. If multiple transcript requests exist when you click the Print Transcripts button on the Transcript Requests window, the Student Selection and Date Range popup window is displayed.
2. Select the appropriate radio button (Current student only or All students who have pending transcript requests). If you select the All students who have . . . radio button, enter a date range.
3. If you want to print the destination address on the transcript, select the Print 'Sent to' Address on Transcript checkbox.
4. Click the OK button to open the Transcript Report window.
5. If necessary, make changes to the options on the Transcript Report window.
6. Click the Print button. The following processing occurs:
o If Holds exist, you must resolve them before the process continues. If no holds exist and you selected the Save a Copy to Document Master checkbox, the Select Document Type and Owner window appears. Select the type of document you want to generate and the owner, and click the Select button.
o The output is checked for errors. If no errors are detected, the file is ready to print.
o When the Official transcript has been generated, the following message is displayed: "One or more Transcripts have been printed. For the students whose Transcripts have been printed, do you want those pending Transcript Requests marked as Printed?" The update of the Transcript Request row(s) on the Transcript Requests window will happen ONLY if the transcript was Official and if you answer ???Yes??? to the prompt. If the transcript was processed as an Unofficial transcript or if you answer ???No??? to the prompt, the Transcript Request row(s) will not be marked as 'Printed'.
If multiple transcript requests (both Electronic and Printed) are being processed, the Electronic Transcripts are processed when you click the Create Electronic Transcript button. The Printed (paper) Transcripts are processed when you click the Print button. If only Electronic Transcripts are being processed, the Print button is not available.
Follow these steps to set up and use Electronic Transcripts:
Step
1: Acquire an updated license
The ability to generate Electronic Transcripts is a licensable option that requires an updated J1 license string. Contact your Account Executive to request the Electronic Transcript license. When you purchase the Electronic Transcript option, you will be sent an updated J1 license string. You must update the license in order for the Jenzabar J1 Desktop windows to display the changes that allow the generation of Electronic Transcripts.
1. Run the EX5License.exe
application (in the Programs folder), and log in as TE_PGMR or SA.
The Apply License Code window
is displayed.
2. Copy and paste the new license code that has been provided.
3. Click the Apply Code button.
An updated license string can also be applied via the DDU (Default Data Update).
Permission must be granted to J1 Functions that control access to the Electronic Transcript to J1 Groups that need to work with them.
To grant administrative permissions to J1 Groups to set up Electronic Transcripts:
1. Open the Group Definition window.
2. Select the appropriate Group ID, and click the Permissions... button to open the Group Permissions window for the selected group.
3. In the Group Permissions window, click the Functions tab.
4. In the Not Allowed group box, select the Module code of RE and Description of Electronic Transcript Settings.
5. Click the << button to move the selected row from the Not Allowed group box to the Allowed group box to give the selected J1 Group permissions to access the Electronic Transcript Settings.
6. Click the OK button.
To grant permissions to J1 Groups to generate Electronic Transcripts:
1. Open the Group Definition window.
2. Select the appropriate Group ID, and click the Permissions... button to open the Group Permissions window for the selected group.
3. In the Group Permissions window, click the Functions tab.
4. In the Not Allowed group box, select the Module code of RE and Description of Print Electronic Transcript.
5. Click the << button to move the selected row from the Not Allowed group box to the Allowed group box to give the selected J1 Group permissions to print the Electronic Transcripts.
6. Click the OK button.
You must define certain rows/columns used by the Electronic Transcript prior to generating the Electronic Transcript.
Window |
Column |
Description |
Define rows for every organization that may be referenced as a transcript destination school and/or transcript source school (your institution). See PESC Organization Code Type for more information, including the list of default Organization Code Types. If you will be sending both XML and EDI transcripts, then choose organization type codes from TABLE_VALUE that have values in both TBL_VALUE_ALT1 (used for the XML) and TBL_VALUE_ALT2 (used for the EDI). |
||
Associate each of your awards (degrees, certificates, etc.) with the appropriate PESC Award Level code. See PESC Award Level Code for more information, including the list of default PESC Award Level values. |
||
Associate each of your Academic Divisions with the appropriate PESC Academic Summary Level. |
||
|
Associate each of your Academic Divisions with the appropriate PESC Course Credit Level. |
|
Division Group Code |
Select and group the divisions you want to use in the transcript. Ensure you define at least one row with an AL code and group all the divisions that you want to include in the transcript. This will be the default if you do not choose a Division Group on the Transcript Request window. |
|
Associate each of your Year/Term combinations with the appropriate PESC Session Type. |
||
Optional and denoted by a SessionDesignatorSuffix. All Subterm courses are included within the Term. |
||
Associate each of your Credit Types with the appropriate PESC Course Credit Units. |
||
Associate each of your Grades with the appropriate PESC Course Academic Grade Scale Code. These commonly used Grade Scale Code values are a subset of the code set defined by the Association of American Medical Colleges. If you use a grade scale whose code is not included, add a row to Table Values using the same format. |
||
Associate each of your courses with the appropriate PESC Course Credit Basis Code. Once this value is filled in for a course in the catalog, when a new section is defined, this value will be copied into the section information. |
||
Associate each of your courses with the appropriate Course Level Code. Once this value is filled in for a course in the catalog, when a new section is defined, this value will be copied into the section information. |
||
Associate each of your sections with the appropriate PESC Course Credit Basis Code. Once this value is filled in for a section, when a student registers for a course, this value will be copied into the student course information. If the value defaults in from the catalog, it can be changed, if needed, for each section. |
||
Associate each of your sections with the appropriate PESC Course Level Code. Once this value is filled in for a section, when a student registers for a course, this value will be copied into the student course information. If the value defaults in from the catalog, it can be changed, if needed, for each section. |
||
Student Registration > Registration tab > Student Course Details subtab |
Associate each of the student???s courses with the appropriate PESC Course Credit Basis Code. Once this value is filled in for a section, when a student registers for a course, this value will be copied into the student course information. If the value defaults in from the section, it can be changed, if needed, for each student???s course. |
|
Student Registration > Registration tab > Student Course Details subtab |
Associate each of the student???s courses with the appropriate PESC Course Level Code. Once this value is filled in for a section, when a student registers for a course, this value will be copied into the student course information. If the value defaults in from the section, it can be changed, if needed, for each student???s course. |
|
Ensure that each student with a United States or Canadian address has a valid ZIP Code defined. |
||
If you wish to have the CIP code reported for any major or minor, ensure those are entered on the Major/Minor Definition window. |
An EX Electronic Transcript Users Guide and a test etrans data im 12.5.pbl is located in the Registration Module Resource Center (https://www.myjenzabar.net/ICS/Support/EX/Module_Support/Registration.jnz) that can help you with setup and to identify columns with missing values. Directions for requesting a login and password to access this location are on the Home page.
Step
4: Process and generate an electronic transcript
The Electronic Transcript is always processed from the Transcript Requests window.
To Add/Process an Electronic Transcript request:
1. Select the Student ID number.
2. If necessary, right-click and select Add Row to add a Transcript Request row.
3. Select the Etrans? checkbox.
4. Select the type of electronic transcript from the Etrans Type drop-down list.
5. If a fee is charged and has been received, select the Paid? checkbox.
6. Enter the number of copies in the # of Copies column.
7. Select the Division Group to indicate the group of courses you want to include in the transcript.
8. Enter the Destination ID number (you can start typing the name to get the ID number in the drop-down list).
9. Select the address type from the Destination Address Code drop-down list. A prompt appears asking if you want the address to automatically appear as the Transcript Destination on the Transcript Generation Detail tab.
10. On the Transcript Request Detail tab, optionally, you may do the following:
a. Enter the Requestor ID Number (you can start typing the name to get the ID number in the drop-down list).
b. Select the requestor's address type from the Address drop-down list. A prompt appears asking if you want the address to automatically appear as the Requestor Address.
c. Enter an address, or edit the populated address, in the Requestor Address fields.
d. Enter the reason you are creating this transcript request in the Reason for Request box.
e. Enter any comments, in addition to system-generated comments.
Each time the selected transcript request's status is changed, either manually with the Status drop-down list or automatically by the system, a row is added to the Status Tracking grid providing details about the change.
11. On the Transcript Generation Detail tab,
a. Select the Source Organization Code Type to be associated with your sending organization (the one with the Organization Code of *LOCAL in the Maintain Organization Master window). The organization code associated with that Organization Code Type for the source organization will be displayed in the Source Organization Code column.
b. Select the Destination Organization Code Type to be associated with your receiving organization (the one identified by the Destination ID). The organization code associated with that Organization Code Type for the destination organization will be displayed in the Destination Organization Code box.
c. Optionally, you may do the following:
i. Enter an address, or edit the populated address based on your Destination Address Code selection, in the Transcript Destination fields.
ii. Select the office sending the transcript (your office) from the Transcript Originating Source drop-down list. To view or maintain the values in this drop-down list, click the ellipses (...) button to open the Electronic Transcript Source Organization Profile Definition window.
iii. Select the appropriate source-office contact from the Transcript Source Contact drop-down list, in case there are questions. To view or maintain the values in this drop-down list, click the ellipses (...) button to open the Electronic Transcript Source Contact Profile Definition window.
iv. If generating an EDI transcript and you want the destination organization to send you a TS 997 to let you know the transcript arrived, select the Functional Acknowledgement Requested checkbox.
12. Save your changes.
13. Click
the Print Transcripts button
to generate the transcript.
To generate the Electronic Transcript:
1. If multiple transcript requests exist when you click the Print Transcripts button on the Transcript Requests window, the Student Selection and Date Range popup window is displayed.
2. Select the appropriate radio button (Current student only or All students who have pending transcript requests). If you select the All students who have . . . radio button, enter a date range.
3. If you want to print the destination address on the transcript, select the Print 'Sent to' Address on Transcript checkbox.
4. Click the OK button to open the Transcript Report window.
5. If necessary, make changes to the options on the Transcript Report window.
6. Click the Create Electronic Transcript button. The following processing occurs:
o If Holds exist and you selected the Save a Copy to Document Master checkbox, you must resolve them before the process continues. If no holds exist, the Select Document Type and Owner window appears. Select the type of document you want to generate and the owner, and click the Select button.
o The Electronic Transcript Settings window appears.
??? Enter a valid location in the Create ETrans File(s) Here column to determine where the file will be saved, or click the ellipsis (...) button to specify a path. The file generated will be named with the Document ID, a unique combination of the source organization ID Number, the date and time of creation, and the student ID Number.
??? If you select the View First File in File Viewer checkbox, the process attempts to open the first Electronic Transcript document created using your default viewer (established in Windows). Selecting this checkbox allows you to validate the file with an Editor application.
??? Click Continue to proceed. The Student ID Number and the Sequence Number from the Transcript Requests window and the Address Priority List and Print Official Transcript information from the Transcript Report window is used to generate the Electronic Transcript. (The Additional Criteria tab information is not referenced.)
o The output is checked for errors. If no errors are detected, the file is ready to send.
o When the Official transcript has been generated, the following message is displayed: "One or more Transcripts have been printed. For the students whose Transcripts have been printed, do you want those pending Transcript Requests marked as Printed?" The update of the Transcript Request row(s) on the Transcript Requests window will happen ONLY if the transcript was Official and if you answer ???Yes??? to the prompt. If the transcript was processed as an Unofficial transcript or if you answer ???No??? to the prompt, the Transcript Request row(s) will not be marked as 'Printed' and the Document ID and File Path will not be populated. However, the XML or EDI file is created and can be reviewed later.
If multiple transcript requests (both Electronic and Printed) are being processed, the Electronic Transcripts are processed when you click the Create Electronic Transcript button. The Printed (paper) Transcripts are processed when you click the Print button. If only Electronic Transcripts are being processed, the Print button initiates no action.
Step
5: Send the Electronic Transcript XML or EDI file to the recipient
XML or EDI Transcripts:
You can send an XML or EDI Transcript to a receiving organization using the following:
If you are required or wish to send the Electronic Transcript XML files via a third party organization, contact the organization about transfer method requirements.
If you are required or wish to send Electronic Transcripts via a defined Web Service protocol, you can contact your Jenzabar Account Executive to arrange for help to do so.
Certain organizations may require that transcripts be sent using a specific method. Because J1 generates and saves the XML file, you may use any preferred method to send the transcript to the receiving organization.
For EDI transcripts, do not use the asterisk (*) in any grades because the EDI file format uses it as a separator.
The following manual Status updates can be made to both electronic and print transcript requests:
Manually update
the status of a transcript request (other than deleting)
The Status is updated automatically when a transcript is generated, however, manual status updates can also be made. Status values are maintained on the Transcript Request Status Definition window, and can be further refined using the Transcript Request Status Reason Definition window.
1. Select the Student ID number.
2. On the Transcript Requests tab, select the request you want to update.
3. From the Status drop-down list, select the status that applies.
When the status is either "Completed" or
"Deleted," very few changes to the request can be made.
Exceptions include the following:
Completed: For XML transcripts, the Tracking
ID on the Electronic File
Detail tab can be updated if needed.
Deleted: On the Deleted Transcript
Requests tab, the Status
can be updated to remove the deleted status if necessary.
For more details on the "Deleted" status, see the appropriate "How Do I" steps in this help topic.
4. Save the change.
Delete
a transcript request but save the record
1. Select the Student ID number.
2. On the Transcript Requests tab, select the request you want to delete.
3. From the Status drop-down list, select the "Deleted" status that applies.
4. Save the change.
5. If you have permissions to permanently delete transcript requests, the Delete Transcript Request popup window appears asking if you want to change the status or delete the request from the system. Click the Change Status button if you do not want to permanently delete it immediately.
6. The transcript request now appears on the Deleted Transcript Requests tab, and details related to the request can be referred to as needed but not changed, however the Status drop-down list is active so you can remove the deleted status if necessary.
Remove a Deleted
status from a transcript request
1. Select the Student ID number.
2. On the Deleted Transcript Requests tab, select the request you want to undelete.
3. From the Status drop-down list, select the new status.
4. Save the change. The transcript request is removed from the Deleted Transcript Requests tab and appears on the Transcript Requests tab with the new status.
Permanently
delete a transcript request that is not currently in a Deleted status
You must have the proper permissions to permanently delete a transcript request.
1. Select the Student ID number.
2. On the Transcript Requests tab, select the request you want to delete.
3. From the Status drop-down list, select the "Deleted" status that applies.
4. Save the change. The Delete Transcript Request popup window appears asking if you want to change the status or delete the request from the system.
5. Click the Delete button. The transcript request is permanently removed from the system.
Permanently
delete a transcript request that is in a Deleted status
You must have the proper permissions to permanently delete a transcript request.
1. Select the Student ID number.
2. On the Deleted Transcript Requests tab, select the request you want to delete.
3. Select Delete Row from the right-click menu. A popup window appears stating dependent data will be permanently removed from the system.
4. Click the Yes button. The transcript request is permanently removed from the system.
Customize
the electronic stored procedure
1. Find and open the stored procedure in SQL Server Management Studio.
2. Create a new stored procedure with the same name followed by some text to indicate why modifications are being made (for example, EDI_TRANSCRIPT_DATA_STATE to indicate that it has state mandated additions.)
3. For XML transcripts, decide whether to store the schema locally (recommended). See the help topic on Schema Location for Electronic Transcripts.
4. Test the revised stored procedure in SQL Server Management Studio and then in J1 Desktop.
5. If you would like help customizing the stored procedure, contact Jenzabar Services.
Schema Location for Electronic Transcripts
Displaying In-Progress Courses on a Transcript
Common Functionality for Grid Windows