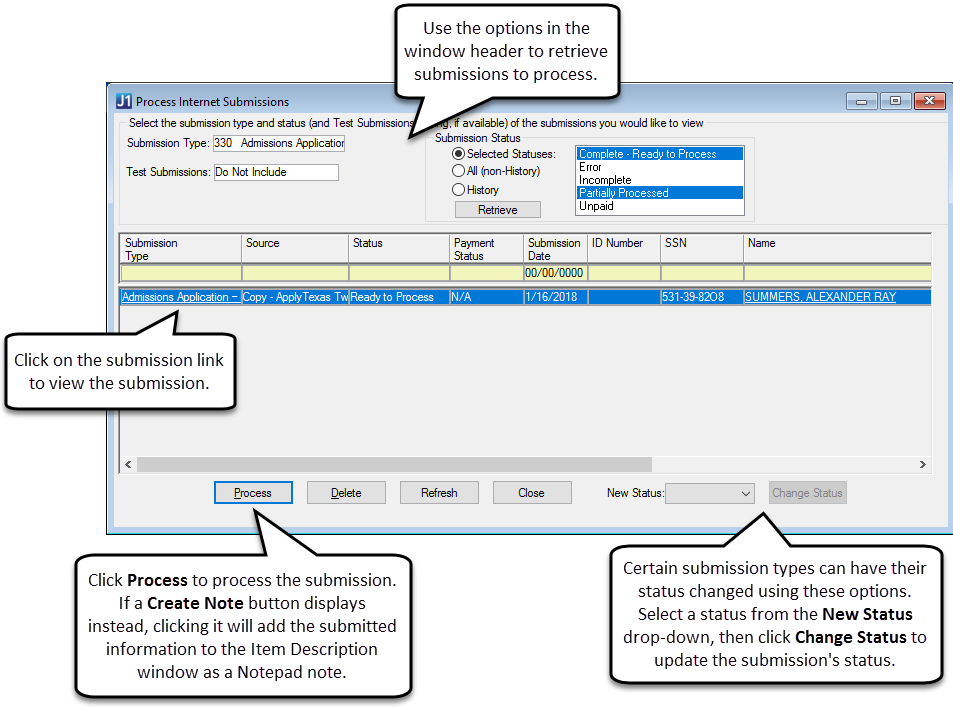
Use the Process Internet Submissions window to review and process data submitted from various sources into live J1 tables. Sources include the Import Data Into J1 window and several campus portal features. The submissions that you can process depend on the security groups you belong to and on the submission types that have been assigned to those groups in the Internet Submissions window. Example
The submission types that a user can process are dependent on which Application groups the users belong to, and which submission types those groups have permission to process. Using the Internet Submissions window, Application groups of users can be given a combination of processing and/or notification rights to each submission type.
|
For example, user group could be set up to process just Admission applications and inquiries while other groups could be set up to process just constituent profile and general updates. With this security, two different users could open the Process Internet Submissions window and would only be able to work with the submission types for which they are set up. |
In addition to assigning group processing and notification rights to each submission type, it is also important to create a personal information update hierarchy using the Personal Information/General Update Priority link on the Internet Submissions window. This link takes the user to the Personal Information Update Priority window where they can decide which roles should take priority for processing an assignment dealing with personal information or general information updates.
|
For example, a user may belong to two campus portal roles, Student and Constituent. They recently had a change of address so they submit their change of address via a personal information update in the My Info feature. Since the user who submitted the personal info change is both a student and a constituent, there are two different offices that may want to process this submission. Setting a role hierarchy enables the school to handle these submissions when there is more than one role and tag the submission as Student or Constituent, depending on the priority setup. This allows the change to be routed to the appropriate person at the school for processing. |
Click below to view a table of the various submission types, the submission source in campus portal, the license needed to process the submission type, and where the submission type is stored.
Code |
Submission Type |
Submission Source in JICS |
License Needed |
Related Submissions Tables |
90 |
Admissions Inquiry |
Make an Inquiry Portlet |
CRM Candidate |
COMTABLE: Contains submission data that still needs to be processed FORM_KEY: Contains the key for the submitter to use to re-retrieve their saved information; only applicable to incomplete submissions SUBMISSION_HISTORY: Contains submission data that has already been processed ONLINE_PAYMENT: Contains payment information for submissions that include a payment |
100 |
Admissions Application |
Apply for Admission Portlet |
CRM Candidate |
|
110 |
General Update for Constituent by Third Party |
Relationship Management Portlet |
CRM Advancement Office |
|
120 |
Personal Information Update by Constituent |
My Info Portlet |
JICS Base |
|
140 |
Personal Information Update by Student |
My Info Portlet |
JICS Base |
|
150 |
Public Registration |
Public Registration Portlet |
CRM Faculty, CRM Student |
|
160 |
Admissions Inquiry by Third Party |
Make an Inquiry Portlet |
CRM Candidate |
|
170 |
Admission Application by Third Party |
Apply for Admission Portlet |
CRM Candidate |
|
180 |
General Update by Constituent |
My Info Portlet |
JICS Base |
|
190 |
Profile Update by Constituent |
My Info Portlet |
JICS Base |
|
200 |
Personal Information with Gift |
Online Giving |
CRM Constituent |
|
210 |
Personal Information Update by Admissions Administrator |
My Info Portlet |
JICS Base |
|
220 |
Personal Information Update by Admissions Counselor |
My Info Portlet |
JICS Base |
|
230 |
Personal Information by Admissions Officer |
My Info Portlet |
JICS Base |
|
240 |
Personal Information by Financial Aid Administrator |
My Info Portlet |
JICS Base |
|
250 |
Personal Information Update by Advisor |
My Info Portlet |
JICS Base |
|
260 |
Personal Information Update by Candidate |
My Info Portlet |
JICS Base |
|
270 |
Personal Information Update by Advancement Officer |
My Info Portlet |
JICS Base |
|
280 |
Personal Information Update by Faculty |
My Info Portlet |
JICS Base |
|
290 |
Personal Information Update by Staff |
My Info Portlet |
JICS Base |
|
300 |
Personal Information Update by Staff Administrator |
My Info Portlet |
JICS Base |
|
340 |
General Update by Admissions Administrator |
My Info Portlet |
JICS Base |
|
350 |
General Update by Admissions Counselor |
My Info Portlet |
JICS Base |
|
360 |
General Update by Admissions Officer |
My Info Portlet |
JICS Base |
|
370 |
General Update by Advancement Officer |
My Info Portlet |
JICS Base |
|
380 |
General Update by Advisor |
My Info Portlet |
JICS Base |
|
390 |
General Update by Advisor Administrator |
My Info Portlet |
JICS Base |
|
400 |
General Update by Candidate |
My Info Portlet |
JICS Base |
|
410 |
General Update by Faculty |
My Info Portlet |
JICS Base |
|
420 |
General Update by Financial Aid Administrator |
My Info Portlet |
JICS Base |
|
430 |
General Update by Staff |
My Info Portlet |
JICS Base |
|
440 |
General Update by Staff Administrator |
My Info Portlet |
JICS Base |
|
450 |
General Update by Student |
My Info Portlet |
JICS Base |
|
460 |
General Update by Student Administrator |
My Info Portlet |
JICS Base |
|
470 |
Personal Information Update by Advisor Administrator |
My Info Portlet |
JICS Base |
|
480 |
Personal Information Update by Student Administrator |
My Info Portlet |
JICS Base |
|
The following are submission types and related tables are used by Form Builder 2.0: |
||||
320 |
Admissions Inquiry - New |
Make an Inquiry Portlet |
CRM Candidate |
SUBMISSION: Contains the basic details about the submission SUBMISSION_RESPONSE: Contains a row for each piece of data submitted for a specific submission ATTACHMENT: May contain rows associated with essays submitted with the rest of the data SUBMISSION_PAYMENT_INFO: Contains waiver information for submissions that include a waiver or a reference to an online payment ID Number ONLINE_PAYMENT: Contains payment information for submissions that include a payment There are additional tables that contain information about a particular form's format and mapping. In order to better display the submission information with the form information, SUBMISSION_V and SUBMISSION_RESPONSE_V views have been created to link all of the data together for easier viewing. |
330 |
Admissions Application - New |
Apply for Admissions Portlet J1 window: Import Data Into J1 |
CRM Candidate |
|
490 |
General Update for Constituent (Third Party) - New |
Relationship Management Portlet (for Form Builder 2.0 submissions) |
CRM Advancement Office |
|
510 |
Registration Agreement |
Course Schedules Portlet |
CRM Faculty, CRM Student |
|
520 |
Personal Info Update |
Course Schedules Portlet |
CRM Faculty, CRM Student |
|
530 |
Student Request |
Student Request Portlet |
CRM Faculty, CRM Student |
|
550 |
FERPA Permissions |
Set FERPA Permissions Portlet View My Student Portlet |
CRM Parent |
|
560 |
Employment Application |
Employment Application Portlet |
CRM Staff |
|
Submissions can be submitted in campus portal and accessed from the Process Internet Submissions window. However, when you select a submission on the Process Internet Submissions window that was not automatically processed and click the Process/Create Note button, several different windows are opened depending upon the submission type.
· The Review Internet Submission window and Review Submitted FERPA Permissions window are used to process Form Builder 2.0 submissions.
· For the following submission types, the button text is changed to "Create Note" and clicking the button opens the NP Notes window: 110, 180, 190, 340-460.
· The rest of the submission types open the Individual Submission Detail window.
|
|
Submission Types 490 and 510 are processed automatically and therefore can only be viewed as history through the Process Internet Submissions window. |
Submissions stored in COMTABLE are viewable through an InfoMaker report in J1 Desktop windows. Depending on the Submission Type, clicking on the Submission Type link displays the information contained in the submission. Note that the Report Name of the InfoMaker report window is the same as the Submission Type.
If the Submission Type for this row is one used by Form Builder 2.0, a report will be displayed as an HTML document in a browser window.
An asterisk (*) is displayed beside each question that is not mapped and therefore not saved to the J1 database; a plus sign (+) is displayed beside each question that is mapped to a customer-created table and therefore not saved directly to the J1 database.
If one or more essays are included with the submission, a See Essay Text link is available. Clicking on this link opens another document in the same browser window showing the essay information. If an essay on the form has not been filled in by the candidate/student, "No essay text available." is displayed. These Web pages can also be printed.
If one or more attachments are included with the submission, an Open Attachment link is available. Clinking on this link allows you to open the attachment immediately or to download the attached file locally to your computer. Once it is downloaded, this attachment (such as a Word document or PDF) can be opened in the appropriate application.
The following columns are populated with data resulting from the three selection criteria entered in the heading. Data displayed are from the COMTABLE or SUBMISSION_HISTORY table or the SUBMISSION_V view.
This column is populated with submission types retrieved as a result of the selection criteria entered in the heading of the Process Internet Submissions window.
Clicking on the link in this column for many of the submission types opens a report window in J1 Desktop that shows the information included on the submission
· For any submission type that uses a version of Form Builder other than 1.0, the submission type is a hyperlink that opens a browser window showing the details of the submission as a Web page.
· If the selected submission has an Error status, the browser window will display the following message: "The auto processing for this submission was not completed successfully. Please review the record for this ID to see what updates may need to be made."
· Submitted values that are codes display both the code and its corresponding description on the Web page.
· If one or more essays are included with the submission, a See Essay Text link is available. Clicking on this link opens another document in the same browser window showing the essay information. If an essay on the form has not been filled in by the candidate/student, the following text is displayed: "No essay text available." These Web pages can also be printed.
If the Submission Type for this row is one used by Form Builder 2.0, this column is populated with the name of the submitted form (SUBMISSION_V.FORM_NAME). Otherwise, it is populated with the portlet name from where the submission came (CATCOMDEFINITION.ENTRY_SOURCE).
When someone makes an internet submission (such as an admissions inquiry, an employment application, or a profile change, among many others), the submission is marked with a status from the following list:
Successfully submitted, ready for processing, and not yet reviewed. Submissions in this status include:
Completed submissions with no payment component (a payment is NOT required or marked as optional on the form)
Completed submissions with a payment component (a payment is either required or optional) and a waiver code is submitted
Completed submissions with a payment component and where the payment is marked as processed by the payment vendor's application
Could not be automatically processed.
|
|
This status is only available for Form Builder 2.0 submissions that are processed automatically (such as the 510 ??? Registration Agreement submissions). |
|
|
The submission data was saved to the submission tables, but the automatic processing could not be completed. If you select this value, the Error column is displayed on the Process Internet Submissions window. |
Saved but not yet submitted. These submissions have not yet been completed, but they have been saved by the submitter for future editing and submission. You can choose to change any submission that has an Incomplete status to Complete status if you want to process the submission even if it has not been paid.
Successfully submitted, reviewed by a J1 Desktop user, and kept active for future processing.
Completed and fully processed submissions. The submissions may have been processed either manually by a user or automatically during the submission [as in the Registration Agreement (510) submission type].
Submission was completed, but payment (optional or required) was not completed. However, you can process unpaid submissions if you wish.
|
The Unpaid status only applies to Form Builder 2.0 submissions. For example, it does not apply to Online Giving submissions. However, the Payment Status column on the Process Internet Submissions window indicates the payment status of a particular Online Giving submission. |
|
After you have retrieved submissions on the Process Internet Submissions Window for one or more specific statuses, the submission status for each record is displayed in the Status column. |
If an error occurs during the processing of a submission (particularly submissions whose data is recorded automatically, such as the Registration Agreement and Relationship Management forms), a submission will be put into the Error status. For the submission types that are processed automatically, if any errors exist, the Error status will automatically be selected upon selection of one of these automatically processed submission types in the Process Internet Submissions window. If no errors exist, the History status will automatically be selected.
Additionally, if a specific error is known, the information is added to the Application Log tables and an error report icon is displayed for the submission. Clicking on the error icon for a row will open the Application Log's Error Log Report to display the error information. Submissions where the data is automatically recorded to the J1 tables cannot be processed via the Process Internet Submissions window. Therefore, you should review the error and make any edits manually to the record as needed to correct the error. However, if data for multiple tables was submitted, then all data that could be processed automatically successfully will have been processed during the submission, so the only remaining edits that would need to be made in this case are the data related to the specific error.
The Payment Status column indicates if a payment is required and has been made for a selected online submission.
The table below details the available payment statuses.
Payment Status |
Description |
N/A |
Payment is not required. |
Waiver |
This submission was submitted with a waiver code. |
Canceled |
This submission was received successfully, but the user did not complete their payment. More specifically, there is no Online Payment row for the submission; therefore, the user most likely canceled out of the Payments portlet prior to completing the payment. |
Successful |
The payment for this submission has been approved, and a corresponding transaction was created. |
Approved |
If the Category Code is 200 - Personal Information with Gift, the payment for this submission has been approved; however, the gift must be accepted in the Process Online Gifts window before the payment transaction can be marked as successfully processed. If the Category Code is NOT 200 - Personal Information with Gift, the payment for this submission has been approved; however, no corresponding transaction was created for this payment. |
Unsuccessful |
The payment for this submission was not approved by the payment vendor. |
Unprocessed |
The payment for this submission has not yet been processed by the payment vendor. |
If you do not want to process an online submission because payment has not been made, you can change the status of that submission to an Incomplete or History status. This helps you to manage submissions without having to leave them in a Complete or Partially Processed status or having to delete the submissions.
This column indicates the date of the submission.
If the Submission Type code for the row is one used by Form Builder 2.0, this column is populated with SUBMISSION_V.SUBMISSION_DTE. Otherwise, it is populated from XML tags contained in a DATA field in either COMTABLE or SUBMISSION_HISTORY.
This column displays the ID Number of the person for whom the submission was made if it is known. When a submitted contact row is associated with a row in the grid on the right side of the Process Internet Submissions window and the row in the grid has an ID Number associated with it, the text "ID" is displayed in parentheses followed by the ID_NUM_EMRG_CNTCT value, which allows you to quickly identify the row with which it is associated.
|
|
You can use the # in the grid on the right side to identify which emergency contact on the left is associated with the emergency contact on the right. The ID Number displayed on the left indicates that the submitted information has been associated with an existing ID Number. |
If the Submission Type code for the row is one used by Form Builder 2.0), this column is populated from SUBMISSION_V.SUBMISSION_ID. Otherwise, it is populated from XML tags contained in a DATA field in either COMTABLE or SUBMISSION_HISTORY.
This column displays the Social Security Number (if it is known) of the person for whom the submission was made.
If the Submission Type code for the row is one used by Form Builder 2.0 and the SSN column is mapped to a question on the submitted form, this column is populated with SUBMISSION_RESPONSE_V.RESPONSE_VALUE for the mapped SSN column.
If the SSN is available for submission via the other Submission Types, this column is populated with SSN data from XML tags contained in a DATA field in either COMTABLE or SUBMISSION_HISTORY table. For all Submission Types, if the SSN is not available as part of the submission for the submission type but the ID Number is available, the SSN column will be populated with the SSN from BIOGRAPH_MASTER.SSN for the ID Number. Otherwise, if the SSN cannot be determined in any way, the SSN will display 000-00-0000.
|
|
The Registration Agreement (510) submission type does not allow the user to map any BIOGRAPH_MASTER columns to the Registration Agreement form. Therefore, the ID Number will be used to retrieve the SSN from BIOGRAPH_MASTER for display on the SSN column. |
|
|
The SSN data may be available for a particular submission type, but it may not be entered by the submitter. In this case, the SSN will be displayed as 000-00-0000. |
This column displays the name of the person (Last, First Middle format) for whom the submission was made and may be a hyperlink to an e-mail address if one exists.
If the Submission Type code for the row is one used by Form Builder 2.0, this column is populated with SUBMISSION_RESPONSE_V.RESPONSE_VALUE for the mapped NAME_MASTER name columns.
If the name information is available for the other Submission Types, it is populated from XML tags contained in a DATA field in either COMTABLE or SUBMISSION_HISTORY table. For all Submission Types, if the name information is not available as part of the submission but the ID Number is available, the Name column is populated with data from the NAME_MASTER table for the specified ID Number.
|
|
The Registration Agreement (510) submission type does not allow the user to map any NAMEMASTER columns to the Registration Agreement form. Therefore, the ID Number is used to retrieve the name and e-mail address information from NAMEMASTER for display ion the Name column. |
This column will be populated if a person (i.e., an Admissions Officer or Advisor) submitted information on behalf of another person. The column will contain the name of the person (Last, First Middle format) who is actually doing the submitting.
If the Submission Type code for the row is one used by Form Builder 2.0, this column is populated with data from NAME_MASTER for the SUBMISSION_V.THIRD_PARTY_SUBMITTER_ID. Otherwise, it is populated with data from NAME_MASTER for the third party submitter ID Number from XML tags contained in a DATA field in either COMTABLE or SUBMISSION_HISTORY table.
This column displays the Permanent City (if available) noted in the submission.
If the Submission Type code for the row is one used by Form Builder 2.0, this column is populated with SUBMISSION_RESPONSE_V.RESPONSE_VALUE for the mapped ADDRESS_MASTER.CITY.
If the Submission Type code is one of the following for this row, it is populated from the XML tag <PermAddrCity> in the DATA column in COMTABLE: 90, 100, 150-170.
If the Submission Type code is one of the following for this row, it is populated from XML tag <City> in the DATA column in COMTABLE: 120, 140, 200-300, 470-480.
Otherwise, the city is not displayed. For more information about each Submission Type, see the Submission Type Table section above.
This column displays the Permanent State (if available) as noted in the submission. If the Submission Type is not one of the following, the State is not displayed.
· If the Submission Type code for this row is one used by Form Builder 2.0, this column is populated with SUBMISSION_RESPONSE_V.RESPONSE_VALUE for the mapped ADDRESS_MASTER.STATE.
· If the Submission Type code is one of the following for this row, it is populated from the XML tag <PermAddrState> in the DATA column in COMTABLE: 90, 100, 150-170.
· If the Submission Type code is one of the following for this row, it is populated from XML tag <State> in the DATA column in COMTABLE: 120, 140, 200-300, 470-480.
For more information about each Submission Type, see the Submission Type Table section above.
This column is populated with Yes and/or No, depending on the selection criteria entered in the heading of the Process Internet Submissions window.
· A Yes is displayed if the submission has been sent through the Preview link in the Form Builder portlet while designing a form.
· A No is displayed if the submission has been sent through the normal submission process in the portlet or if the Test Submission property is not applicable to the submission type.
Setup for the Processing of Internet Submissions
1. Set up the proper permissions to view/process submissions sent through campus portal (JICS).
a. Open the Internet Submissions window.
b. Click the appropriate Submission Type row for which you want to set permissions.
c. Click the Assign Processing and Notification Rights button to open the Assign Processing and Notification Rights window.
d. Assign security groups to submission types. Right-click in the Groups group box and choose Add Row.
e. For each group, select the Can Process and/or Must Notify checkboxes.
i. Selecting the Can Process checkbox gives permission to process the submission type.
ii. Selecting the Must Notify checkbox indicates that the group will be notified via and e-mail message when there are submissions.
f. Click the Save button.
g. If users of the groups do not have e-mail addresses, the following message is displayed: "You have flagged the <group> as needing to be notified when a submission is made. The following user(s) in this group do not have an e-mail address and thus will not be notified of the submission." Usernames are listed following the message. Click the OK button.
h. Close the Assign Processing and Notification Rights window.
i. Repeat the above steps for each of the submission types you will be using.
2. Prioritize roles for processing personal information updates.
a. On the Internet Submissions window, click the Personal Information/General Update Priority link to open the Personal Information Update Priority window.
b. A role is displayed for each base role in campus portal (JICS) and J1 Desktop. Assign a priority order that will be used when personal info changes are submitted by a campus portal (JICS) user who has more than one campus portal (JICS) role. In these cases, the priority will be used to give the personal information change a submission type so that the appropriate administrative person processes the submission.
3. Users should now be able to view and process submissions from the Process Internet Submissions window. Submissions are marked with one of these statuses:
Ready to Process
Error
Incomplete
Partially Processed
Unpaid
History
 |
Not all of these statuses are available for all submission types. See Internet Submission Status for more details. |
1. Select the Submission Type from the drop-down list.
2. Select a Test Submissions option from the drop-down list.
3. Select a Submission Status radio button.
· History: to display only fully processed submissions
· All (non-History): to display all submissions that are not yet fully processed
· Selected Statuses: Click any combination of statuses representing submissions that are not yet fully processed.
4. Click Retrieve.
Process Submission Types for Which the Process Button is Displayed
|
|
The Process Internet Submissions window opens the Individual Submission Detail window for non-Formbuilder 2.0 submissions and the Review Internet Submission window or the Review Submitted FERPA Permissions window for Formbuilder 2.0 submissions. |
1. Select the row to be processed.
2. Click the Process button. You will be notified if the submission required a payment that was not submitted, at which time you can continue with or abort the processing.
|
|
If no ID Number is included in the selected submission and the system is configured to do a duplicate name search, the Duplicate Name Search process is run with the submitted information using the duplicate name search configuration for the logged-in user. |
|
When an ID Number is identified or if the submission is identified as not having an ID Number in the database, the Review Internet Submission window, the Individual Submission Detail window, or the Review Submitted FERPA Permissions window opens with the submission details and allows you to continue with the processing. If the submission does not yet have an ID Number, you must save the data on the Name tab to generate a new ID Number before you are allowed to process the remainder of the submitted data. |
Process Submission Types for Which the Create Note Button is Displayed
1. Select the appropriate row to be processed.
2. Click the Create Note button. The submitted information is inserted into the Item Description window as a Notepad note.
3. Edit as needed.
4. Select the Display on Web checkbox to display the information in the corresponding campus portal (JICS) portlets.
5. Click the OK button. A new note using the specified text and the Display on Web value is added to the ITEMS table for this ID Number. Also, the Submission row is automatically moved to a History status so that duplicate entries cannot be added to the ITEMS table for the same submission.
1. Select the rows to be deleted.
2. Click the Delete button.
3. Confirm or cancel the deletions.
1. In the Process Internet Submissions window, click on a submission's hyperlink in the Submission Type column.
2. The submission report will open in a new browser window.
3. If admissions essays or student notes are included in the submission, click the See Essay Text hyperlink in the submission report. A second browser window will open showing you the contents of the essay or note.
4. If attachments are included in the submission, click on the Open Attachment hyperlink to open the file or to download the attachment locally to your computer, thereby allowing you to view it in the appropriate program.
What are the different submission statuses?
When someone makes an internet submission (such as an admissions inquiry, an employment application, or a profile change, among many others), the submission is marked with a status from the following list:
Successfully submitted, ready for processing, and not yet reviewed. Submissions in this status include:
Completed submissions with no payment component (a payment is NOT required or marked as optional on the form)
Completed submissions with a payment component (a payment is either required or optional) and a waiver code is submitted
Completed submissions with a payment component and where the payment is marked as processed by the payment vendor's application
Could not be automatically processed.
|
|
This status is only available for Form Builder 2.0 submissions that are processed automatically (such as the 510 ??? Registration Agreement submissions). |
|
|
The submission data was saved to the submission tables, but the automatic processing could not be completed. If you select this value, the Error column is displayed on the Process Internet Submissions window. |
Saved but not yet submitted. These submissions have not yet been completed, but they have been saved by the submitter for future editing and submission. You can choose to change any submission that has an Incomplete status to Complete status if you want to process the submission even if it has not been paid.
Successfully submitted, reviewed by a J1 Desktop user, and kept active for future processing.
Completed and fully processed submissions. The submissions may have been processed either manually by a user or automatically during the submission [as in the Registration Agreement (510) submission type].
Submission was completed, but payment (optional or required) was not completed. However, you can process unpaid submissions if you wish.
|
The Unpaid status only applies to Form Builder 2.0 submissions. For example, it does not apply to Online Giving submissions. However, the Payment Status column on the Process Internet Submissions window indicates the payment status of a particular Online Giving submission. |
|
After you have retrieved submissions on the Process Internet Submissions Window for one or more specific statuses, the submission status for each record is displayed in the Status column. |
What are the Test Submissions options?
If Do Not Include is selected, submissions that have been submitted via the Preview link in campus portal (JICS) will be excluded from the list (i.e., only rows with SUBMISSION_V.IS_TEST_SUBMISSION = 'N' for the submission types are displayed).
If Include is selected, all appropriate submission rows regardless of the SUBMISSION_V.IS_TEST_SUBMISSION value are displayed.
If View Tests Only is selected, only rows that have been submitted through the Preview link in campus portal (JICS) (i.e., where SUBMISSION_V.IS_TEST_SUBMISSION = 'Y') for the submission types are displayed.
If the Submission Type of All is selected, all submissions other than those used by Form Builder 2.0 will be given the Test Submission value of 'N'. Therefore, these rows will only be displayed if the Do Not Include and Include options are selected.
Why is the New Status button unavailable?
The New Status drop-down list is not displayed if the Submission Type of All is selected. It is only available if any status except History has been selected in the Status drop-down in the header of the Process Internet Submissions window and if the selected Submission Type code for the row is one used by Form Builder 2.0.
Why can I not change the status of a submission?
Only submission types that are used by Form Builder 2.0 will be able to have their status changed. If the submission type can have its status changed, ensure that a new status has been selected from the New Status drop-down. If a submission has a status of "History", the status will not be able to be changed.
I changed the status of a submission and now I cannot see it. Where did it go?
If the submission status was changed and you can no longer see that submission, you may have to adjust the settings in the window header for Submission Status to display submissions with that status.
Why am I seeing a Create Note button instead of a Process button?
Whether or not a Process or a Create Note button displays depends on the submission type. If a Create Note button displays instead, clicking it will add the submitted information to the Item Description window as a Notepad note.
Why did the Duplicate Search window open when I clicked Process?
For certain submission types, if there is no ID Number associated with the submission, the Duplicate Search window opens listing potential matches in the database. You can either click Select Match to match the submission to a selected ID Number, or you can click the No Match - New ID button to open a window with only the Name tab enabled to allow you to fill out the person's information. Clicking Save will generate a new ID number and will enable the other tabs.
If I delete a submission, where does it get deleted from?
For general internet submissions:
If you are deleting unprocessed submissions, the selected submissions are removed from the COMTABLE table and any corresponding key for incomplete submissions is deleted from the FORM_KEY table.
If you are deleting processed submissions (i.e., those in a 'History' status), the selected submissions are removed from the SUBMISSION_HISTORY table.
For Form Builder 2.0 submissions:
All rows in SUBMISSION_RESPONSE associated with the selected submissions are removed. Also, any corresponding rows in the ATTACHMENT table and SUBMISSION_PAYMENT_INFO table and the corresponding row in the SUBMISSION table are removed.
If the submission contains text from an Essay type of question that was mapped to the CANDIDACY_ATTACHMENT.ATTACHMENT_TEXT mapping column, the submitted attachment may not be removed from the ATTACHMENT table because it may be associated with another object in the database, such as a Candidacy row.
|
No data is removed from the ONLINE_PAYMENT table, regardless of the submission type, because of a need to retain financial data. |
Review Internet Submissions window