| Configurations can be set for specific modules. Information about these configuration items are discussed in the J1 Desktop <Module> Configuration Guide. Worksheets are available to aid you in making decisions to meet your organization's particular needs. The data provided on your worksheets is entered into your database via appropriate windows. |
The following configurations can be entered in both the Maintain Config Table window and the Module Configuration window. These configuration settings are stored and maintained in the CONFIGURATION_TABL table.
 Configuring Rich Text Format
(RTF) or TXT Format in Communication Management
Configuring Rich Text Format
(RTF) or TXT Format in Communication Management
|
Changing the configuration from TXT to RTF or the other way around requires re-saving custom forms to make them available. See Edit Item (Action) Window and Edit Item (Action List) Window topics. |
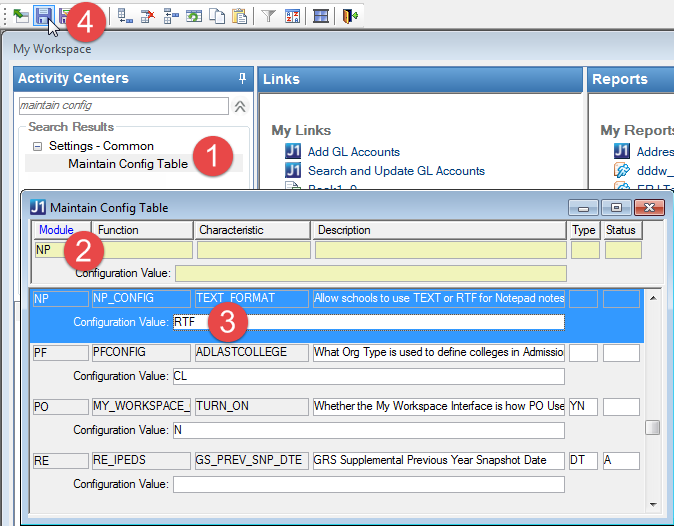
1. Open the Maintain Config Table window.
2. In the Module
field, enter “NP.”
The NP_CONFIG function shows.
3. In the Configuration
Value field, enter either of these:
“RTF” to switch to rich text format
"TEXT" to switch to plain text format
4. Click the Save button on the toolbar.
![]() Configuring
Expiration Days for Passwords
Configuring
Expiration Days for Passwords
1. Open the Maintain Config Table window.
2. Use
the vertical scroll bar to locate the row with the following information:
Module: CM
Function: PASSWORD
Characteristic: PWD_EXP_DAYS
Description: Number of Days before password expiration
3. In the Configuration Value column, enter the number of days for which a password is valid. The default is 90.
4. Save.
![]() Configuring
Failed Password Locks
Configuring
Failed Password Locks
1. Open the Maintain Config Table window.
2. Use
the vertical scroll bar to locate the row with the following information:
Module: CM
Function: PASSWORD
Characteristic: FAIL_PWD_LOCKS
Description: Failed Password Change results in Lockout
Type: YN
3. In
the Configuration Value column:
If you enter N (default), you
are allowed to log in after a failed password change.
If you enter Y, you are forced
to change an expired password and are forced to exit the J1 Desktop
application after a failed password change.
4. Save.
![]() Configuring
for Campus Visit Functionality
Configuring
for Campus Visit Functionality
1. Open the Maintain Config Table window.
2. Use
the vertical scroll bar to locate the row with the following information:
Module: CM
Function: CAMPUS_VISIT
Characteristic: ACTIVE
Description: Activate Campus Visit Functionality
Type: YN
3. In
the Configuration Value column:
If you enter Y (default), the
campus visit functionality is available and the Campus
Visit tab on the Edit Item
- Event window is available for scheduling campus visits.
If you enter N, the campus
visit functionality is disabled and the Campus
Visit tab on the Edit Item
- Event window is not available.
4. Save.
![]() Configuring
How the System Selects and Displays Data in Drop-Down Columns
Configuring
How the System Selects and Displays Data in Drop-Down Columns
1. Open the Maintain Config Table window.
2. Use
the vertical scroll bar to locate the row with the following information:
Module: **
Function: drop-down
Characteristic: SELECTDISPLAY
Description: See table below
Type: CD
3. In
the Configuration Value column:
If you enter C (default), the
system will search by code and the column will display the code and
the description.
If you enter D, the system
will search by description and the column will display the description
only.
4. Save.
![]() Configuring
Password Expiration
Configuring
Password Expiration
1. Open the Maintain Config Table window.
2. Use
the vertical scroll bar to locate the row with the following information:
Module: CM
Function: PASSWORD
Characteristic: ENABLE_PWD_EXP
Description: Enable Password Expiration
Type: YN
3. In
the Configuration Value column:
If you enter N (default), password
expiration is disabled and you can log in without warnings or lockouts.
If you enter Y, you are forced
to change an expired password.
4. Save.
![]() Configuring
Pause Time for Quick Name Search
Configuring
Pause Time for Quick Name Search
Finding the appropriate configuration value for wait time makes the search easier to use since many users pause during entry of their search string but do not want the search to start immediately while they think about the next characters to enter. Jenzabar recommends that values near 1.25 seem to be generally a better choice than values much higher or lower.
1. Open the Maintain Config Table window.
2. Search
for CM (Module) and Name_Search (Function) or use the vertical scroll
bar to locate the row with the following information:
Module: CM
Function: Name_Search
Characteristic: WAIT_SECONDS
Description: Seconds to wait before starting the retrieval
(use decimals)
3. In the Configuration Value column, enter the number of seconds (e.g., 0.75) you want to wait before the retrieval begins.
4. Save.
![]() Configuring
QAS Address Lookup Functionality
Configuring
QAS Address Lookup Functionality
1. Open the Maintain Config Table window.
2. If
you have a license for the QAS Address Verification software, use
the vertical scroll bar to locate the row with the following information:
Module: **
Function: GLOBAL_VARIABLE
Characteristic: ENFORCEQAS
Description: Should J1 Desktop enforce the use of the QAS address
lookup?
3. In the Configuration Value column:
a. Enter Y to enforce that the QAS Lookup functionality be used when adding or changing an address that is not an e-mail address.
b. Enter N to not enforce that the QAS Lookup functionality be used when adding or changing an address that is not an e-mail address.
4. Save.
![]() Configuring
Sort Order When Displaying All Addresses for an ID Number
Configuring
Sort Order When Displaying All Addresses for an ID Number
1. Open the Maintain Config Table window.
2. Use
the vertical scroll bar to locate the row with the following information:
Module: **
Function: ADDR_DISPLAY
Characteristic: ORDER
Description: Sort Order When Displaying All Addresses for
an ID Number
3. The Configuration Value column value is Default (*LHP). Users may change this value via the User Preferences window.
4. Save.
![]() Configuring
SQL Database Check for J1 Desktop
Version
Configuring
SQL Database Check for J1 Desktop
Version
In order to successfully run the J1 Desktop software application with the compatible database version, a check will be made at the time the user logs in to J1 Desktop. If the J1 Desktop software application is not compatible with the database version being used, a prompt window with OK or Yes/No buttons may or may not appear depending on the configuration setting in the CONFIGURATION_TABL.
1. Open the Maintain Config Table window.
2. Use
the vertical scroll bar to locate the row with the following information:
Module: **
Function: LOGIN
Characteristic: CODE_VS_DB_OPT
Description: Treat unmatched code and DB as ERROR, WARNING,
ERROR?
3. In the Configuration Value column, one of following three values can be entered in the Configuration Value column:
a. ERROR
If you enter ERROR
and a user logs on to J1 Desktop and the J1 Desktop Version is not
at the required J1 database version, the following message is displayed
the user: "Logon failed. J1 Desktop version <version being
run> requires the J1 database to be at least version <minimum
database version> but the database you are connected to is at version
<current version>." A message is also written to the LOGON_ERROR_LOG
table, and the login is aborted.
The user should contact the IT Administrator.
b. WARNING
If you enter WARNING
and a user logs on to J1 Desktop and the J1 Desktop Version is not
at the required J1 database version, the following message is displayed
to the user: "J1 Desktop version <version being run> requires
the J1 database to be at least version <minimum database version>
but the database you are connected to is at version <current version>.
Running the system in this state may produce undesired results. Do
you wish to continue?"
If the user clicks Yes, the
logon continues normally.
If the user clicks No, a message
is written to the LOGON_ERROR_LOG table and the logon is aborted.
The user should contact the IT Administrator.
c. IGNORE
If you enter IGNORE and a user
logs on to J1 Desktop and the J1 Desktop Version is not at the
required J1 database version, a message is written to the LOGON_ERROR_LOG
table and the logon continues normally.
4. Save.
![]() Configuring
the Database to Use
Configuring
the Database to Use
1. Use
the vertical scroll bar to locate the row with the following information:
Module: **
Function: DATABASE
Characteristic: DATABASE_TYPE
Description: Database name
2. In the Configuration Value column, enter the name of the database to be used.
![]() Configuring
the Default End Date for Vehicle Registration
Configuring
the Default End Date for Vehicle Registration
1. Open the Maintain Config Table window.
2. Use
the vertical scroll bar to locate the row with the following information:
Module: CM
Function: VEH_REG
Characteristic: VPENDDTE
Description: Config for default End date
3. In the Configuration Value column, enter the appropriate value.
4. Save.
![]() Configuring
the Default Organization Name
Configuring
the Default Organization Name
1. Open the Maintain Config Table window.
2. Use
the vertical scroll bar to locate the row with the following information:
Module: **
Function: GLOBAL_VARIABLE
Characteristic: CUSTOMER_NAME
Description: Customer Name
3. In the Configuration Value column, enter the name you want to appear as the default organization name.
4. Save.
![]() Configuring
the Default Start Date for Vehicle Registration
Configuring
the Default Start Date for Vehicle Registration
1. Open the Maintain Config Table window.
2. Use
the vertical scroll bar to locate the row with the following information:
Module: CM
Function: VEH_REG
Characteristic: VPSTARTDTE
Description: Config for default Start date
3. In the Configuration Value column, enter the appropriate value.
4. Save.
![]() Configuring
the Default Status for CAMPUS_VISIT_ITEM_HISTORY Rows
Configuring
the Default Status for CAMPUS_VISIT_ITEM_HISTORY Rows
1. Open the Maintain Config Table window.
2. Use
the vertical scroll bar to locate the row with the following information:
Module: CM
Function: CAMPUS_VISIT
Characteristic: DEFAULT_STATUS
Description: Default Campus Visit Un-assign Status (max
5 char)
3. In
the Configuration Value column:
If you enter a status (up to 5 characters), then when the Remove
Assigned Campus Visit button is clicked on the Campus
Visit tab on the Edit Item
- Event window, a CAMPUS_VISIT_ITEM_HISTORY row is created with
the status set to this value.
If you do not enter a status, then when the Remove
Assigned Campus Visit button is clicked on the Campus
Visit tab on the Edit Item
- Event window, the Campus Visit
Un-assignment Reason window opens to allow the user to define
a reason and enter notes.
4. Save.
This configuration allows IT staffs to monitor end users who are logging in with versions of the J1 Desktop application that are not compatible with the production database version and optionally to prevent end users from connecting to the database in this situation.
When a user logs in to the system, the J1 Desktop software checks the property of the executable file for that module (ex.ex3_cm.exe for the Common module) called "Minimum Database Level" and compares that to the "MINIMUM CODE" setting in the Database Level (DATABASE_LEVEL) table in the J1 database. If these values are not in sync, the J1 Desktop software does one of three things based on a configuration setting in the Maintain Config Table window.
Configuration Setting |
Description of what J1 Desktop will do |
ERROR (default setting) |
A dialog box is displayed to the user indicating that their software version is not in sync with the database to which they are trying to connect. Once the user clicks OK to the message, the application login process stops and they are not allowed to log in to J1 Desktop. In addition, a row is inserted into the LOGON_ERROR_LOG table to provide a record to the IT staff that this condition has occurred. This row includes the date the condition occurred, the user name, and the machine name. |
WARNING |
The user receives a dialog box similar to the one they receive with the ERROR setting; however, once they click OK to the message, they are allowed to log in to the J1 Desktop application. A record is also written to the LOGON_ERROR_LOG table. |
IGNORE |
The user does not see a dialog box indicating any problem and is allowed to log in to the J1 Desktop application. However, a record is written to the LOGON_ERROR_LOG table so that the IT staff has a record that this is occurring. |
1. Open the Maintain Config Table window.
2. Use
the vertical scroll bar to locate the row with the following information:
Module: **
Function: LOGIN
Characteristic: CODE_VS_DB_OPT
Description: Treat mismatched code and DB as ERROR, WARNING, IGNORE?
3. In the Configuration Value column, enter ERROR, WARNING, or IGNORE (as described above).
4. Save.
![]() Configuring
the Module Codes Licensed for Use by the Organization
Configuring
the Module Codes Licensed for Use by the Organization
1. Open the Maintain Config Table window.
2. Use
the vertical scroll bar to locate the row with the following information:
Module: **
Function: LICENSING
Characteristic: MODULECODES
Description: String of Module Codes for Licensing
3. In the Configuration Value column, enter the two-letter codes of the modules the organization is licensed to use.
4. Save.
![]() Configuring
the Number of Allowed Months for CIP Award Level of 1 Year but Less than
2 Years
Configuring
the Number of Allowed Months for CIP Award Level of 1 Year but Less than
2 Years
For more information, see IPEDS Award Level.
1. Open the Maintain Config Table window.
2. Use
the vertical scroll bar to locate the row with the following information:
Module: CM
Function: CIP_ALLOW
Characteristic: 1_NOT_2_YR
Description: Allowed Months for CIP Award Level of 1 Year
but Less Than 2 Years
3. In the Configuration Value column, enter the appropriate numeric value.
4. Save.
![]() Configuring
the Number of Allowed Months for CIP Award Level of 2 Years but Less than
4 Years
Configuring
the Number of Allowed Months for CIP Award Level of 2 Years but Less than
4 Years
For more information, see IPEDS Award Level.
1. Open the Maintain Config Table window.
2. Use
the vertical scroll bar to locate the row with the following information:
Module: CM
Function: CIP_ALLOW
Characteristic: 2_NOT_4_YR
Description: Allowed Months for CIP Award Level of 2 Years
but Less Than 4 Years
3. In the Configuration Value column, enter the appropriate numeric value.
4. Save.
![]() Configuring
the Number of Allowed Months for CIP Award Level of Associate's Degree
Configuring
the Number of Allowed Months for CIP Award Level of Associate's Degree
For more information, see IPEDS Award Level.
1. Open the Maintain Config Table window.
2. Use
the vertical scroll bar to locate the row with the following information:
Module: CM
Function: CIP_ALLOW
Characteristic: ASSOCIATES
Description: Allowed Months for CIP Award Level of Associate's
Degree
3. In the Configuration Value column, enter the appropriate numeric value.
4. Save.
![]() Configuring
the Number of Allowed Months for CIP Award Level of Bachelor's Degree
Configuring
the Number of Allowed Months for CIP Award Level of Bachelor's Degree
For more information, see IPEDS Award Level.
1. Open the Maintain Config Table window.
2. Use
the vertical scroll bar to locate the row with the following information:
Module: CM
Function: CIP_ALLOW
Characteristic: BACHELORS
Description: Allowed Months for CIP Award Level of Bachelor's
Degree
3. In the Configuration Value column, enter the appropriate numeric value.
4. Save.
![]() Configuring
the Number of Allowed Months for CIP Award Level of Doctor's Degree -
Other
Configuring
the Number of Allowed Months for CIP Award Level of Doctor's Degree -
Other
For more information, see IPEDS Award Level.
1. Open the Maintain Config Table window.
2. Use
the vertical scroll bar to locate the row with the following information:
Module: CM
Function: CIP_ALLOW
Characteristic: 19_DR_OTHER
Description: Allowed Months for CIP Award Level of Dr. Degree
- Other
3. In the Configuration Value column, enter the appropriate numeric value.
4. Save.
For more information, see IPEDS Award Level.
1. Open the Maintain Config Table window.
2. Use
the vertical scroll bar to locate the row with the following information:
Module: CM
Function: CIP_ALLOW
Characteristic: 18_DR_PROF_PRAC
Description: Allowed Months for CIP Award Level of Dr. Degree
- Prof Practice
3. In the Configuration Value column, enter the appropriate numeric value.
4. Save.
For more information, see IPEDS Award Level.
1. Open the Maintain Config Table window.
2. Use
the vertical scroll bar to locate the row with the following information:
Module: CM
Function: CIP_ALLOW
Characteristic: 17_DR_RESEARCH
Description: Allowed Months for CIP Award Level of Dr. Degree
- Research
3. In the Configuration Value column, enter the appropriate numeric value.
4. Save.
![]() Configuring
the Number of Allowed Months for CIP Award Level of Less Than 1 Year
Configuring
the Number of Allowed Months for CIP Award Level of Less Than 1 Year
For more information, see IPEDS Award Level.
1. Open the Maintain Config Table window.
2. Use
the vertical scroll bar to locate the row with the following information:
Module: CM
Function: CIP_ALLOW
Characteristic: LESS_1_YR
Description: Allowed Months for CIP Award Level of Less
Than 1 Year
3. In the Configuration Value column, enter the appropriate numeric value.
4. Save.
![]() Configuring
the Number of Allowed Months for CIP Award Level of Master's Degree
Configuring
the Number of Allowed Months for CIP Award Level of Master's Degree
For more information, see IPEDS Award Level.
1. Open the Maintain Config Table window.
2. Use
the vertical scroll bar to locate the row with the following information:
Module: CM
Function: CIP_ALLOW
Characteristic: MASTERS
Description: Allowed Months for CIP Award Level of Master's
Degree
3. In the Configuration Value column, enter the appropriate numeric value.
4. Save.
![]() Configuring
the Number of Allowed Months for CIP Award Level of Post Baccalaureate
Certificate
Configuring
the Number of Allowed Months for CIP Award Level of Post Baccalaureate
Certificate
For more information, see IPEDS Award Level.
1. Open the Maintain Config Table window.
2. Use
the vertical scroll bar to locate the row with the following information:
Module: CM
Function: CIP_ALLOW
Characteristic: POST_BACC
Description: Allowed Months for CIP Award Level of Post
Baccalaureate Certificate
3. In the Configuration Value column, enter the appropriate numeric value.
4. Save.
![]() Configuring
the Number of Allowed Months for CIP Award Level of Post Master's Degree
Configuring
the Number of Allowed Months for CIP Award Level of Post Master's Degree
For more information, see IPEDS Award Level.
1. Open the Maintain Config Table window.
2. Use
the vertical scroll bar to locate the row with the following information:
Module: CM
Function: CIP_ALLOW
Characteristic: POST_MASTERS
Description: Allowed Months for CIP Award Level of Post
Master's Degree
3. In the Configuration Value column, enter the appropriate numeric value.
4. Save.
![]() Configuring
the Number of Days to Add to Start Date to Get End Date
Configuring
the Number of Days to Add to Start Date to Get End Date
1. Open the Maintain Config Table window.
2. Use
the vertical scroll bar to locate the row with the following information:
Module: CM
Function: VEH_REG
Characteristic: VPNUMDAYS
Description: # of days to add to start date to get end date
(numeric)
3. In the Configuration Value column, enter the appropriate numeric value.
4. Save.
![]() Configuring
the Number of Normal Months for CIP Award Level of 1 Year But Less Than
2 Years
Configuring
the Number of Normal Months for CIP Award Level of 1 Year But Less Than
2 Years
For more information, see IPEDS Award Level.
1. Open the Maintain Config Table window.
2. Use
the vertical scroll bar to locate the row with the following information:
Module: CM
Function: CIP_NORMAL
Characteristic: 1_NOT_2_YR
Description: Normal Months for CIP Award Level of 1 Year Less
Than 2 Years
3. In the Configuration Value column, enter the appropriate numeric value.
4. Save.
![]() Configuring
the Number of Normal Months for CIP Award Level of 2 Years But Less Than
4 Years
Configuring
the Number of Normal Months for CIP Award Level of 2 Years But Less Than
4 Years
For more information, see IPEDS Award Level.
1. Open the Maintain Config Table window.
2. Use
the vertical scroll bar to locate the row with the following information:
Module: CM
Function: CIP_NORMAL
Characteristic: 2_NOT_4_YR
Description: Normal Months for CIP Award Level of 2 Years
Less Than 4 Years
3. In the Configuration Value column, enter the appropriate numeric value.
4. Save.
![]() Configuring
the Number of Normal Months for CIP Award Level of Associate's Degree
Configuring
the Number of Normal Months for CIP Award Level of Associate's Degree
For more information, see IPEDS Award Level.
1. Open the Maintain Config Table window.
2. Use
the vertical scroll bar to locate the row with the following information:
Module: CM
Function: CIP_NORMAL
Characteristic: ASSOCIATES
Description: Normal Months for CIP Award Level of Associate's
Degree
3. In the Configuration Value column, enter the appropriate numeric value.
4. Save.
![]() Configuring
the Number of Normal Months for CIP Award Level of Bachelor's Degree
Configuring
the Number of Normal Months for CIP Award Level of Bachelor's Degree
For more information, see IPEDS Award Level.
1. Open the Maintain Config Table window.
2. Use
the vertical scroll bar to locate the row with the following information:
Module: CM
Function: CIP_NORMAL
Characteristic: BACHELORS
Description: Normal Months for CIP Award Level of Bachelor's Degree
3. In the Configuration Value column, enter the appropriate numeric value.
4. Save.
![]() Configuring
the Number of Normal Months for CIP Award Level of Doctor's Degree - Other
Configuring
the Number of Normal Months for CIP Award Level of Doctor's Degree - Other
For more information, see IPEDS Award Level.
1. Open the Maintain Config Table window.
2. Use
the vertical scroll bar to locate the row with the following information:
Module: CM
Function: CIP_NORMAL
Characteristic: 19_DR_OTHER
Description: Normal Months for CIP Award Level of Dr. Degree
- Other
3. In the Configuration Value column, enter the appropriate numeric value.
4. Save.
For more information, see IPEDS Award Level.
1. Open the Maintain Config Table window.
2. Use
the vertical scroll bar to locate the row with the following information:
Module: CM
Function: CIP_NORMAL
Characteristic: 18_DR_PROF_PRAC
Description: Normal Months for CIP Award Level of Dr. Degree
- Prof Practice
3. In the Configuration Value column, enter the appropriate numeric value.
4. Save.
For more information, see IPEDS Award Level.
1. Open the Maintain Config Table window.
2. Use
the vertical scroll bar to locate the row with the following information:
Module: CM
Function: CIP_NORMAL
Characteristic: 17_DR_RESEARCH
Description: Normal Months for CIP Award Level of Dr. Degree
- Research
3. In the Configuration Value column, enter the appropriate numeric value.
4. Save.
![]() Configuring
the Number of Normal Months for CIP Award Level of Less Than 1 Year
Configuring
the Number of Normal Months for CIP Award Level of Less Than 1 Year
For more information, see IPEDS Award Level.
1. Open the Maintain Config Table window.
2. Use
the vertical scroll bar to locate the row with the following information:
Module: CM
Function: CIP_NORMAL
Characteristic: LESS_1_YR
Description: Normal Months for CIP Award Level of Less Than
1 Year
3. In the Configuration Value column, enter the appropriate numeric value.
4. Save.
![]() Configuring
the Number of Normal Months for CIP Award Level of Master's Degree
Configuring
the Number of Normal Months for CIP Award Level of Master's Degree
For more information, see IPEDS Award Level.
1. Open the Maintain Config Table window.
2. Use
the vertical scroll bar to locate the row with the following information:
Module: CM
Function: CIP_NORMAL
Characteristic: MASTERS
Description: Normal Months for CIP Award Level of Master's
Degree
3. In the Configuration Value column, enter the appropriate numeric value.
4. Save.
![]() Configuring
the Number of Normal Months for CIP Award Level of Post Baccalaureate
Certificate
Configuring
the Number of Normal Months for CIP Award Level of Post Baccalaureate
Certificate
For more information, see IPEDS Award Level.
1. Open the Maintain Config Table window.
2. Use
the vertical scroll bar to locate the row with the following information:
Module: CM
Function: CIP_NORMAL
Characteristic: POST_BACC
Description: Normal Months for CIP Award Level of Post Baccalaureate
Certificate
3. In the Configuration Value column, enter the appropriate numeric value.
4. Save.
![]() Configuring
the Number of Normal Months for CIP Award Level of Post Master's Degree
Configuring
the Number of Normal Months for CIP Award Level of Post Master's Degree
For more information, see IPEDS Award Level.
1. Open the Maintain Config Table window.
2. Use
the vertical scroll bar to locate the row with the following information:
Module: CM
Function: CIP_NORMAL
Characteristic: POST_MASTERS
Description: Normal Months for CIP Award Level of Post Master's
Degree
3. In the Configuration Value column, enter the appropriate numeric value.
4. Save.
![]() Configuring
the Relationship Code for the Name Search and Duplicate Name Search Results
Function
Configuring
the Relationship Code for the Name Search and Duplicate Name Search Results
Function
1. Open the Maintain Config Table window.
2. Use
the vertical scroll bar to locate the row with the following information:
Module: CM
Function: NAME_SEARCH
Characteristic: SPSE_REL_CDE
Description: Rel code for the spouse relationship in the
Search Results
Configuration Value: SPSE
3. In the Configuration Value column, enter the relationship code you want to use.
4. Save.
![]() Configuring
the System for Citizenship Status Text for Ethnicity and Race Portlet
Configuring
the System for Citizenship Status Text for Ethnicity and Race Portlet
To configure the Country Code:
1. Open the Maintain Config Table window.
2. Use
the vertical scroll bar to locate the row with the following information:
Module: CM
Function: BIOGRAPH_MASTER
Characteristic: CITIZEN_COUNTRY
Description: This is the country of the school where J1
Desktop is deployed
Type: Text
3. In the Configuration Value column, enter the appropriate country code.
4. Save.
To configure text for the Resident Alien radio button:
1. Open the Maintain Config Table window.
2. Use
the vertical scroll bar to locate the row with the following information:
Module: CM
Function: BIOGRAPH_MASTER
Characteristic: CITIZEN_LPR
Description: Text sent to campus portal (JICS) for Citizen-Legal
Permanent Resident
Type: Text
3. In the Configuration Value column, enter the appropriate text that appears in Ethnicity and Race portlet in campus portal (JICS) for the Resident Alien radio button.
4. Save.
To configure text for the Nonresident Alien radio button:
1. Open the Maintain Config Table window.
2. Use
the vertical scroll bar to locate the row with the following information:
Module: CM
Function: BIOGRAPH_MASTER
Characteristic: CITIZEN_NRA
Description: Text sent to campus portal (JICS) for Citizen-Nonresident
Alien
Type: Text
3. In the Configuration Value column, enter the appropriate text that displays in the Ethnicity and Race portlet in campus portal (JICS) for the Nonresident Alien radio button.
4. Save.
To configure text for the Citizen radio button:
1. Open the Maintain Config Table window.
2. Use
the vertical scroll bar to locate the row with the following information:
Module: CM
Function: BIOGRAPH_MASTER
Characteristic: CITIZEN_OF
Description: Text sent
Type: Text
3. In the Configuration Value column, enter the appropriate text that displays in the Ethnicity and Race portlet in campus portal (JICS) for the Citizen radio button.
4. Save.
![]() Configuring
the System for Requirements on Race and Ethnicity Portlet
Configuring
the System for Requirements on Race and Ethnicity Portlet
IPEDS has indicated that an individual should be able to identify one or more race values without answering the Ethnicity question and that the Race answer(s) should be used to calculate the IPEDS value. Therefore, the following three (3) configuration options determine data that are required on the Ethnicity and Race portlet in campus portal (JICS):
· Citizenship
· Ethnicity
· Race
To configure the requirement for Citizenship:
1. Open the Maintain Config Table window.
2. Use
the vertical scroll bar to locate the row with the following information:
Module: CM
Function: ETHNIC_RACE
Characteristic: CITIZEN_REQ
Description: Indicates if Citizenship is required in the
portlet
Type: YN
3. In the Configuration Value column, enter Y if you wish to require the Ethnicity and Race portlet user to select one of the 3 Citizenship values.
4. Save.
To configure the requirement for Ethnicity:
1. Open the Maintain Config Table window.
2. Use
the vertical scroll bar to locate the row with the following information:
Module: CM
Function: ETHNIC_RACE
Characteristic: ETHNIC_REQ
Description: Indicates if Ethnicity is required in the portlet
Type: YN
3. In the Configuration Value column, enter Y if you wish to require the Ethnicity and Race portlet user to select one of the 2 Ethnicity values.
4. Save.
To configure the requirement for Race:
1. Open the Maintain Config Table window.
2. Use
the vertical scroll bar to locate the row with the following information:
Module: CM
Function: ETHNIC_RACE
Characteristic: RACE_REQ
Description: Indicates if Race is required in the portlet
Type: YN
3. In the Configuration Value column, enter Y if you wish to require the Ethnicity and Race portlet user to select one of the 5 Race values.
4. Save.
![]() Configuring
the System to Automatically Open Drop-Downs
Configuring
the System to Automatically Open Drop-Downs
1. Open the Maintain Config Table window.
2. Use
the vertical scroll bar to locate the row with the following information:
Module: **
Function: drop-down
Characteristic: AUTOdrop-down
Description: Should the drop-down happen automatically?
Type: YN
3. In the Configuration Value column, enter Y (default is N) to have the drop-down list boxes to automatically display when you start to edit or type in the column or N to have the drop-down list boxes display by clicking the down arrow.
4. Save.
![]() Configuring
the System to Display or Not Display the Privacy Act Text
Configuring
the System to Display or Not Display the Privacy Act Text
|
Since this is a global configuration (i.e., affects all users), only system administrators should configure whether or not to display the Privacy Act Text. |
1. Open the Maintain Config Table window.
2. Use
the vertical scroll bar to locate the row with the following information:
Module: **
Function: GLOBAL_VARIABLE
Characteristic: DISP_PRIVACY_TX
Description: Display privacy text
Type: YN
3. In the Configuration Value column, enter Y to have the system display the text when you open the software or N to have the system not display the text when you open the software.
4. Save.
![]() Configuring
the System to Enable Modifiable Datawindows
Configuring
the System to Enable Modifiable Datawindows
1. Open the Maintain Config Table window.
2. Use
the vertical scroll bar to locate the row with the following information:
Module: **
Function: GLOBAL_VARIABLE
Characteristic: MODIFY_DWS
Description: Enable Modifiable Datawindows
Type: Y/N
3. In the Configuration Value column, enter Y to enable datawindows to be modifiable or N to disable modifiable datawindows.
4. Save.
![]() Configuring
the System to Search for Duplicate Names
Configuring
the System to Search for Duplicate Names
1. Open the Maintain Config Table window.
2. Use
the vertical scroll bar to locate the row with the following information:
Module: CM
Function: Name_Entry
Characteristic: DUP_NAME_CHECK
Description: Perform duplicate name check
Type: YN
3. In the Configuration Value column, enter Y to turn on or N to turn off the Duplicate Name Search function.
4. Save.
![]() Configuring
the System to Search for Duplicate Social Security Numbers
Configuring
the System to Search for Duplicate Social Security Numbers
1. Open the Maintain Config Table window.
2. Use
the vertical scroll bar to locate the row with the following information:
Module: CM
Function: BIOGRAPH_MASTER
Characteristic: SSN_UNIQUE
Description: SSN Unique
Type: YN
3. In the Configuration Value column, enter Y to have the system check for duplicate Social Security Numbers or N to have the system disregard duplicate Social Security Numbers.
4. Save.
![]() Configuring
the Web Client Utility Path and Executable File
Configuring
the Web Client Utility Path and Executable File
1. Open the Maintain Config Table window.
2. Use
the vertical scroll bar to locate the row with the following information:
Module: **
Function: WEB_COM
Characteristic: WEB_COM
Description: Web client utility path and executable
3. In the Configuration Value column, enter the path to the appropriate file.
4. Save.
![]() Configuring
Whether to Send E-Mail Messages from Individual Client Machines or from
Server
Configuring
Whether to Send E-Mail Messages from Individual Client Machines or from
Server
1. Open the Maintain Config Table window.
2. Use
the vertical scroll bar to locate the row with the following information:
Module: **
Function: GLOBAL_VARIABLE
Characteristic: EMAIL_PROC_NOTF
Description: Use the process notification service to send
e-mail message from J1 Desktop?
3. In
the Configuration Value column:
If you enter N, e-mail messages
will be sent through ASPEmail installed on the client machine.
If you enter Y, Process Notification
tables will be populated with data so that the J1 Client Application
Services on the process machine will generate the mail using ASPEmail
on that machine.
4. Save.
![]() Enabling
and Configuring J1 Web Residence Life Features
Enabling
and Configuring J1 Web Residence Life Features
1. Open the Maintain Config Table window.
2. Use
the vertical scroll bar to locate the row with the following information:
Module: SA
Function: CONFIG
Characteristic: RESLIFE_ENABLED
Description: Are you using the new Residence Life features?
3. In
the Configuration Value column:
If you have not yet switched to the new Residence Life features in
J1 Web, select N. This will ensure that locations and facilities will
be indicated by labels 0f Location, Building, and Room in the windows
and reports listed below.
If you have switched to the new Residence Life features in J1 Web,
select Y. This will change location and facility labels to Campus,
Place, and Space in the windows and reports listed below.
4. The location labels are affected on these windows and reports:
Maintain Keys window
Maintain Key Details window
Key History window
Keys by Issuee window
Keys Report window
Keys by Location report
Keys by Due Date report
5. Save.