|
Information and features vary according to the roles to which you belong and the permissions associated with those roles. For more information, contact your module manager or your campus support team. |
|
Information and features vary according to the roles to which you belong and the permissions associated with those roles. For more information, contact your module manager or your campus support team. |
Use this window to work with W-2 forms. From this window, you can:
W-2s are usually run at the end of each calendar year (January of the following year); however, they can be generated when needed for all or select employees by using the All or Individual radio buttons. Electronic W-2 forms are generated for employees who have opted in to receive them in J1 Web, and printable W-2 forms are generated for those who have not.
|
W-2s are generated only for those employees whose year-to-date gross is greater than zero for the current tax year. |
The Tax Year from the Payroll Controls window appears at the top of the Generate W-2s window so you can immediately tell what tax year you are validating, reviewing, or generating. A link to the Payroll Controls window also appears to those who have access to the window, allowing them to easily update the year when necessary.
|
The Tax Year choices are limited to the years where the W-2 and 1095-C processes are up-to-date in J1 Desktop. |
When generating W-2s, you can decide whether to replace the most recently generated W-2 with the new one or add a new version. A prompt appears giving you the option after you click the button to generate.
|
This validate check is based on your school's information, and is checking to make sure the school is properly setup to report W-2 information to the IRS. |
When you open the Generate W-2s window, validation checks run automatically. If errors are found, a message for each error appears stating the issue and providing a link to the appropriate window so you can make revisions. If you do not have full permissions to access the window where revisions need to be made, the window's name will not be hyperlinked. The following validation checks occur:
· The user name you log into J1 Desktop with must be in a Group ID that has permission to view employee Social Security numbers. If not, the error message contains a link (if user has access) to the Data Display Access window where this view permission is defined along with guidance to either have an administrator update the Group ID permissions or ask a user with full access to employee SSNs to print the form/report.
· The Employer ID Number on the Tax Tables window cannot be blank. If it is, the error message appears along with a link (if user has access) to the Tax Tables window.
· The following items on the W-2 Controls window cannot be blank. If any are, the corresponding error message appears along with a link (if user has access) to the W-2 Controls window.
o Transmitter Name, Address, City, State, Zip
o File Return Name, Address, City, State, Zip
o Kind of Employer
o Example
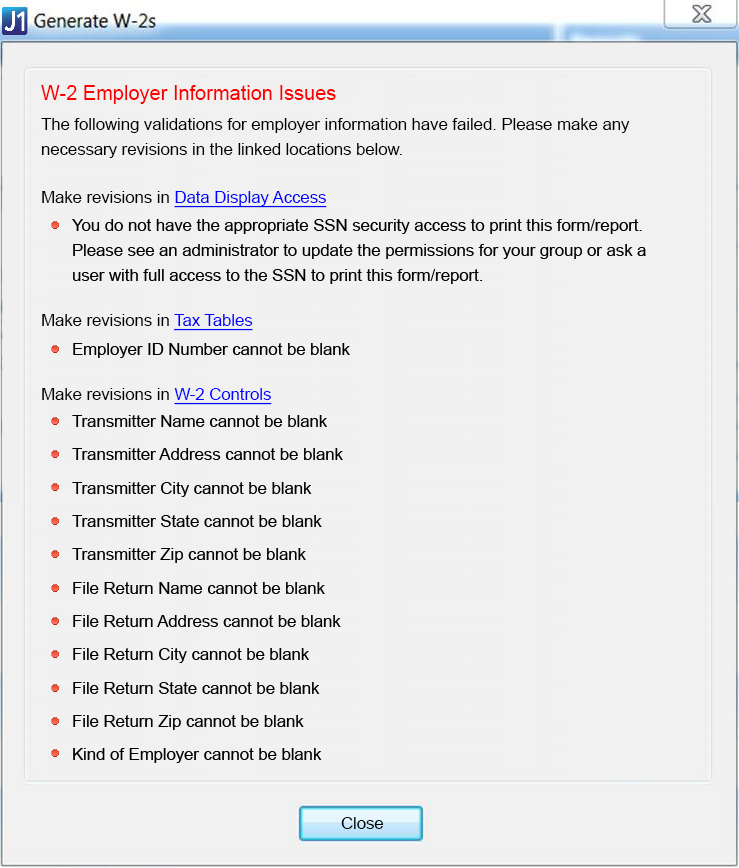
After an error is corrected, the corresponding error message no longer appears on the Generate W-2s window. Once all initial validation errors are corrected, the window's functionality appears.
Several reports can be created from the Generate W-2s window. Using the radio buttons at the top of the window, you can select Validate Employee Info to ensure accuracy, Review W-2s to preview your forms, or Generate W-2s to create forms and create a media file.
Use the Validate Employee Info radio button to generate reports that allow you to gather errors and adjustments before generating the W-2s.
The W-2 Error Report list employees who have any taxable amounts, tax amounts, or other reportable amounts (such as 401ks or dependent care) that are less than zero. Generated when validating employee information. Example

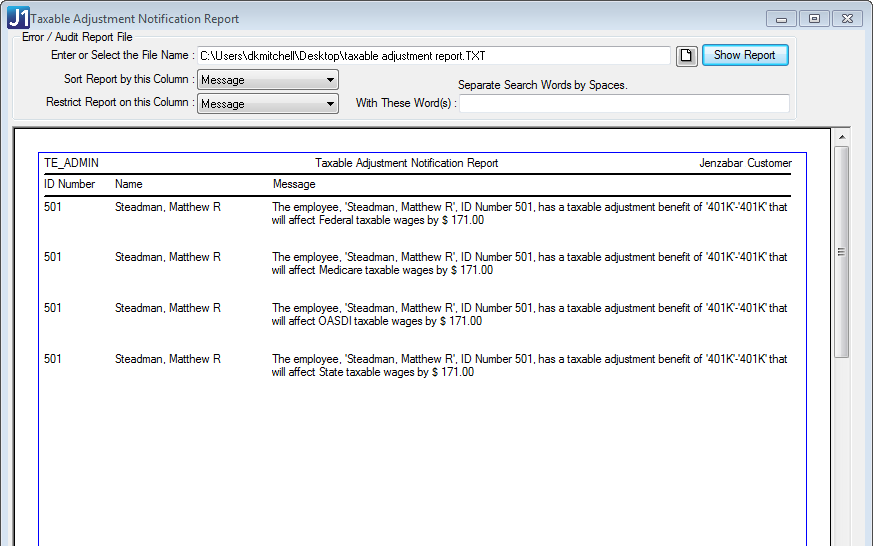
Taxable Adjustment Notification Report
Taxable Adjustment Notification Report generates a list of benefits for employees that had taxable adjustments throughout the year. Example
|
If the report lists taxable adjustments that were added to the employee's W-2 History, the following message is displayed: "The employee, Smith, John, ID Number #1, has a taxable adjustment in W-2 History of 'TAXAD,' that will affect Federal taxable wages by $100." |
When you select the Review W-2s radio option, and run a report using the Preview button, you will see two reports:
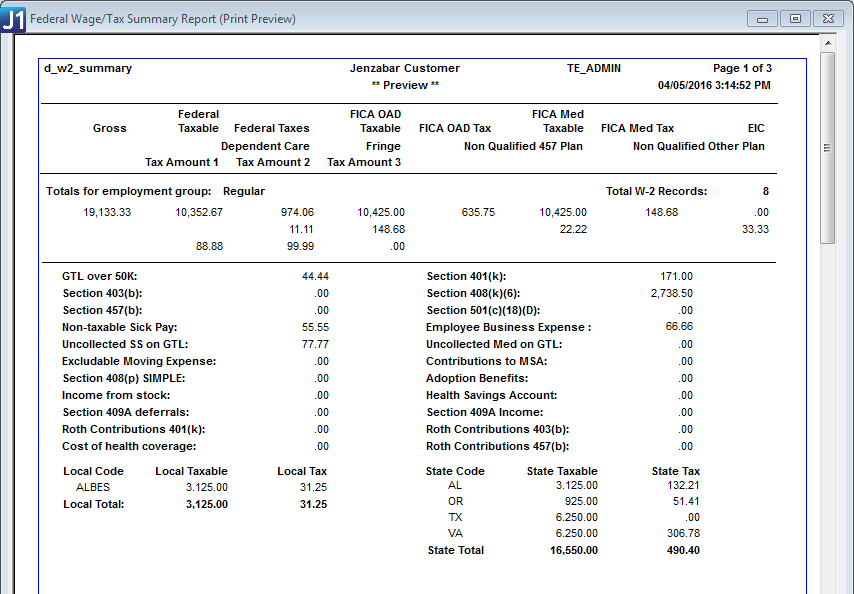
Federal Wage/Tax Summary Report
The Federal Wage/Tax Summary Report summarizes/totals employee wage/tax information reported on the W-2. This report is generated when previewing or generating W-2s. Example
|
If the report is generated for more than one employee, the totals are combined. |
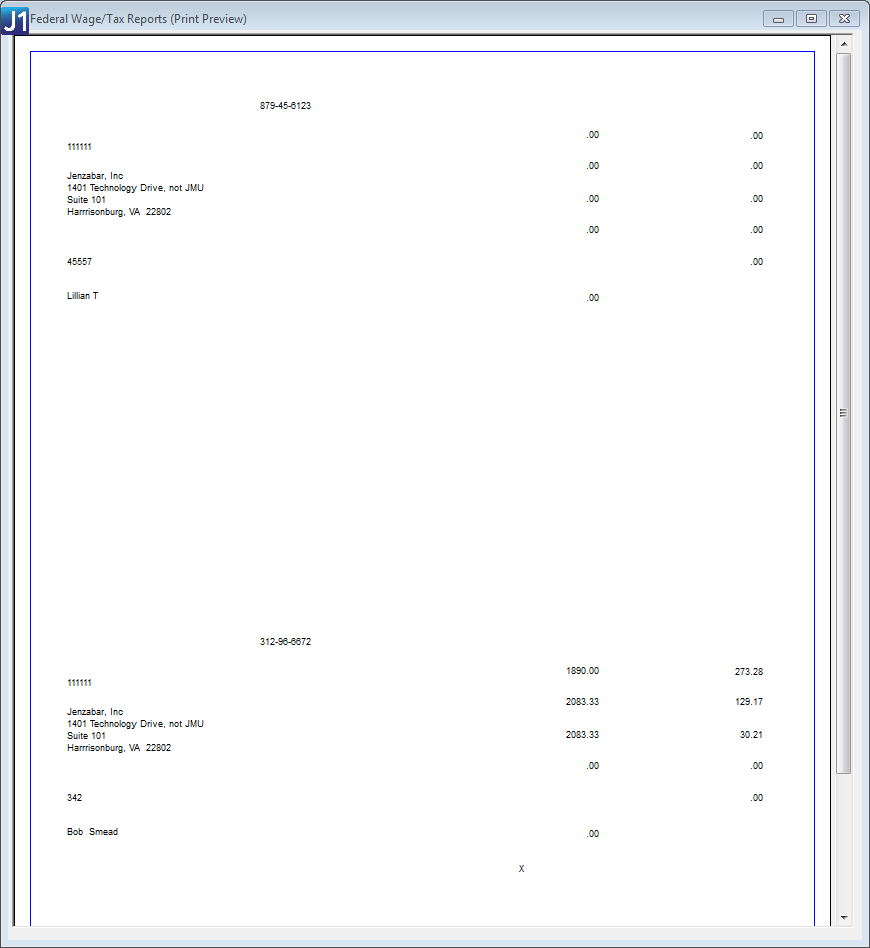
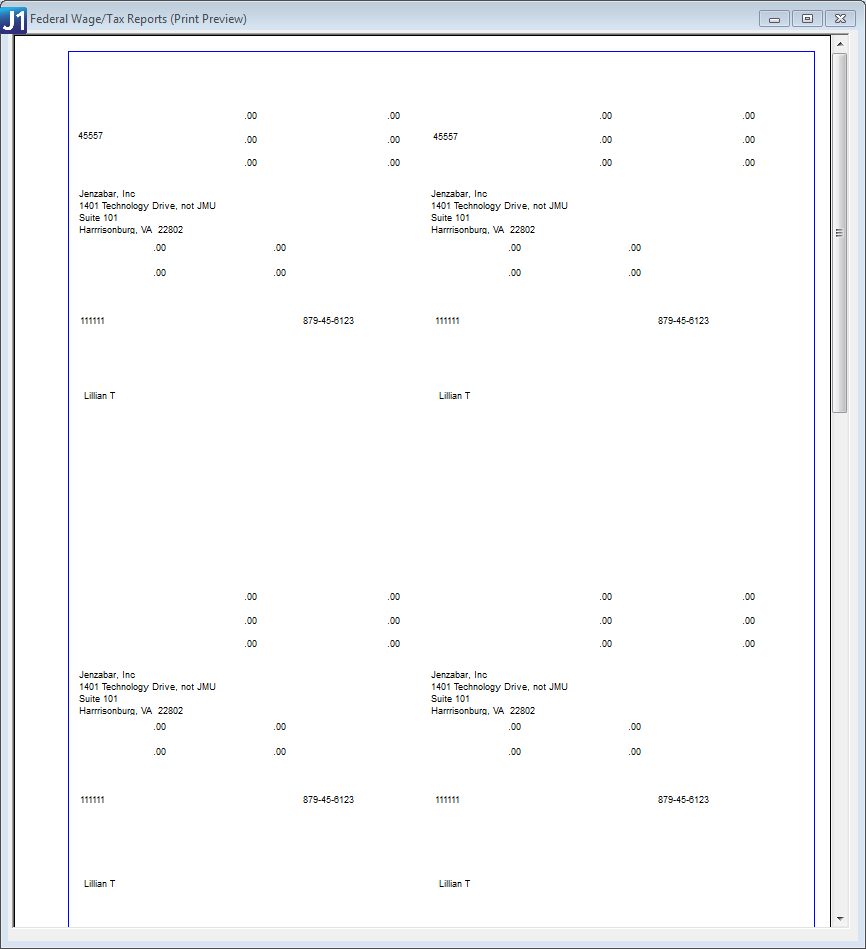
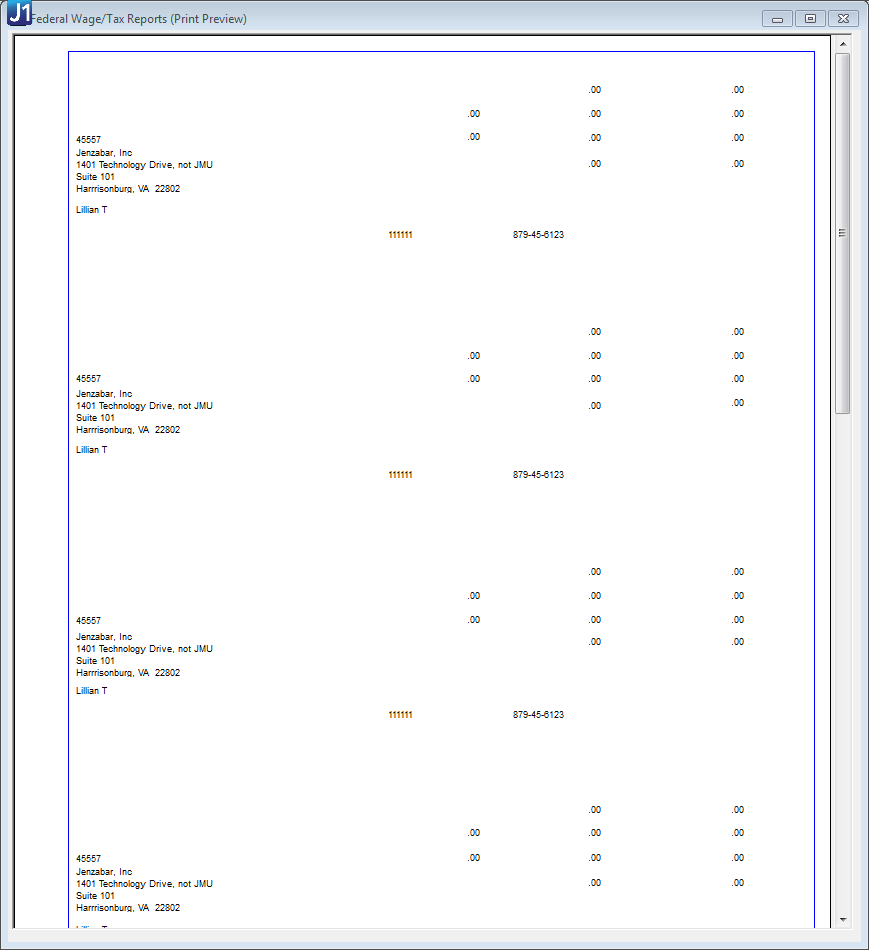
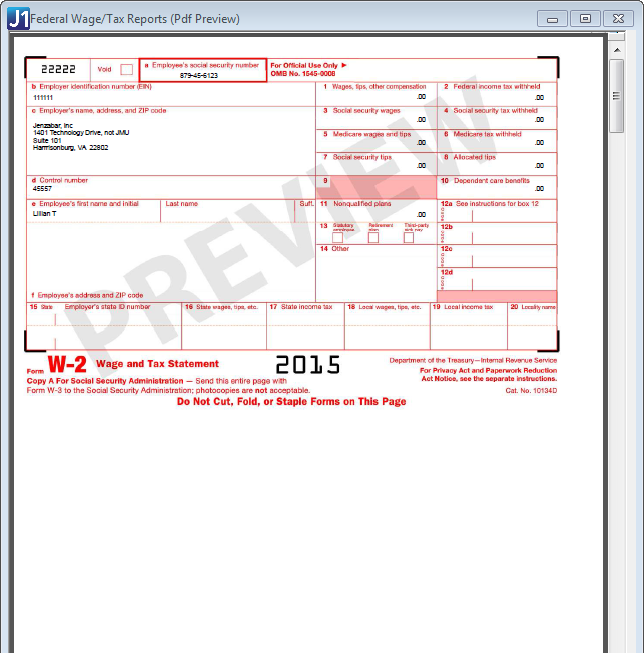
Federal Wage/Tax Reports (W-2s)
The Federal Wage/Tax Reports (W-2s) will display a preview for all or selected employees in a single window for you to save and/or print. Created when previewing W-2s, you can choose one of three formats (one wide, four part quadrant, or four part long) for the W-2s.
When the printed form is generated, a summary report automatically prints and includes totals for all of the W-2 columns and gross wages as well as a record count. Printed Form Examples
PDF files are generated when Review W-2s is selected. PDF Example*
One Wide Format Example
 |
W-2 Tax Reports can only be generated as a PDF in the One Wide format. In order to get the Four Part Quadrant or Four Part Long formats you need to use the Printed forms option. |
|
You can click the Customize button to create a customized version of the W-2 form. |
While reviewing employee information on the Review W-2s option of the Generating W-2s window, there may be errors in the employee information that you will want to update. Using the Edit W-2 Data button, to access the Edit Employee W-2 Data window, you are able to view and make changes to the existing data that appears on the W-2 forms.
|
Any changes made will not affect the original data. Changes made will remain until you edit the data in the Edit Employee W-2 Data window. |
When generating a preview of the W-2s, you can select the Use edited data checkbox if you want to see the changes made reflected in your W-2s. If you want to generate the W-2s with the original data, just make sure the Use edited data checkbox is not selected.
Once you have validated your data, reviewed your information and layout, and made any edits to your W-2, you can generate your W-2s.
If you make any changes to the W-2 data with the Edit Data option on the Review section, you can use this checkbox to generate your W-2 forms using the changes made rather than the original data. If you would like to use the original data, make sure this checkbox is not selected.
If selected, when you click the Preview or Generate options, the report will show the social security number masked except for the last four digits. For example, XX-XXX-6789. If left unselected, the social security number shows unmasked when previewing or generating. For example, 12-345-6789
The media file generated at the end of the calendar year is sent to federal and/or state governments and adheres to the EFW2 format for filing W-2 forms electronically. You can generate W-2s for either all of your employees or a selected list.
The Generate Media File checkbox controls whether or not a file is created with the W-2 information. If you need to generate the file multiple times in order to correct employee records each time, it is recommended you only create the file once the W-2s are correct, then run the option one final time to create the file.
· Select the checkbox to create the magnetic media file for employees.
· Clear the checkbox to prevent the magnetic media file from being created. The checkbox will not be displayed if the Selected Employees option is chosen. All Employees must be selected in order for the file to be created.
· When you Generate the file, you need to enter some information about the process and a contact person for the files. Example
|
For more information on W-2 forms, filing specifications, frequently asked questions, and more, go to the Social Security Administration website: https://www.ssa.gov/employer/ |
|
The optional RV State Total Record on the Magnetic Media File provides free space for state unemployment agencies or territorial jurisdictions. The purpose of the RV State Total Record is to summarize totals for all RS Records reported since the last RE Record. |
|
In order to add and populate this RV Record, you must edit the W-2 EFW2 file. The RV Record should follow the RU Total Record; and, if no RU Total Record is in the submission, then it should follow the RT Total Record. |
|
SSA and IRS do not read or process this information. Contact your State Revenue Agency to confirm the use of this record format and for questions about field definitions, covering transmittals, reporting procedures, etc. |
When you generate W-2 forms for employees, a master report is created as a PDF that includes all printable forms. Each master report shows the W-2s for employees that have not consented to receiving their 1095-C forms in J1 Web, listed in alphabetical order. You can access the master reports from the View Previous W-2s link on the Generate W-2s window. Example

|
This Master file allows you to print W-2 forms for your employees when they need it. For employees that opt-in to receiving their forms online, they can download and print their W-2 forms from the Employee Hub in J1 Web. |
If you do not have a license for J1 Web Employee, some of the features on the W-2 window may not be available or visible to you.
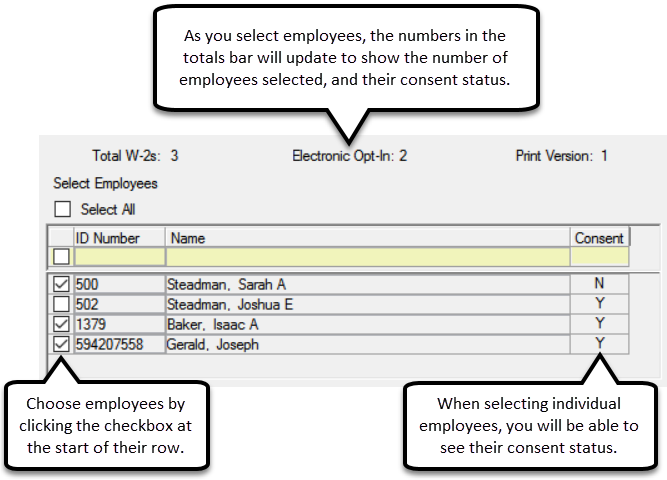
In the middle of the W-2 window, you will see a row with Total, Electronic Opt-in, and Print Version. This will show you the number of employees that have W-2 forms, the number that have chosen to receive electronic W-2s, and the number that will receive print-only versions of their W-2.
When using J1 Web to provide electronic W-2 forms to your employees, they will need to switch to electronic statement on the Annual Statements page of the J1 Web Employee Hub. Alternatively, consent to receive electronic W-2s can be assigned on the Header tab of the HR Employee Master via Payroll window using the Electronic W-2 checkbox.
To see which employees have opted into electronic statements from the Generating W-2 window, click the Selected Employees radio button. In the Select Employees section, you can see a Y for consent granted or a N for consent not yet granted. Example
When you generate or preview the W-2 forms, you automatically get the printable forms that can be used with the pre-printed paper for W-2s. In addition to the printable versions, you will also see PDF files with the employee data already inserted into the W-2 form layout. For more details, see the examples shown in the Review W-2s and Generate W-2s sections below.
|
These pop-up PDF files will only show employees that have chosen not to have their electronic forms available online. If employees chose to view their forms online from the J1 Web Employee Hub, their form will not need to be printed and therefore will not be generated as a PDF. |
|
To view PDFs generated by this window, the following must be installed: · Adobe Reader, available for download from the Adobe website: https://get.adobe.com/reader/ · Ghostscript PDF Writer version 8.71. In addition, your printer must be configured to Print to File. Refer to the latest Jenzabar One Installation Guide for detailed instructions. |
When you generate W-2 forms for all employees, a master report is created as a PDF that includes all printable forms. Each master report will show the W-2s for all employees that have not consented to receiving their W-2forms in J1 Web, listed in alphabetical order.
|
If you would like to go back and view a W-2 form that was created at an earlier date, you can click the View Previous W-2s link that will open a new window and allow you to search and view previous versions for All or Selected employees. |
Validate Employee Information and/or Taxable Adjustments for All Employees
1. Access the Generate W-2s window.
2. Check the Tax Year in the top-left corner of the window to make sure you are generating reports for the correct calendar year.
3. Select the Validate Employee Info radio button.
4. Select the All Employees radio button.
|
The total number of employees who would receive W-2s at this point appears along with the breakdown of electronic versus print W-2s. These numbers help you reconcile other reports and let you know how many print forms you may need. |
5. To generate the W-2 Error Report listing employees who have any taxable amounts, tax amounts, or other reportable amounts (such as 401ks or dependent care) that are less than zero, click the Generate Report button in the Validate W-2s group box. The report is generated.
|
If you need to revise employee information, you can access the HR Employee Master (via Payroll or Personnel) window by clicking the Employee Master link in the Validate W-2s group box. |
6. To generate the Taxable Adjustment Notification Report, in the Taxable Adjustment Report/File group box,
a. Enter or select where the file is to be stored in the File Destination field.
|
To
browse to the location where you want the file stored, click
the Browse |
b. Click the Generate Report/File button. If taxable adjustments exist, the Taxable Adjustment Notification Report is generated. Otherwise, a message appears letting you know no taxable adjustments exist.
7. When finished,
click the Close button.
Validate Employee Information and/or Taxable Adjustments for Selected Employees
1. Access the Generate W-2s window.
2. Check the Tax Year in the top-left corner of the window to make sure you are generating reports for the correct calendar year.
3. Select the Validate Employee Info radio button.
4. Select the Selected Employees radio button. The Select Employees list appears displaying ID numbers, names, and electronic W-2 consent status for all employees whose year-to-date gross is greater than zero for the current tax year.
5. Select the employees whose W-2s and/or taxable adjustments you want to validate.
|
As you select employees, the number of employees who will receive W-2s and the numeric breakdown of electronic versus print W-2s adjust automatically. |
6. To generate the W-2 Error Report listing selected employees who have any taxable amounts, tax amounts, or other reportable amounts (such as 401ks or dependent care) that are less than zero, click the Generate Report button in the Validate W-2s group box. The report is generated.
|
If you need to revise employee information, you can access the HR Employee Master (via Payroll or Personnel) window by clicking the Employee Master link in the Validate W-2s group box. |
7. To generate the Taxable Adjustment Notification Report, in the Taxable Adjustment Report/File group box:
a. Enter or select where the file is to be stored in the File Destination field.
|
To
browse to the location where you want the file stored, click
the Browse |
b. Click the Generate Report/File button. If taxable adjustments exist, the Taxable Adjustment Notification Report is generated. Otherwise, a message appears letting you know no taxable adjustments exist.
8. When finished,
click the Close button.
1. Access the Generate W-2s window.
2. Check the Tax Year in the top-left corner of the window to make sure you are generating reports for the correct calendar year.
3. Select the Review W-2s radio button.
4. Select the All Employees radio button.
|
The total number of employees who would receive W-2s at this point appears along with the breakdown of electronic versus print W-2s. These numbers help you reconcile other reports and let you know how many print forms you may need. |
5. In the W-2 Format group box, select one of the following formats:
o One Wide - One W-2 form per person.
o 4 Part Quadrant - Four forms per person, dividing paper in quarters.
o 4 Part Long - Four forms per person, one after another.
6. In the Preview W-2s to be Generated group box, click the Preview button. A PDF preview of the Federal Wage/Tax Reports (W-2s) for all employees appears along with the Federal Wage/Tax Summary Report preview.
7. When finished,
save or close the previews and click the Close
button on the Generate W-2s
window.
View/Compare Previous W-2s for All Employees*
|
Follow the steps below if you are comparing current W-2s with a previous version. Alternatively, if you click the View Previous W-2s link at the top of the Generate W-2s window, start at step 6 below. |
|
The View Previous W-2s link appears only if W-2s, from any year, have been generated. |
1. Access the Generate W-2s window.
2. Check the Tax Year in the top-left corner of the window to make sure you are generating reports for the correct calendar year.
3. Select the Review W-2s radio button.
4. Select the All Employees radio button.
5. To compare the current W-2s with a previous version, click the Preview button in the Preview W-2s to be Generated group box to open the most recent W-2s. A PDF preview of the Federal Wage/Tax Reports (W-2s) for all employees appears along with the Federal Wage/Tax Summary Report preview.
6. In the Preview W-2s to be Generated group box, click the View Previous W-2s link. The View Previous W-2s window appears with All selected as both the View a Previous W-2... option and the Tax Year. All W-2s that have been generated are listed in the Available Versions grid.
7. To narrow down the list of available W-2s, select the year you want to view from the Tax Year drop-down list. W-2s that were generated for the selected year appear in the Available Versions grid.
|
A message appears if W-2s were not generated for that year. |
8. In the Available Versions grid, click on the W-2 version you want to view to select it.
9. Click the View W-2 button. A PDF preview of the Federal Wage/Tax Reports (W-2s) of the version you selected appears.
10. When finished,
save or close the preview windows and click the Close
button on the View Previous W-2s
and Generate W-2s windows.
Review W-2s for Selected Employees*
1. Access the Generate W-2s window.
2. Check the Tax Year in the top-left corner of the window to make sure you are generating reports for the correct calendar year.
3. Select the Review W-2s radio button.
4. Select the Selected Employees radio button. The Select Employees list appears displaying ID numbers, names, and electronic W-2 consent status for all employees whose year-to-date gross is greater than zero for the current tax year.
5. Select the employees whose W-2s you want to preview.
|
As you select employees, the number of employees who will receive W-2s and the numeric breakdown of electronic versus print W-2s adjust automatically. |
6. In the W-2 Format group box, select one of the following formats:
o One Wide - One W-2 form per person.
o 4 Part Quadrant - Four forms per person, dividing paper in quarters.
o 4 Part Long - Four forms per person, one after another.
7. In the Preview W-2s to be Generated group box, click the Preview button. A PDF preview of the Federal Wage/Tax Reports (W-2s) for all selected employees appears along with the Federal Wage/Tax Summary Report preview.
8. When finished,
save or close the previews and click the Close
button on the Generate W-2s
window.
View/Compare Previous W-2s for an Individual Employee*
|
Follow the steps below if you are comparing the employee's current W-2 with a previous version. Alternatively, if you click the View Previous W-2s link at the top of the Generate W-2s window, start at step 8 below. |
|
The View Previous W-2s link appears only if W-2s, from any year, have been generated. |
1. Access the Generate W-2s window.
2. Check the Tax Year in the top-left corner of the window to make sure you are generating reports for the correct calendar year.
3. Select the Preview W-2s radio button.
4. Select the Selected Employees radio button. The Select Employees list appears displaying ID numbers, names, and electronic W-2 consent status for all employees whose year-to-date gross is greater than zero for the current tax year.
5. Select the employees whose W-2s you want to view or compare.
6. To compare current W-2s with a previous version, click the Preview button in the Preview W-2s to be Generated group box to open the most recent W-2s. A PDF preview of the Federal Wage/Tax Reports (W-2s) for selected employees appears along with the Federal Wage/Tax Summary Report preview.
7. In the Preview W-2s to be Generated group box, click the View Previous W-2s link. The View Previous W-2s window appears with Individual selected as the View a Previous W-2... option. Any employees you selected on the Generate W-2s window appear in the Find an Individual search results.
8. To view previous W-2s for an employee you selected from the Generate W-2s window, go to step 9.
9. To search for the employee whose previous W-2s you would like to view,
a. In the Find an Individual group box, enter the employee's identifying information into the search fields: Last Name, First Name, ID, and/or SSN.
b. Click the Search button. Employees matching the search results appear in the grid.
10. Select the employee from the Find an Individual grid. All W-2s that have been generated for that employee are listed in the Available Versions grid.
11. In the Choose a W-2 Version group box, if you want to narrow down the list of available W-2s, select the year you want to view from the Tax Year drop-down list. W-2s that were generated for the selected year appear in the Available Versions grid.
|
A message appears if W-2s were not generated for that year. |
12. In the Available Versions grid, click on the W-2 version you want to view to select it.
13. Click
the View W-2 button. A PDF
preview of the Federal Wage/Tax Report (W-2) appears for the selected
employee and tax year.
Generate W-2s for All Employees and the Media File for the Government
1. Access the Generate W-2s window.
2. Check the Tax Year in the top-left corner of the window to make sure you are generating reports for the correct calendar year.
3. Select the Generate W-2s radio button.
4. Select the All Employees radio button.
|
The total number of employees who will receive W-2s appears along with the breakdown of electronic versus print W-2s. |
5. In the W-2 Format group box,
a. Select one of the following formats:
o One Wide - One W-2 form per person.
o 4 Part Quadrant - Four forms per person, dividing paper in quarters.
o 4 Part Long - Four forms per person, one after another.
b. Choose or customize the InfoMaker query if needed.
6. In the Generate W-2s group box,
a. Select or deselect the Mask SSN checkbox. When checked, the report will show the social security number masked except for the last four digits.
b. Select the Generate Media File checkbox to generate the file for the government.
c. Enter or select where the file will be saved in the Media File Destination field.
|
To
browse to the location where you want the file stored, click
the Browse |
d. Enter a title for the file in the Report Title field.
e. Click the Generate W-2s/Media File button. A prompt appears asking if you want to replace the most recent W-2 created or add a new version.
f. Click Replace if you want to override the most recent W-2 PDF displaying all employees with this one, or Add New if you want to keep the most recent version and create a new one.
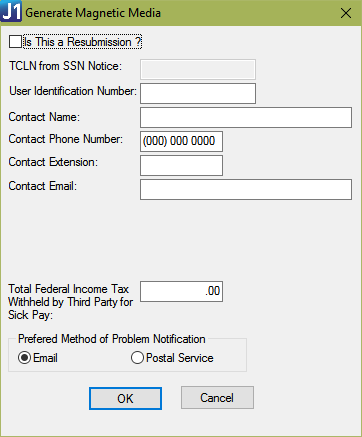
g. The Generate Magnetic Media window appears, where you can enter values that populate the Submitter Record (RA) in the EFW2 File (Magnetic Media File).
7. On the Generate Magnetic Media window Example
a. If you are resubmitting the magnetic media file, select the Is This a Resubmission? checkbox and enter the TCLN from SSN Notice.
b. Enter the following for the employee who is attesting to the accuracy of this file:
§ User ID
§ Name
§ Phone number
§ Extension
c. If appropriate, fill in the Total Federal Income Tax Withheld by Third Party for Sick Pay column.
d. Select either email or postal service under Preferred Method of Problem Notification.
e. Click the OK button. The Generate Magnetic Media window closes and the following are generated:
§ Media file
§ Federal Wage/Tax and Summary Reports for all employees
§ Printable W-2 forms for employees who have not opted in to receive electronic W-2s in J1 Web. This is the InfoMaker report for printing on preprinted forms.
§ If you have a license for J1 Web Employee:
PDF with W-2 forms (for all employees that have not consented to receive online W-2 forms in J1 Web), one per page, listed in alphabetical order.
Electronic W-2 forms. Employees who have opted in to receive electronic W-2s in J1 Web can now access their W-2s. You can send these employees a message to let them know their W-2s are available in J1 Web.
|
An electronic W-2 form is generated and saved for each employee, regardless of opt-in status. If employees choose to opt in to receive electronic W-2s in the future, they can view any past electronic W-2s that have been generated. |
8. When finished,
close the Generate W-2s window.
Generate W-2s for All Employees without the Media File
1. Access the Generate W-2s window.
2. Check the Tax Year in the top-left corner of the window to make sure you are generating reports for the correct calendar year.
3. Select the Generate W-2s radio button.
4. Select the All Employees radio button.
|
The total number of employees will receive W-2s appears along with the breakdown of electronic versus print W-2s. |
5. In the W-2 Format group box,
a. Select one of the following formats:
o One Wide - One W-2 form per person.
o 4 Part Quadrant - Four forms per person, dividing paper in quarters.
o 4 Part Long - Four forms per person, one after another.
b. Choose or customize the InfoMaker query if needed.
6. In the Generate W-2s group box,
a. Deselect the Generate Media File checkbox so the media file will not be generated.
b. Enter a title for the file in the Report Title field.
c. Click the Generate W-2s button. A prompt appears asking if you want to replace the most recent W-2 created or add a new version.
d. Click Replace if you want to override the most recent W-2 PDF displaying all employees with this one, or Add New if you want to keep the most recent version and create a new one.
e. The following are generated:
§ Federal Wage/Tax and Summary Reports for all employees
§ Printable W-2 forms for employees who have not opted in to receive electronic W-2s in J1 Web. This is the InfoMaker report for printing on preprinted forms.
§ If you have a license for J1 Web Employee:
PDF with W-2 forms (for all employees that have not consented to receive online W-2 forms in J1 Web), one per page, listed in alphabetical order.
Electronic W-2 forms. Employees who have opted in to receive electronic W-2s in J1 Web can now access their W-2s. You can send these employees a message to let them know their W-2s are available in J1 Web.
|
An electronic W-2 form is generated and saved for each employee, regardless of opt-in status. If employees choose to opt in to receive electronic W-2s in the future, they can view any past electronic W-2s that have been generated. |
7. When finished,
click the Close button.
Generate W-2s for Selected Employees
1. Access the Generate W-2s window.
2. Check the Tax Year in the top-left corner of the window to make sure you are generating reports for the correct calendar year.
3. Select the Generate W-2s radio button.
4. Select the Selected Employees radio button. The Select Employees list appears displaying ID numbers, names, and electronic W-2 consent status for all employees whose year-to-date gross is greater than zero for the current tax year.
5. Select the employees whose W-2s you want to generate.
|
As you select employees, the number of employees who will receive W-2s and the numeric breakdown of electronic versus print W-2s adjust automatically. |
6. In the W-2 Format group box,
a. Select one of the following formats:
o One Wide - One W-2 form per person.
o 4 Part Quadrant - Four forms per person, dividing paper in quarters.
o 4 Part Long - Four forms per person, one after another.
b. Choose or customize the InfoMaker query if needed.
7. In the Generate W-2s group box,
a. Enter a title for the file in the Report Title field.
b. Click the Generate W-2s button. A prompt appears asking if you want to replace the most recent W-2 created or add a new version.
c. Click Replace if you want to override the most recent W-2 with this one, or Add New if you want to keep the most recent version and create a new one.
d. The following are generated:
§ Federal Wage/Tax and Summary Reports for the selected employees
§ Printable W-2 forms for employees who have not opted in to receive electronic W-2s in J1 Web. This is the InfoMaker report for printing on preprinted forms.
§ If you have a license for J1 Web Employee:
PDF with W-2 forms (for all selected employees that have not consented to receive online W-2 forms in J1 Web), one per page, listed in alphabetical order.
Electronic W-2 forms. Employees who have opted in to receive electronic W-2s in J1 Web can now access their W-2s. You can send these employees a message to let them know their W-2s are available in J1 Web.
|
An electronic W-2 form is generated and saved for each selected employee, regardless of opt-in status. If employees choose to opt in to receive electronic W-2s in the future, they can view any past electronic W-2s that have been generated. |
8. When finished,
click the Close button.
Find Out When W-2s Were Last Generated for All Employees
1. Access the Generate W-2s window.
2. Check the Tax Year in the top-left corner of the window to make sure you are generating reports for the correct calendar year.
3. Select the Generate W-2s radio button.
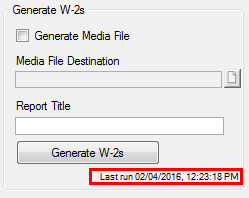
4. Look in the bottom right corner of the Generate W-2s group box for the "Last run..." date and time. If nothing appears, the W-2s have not yet been generated for all employees.
5. When finished,
click the Close button.
View an Employee's Electronic W-2 Consent Status*
1. Access the Generate W-2s window.
2. Select the Selected Employees checkbox. The Select Employees list appears displaying ID numbers, names, and electronic W-2 consent status for all employees whose year-to-date gross is greater than zero for the current tax year.
|
The Electronic W-2 checkbox on the Header tab of the HR Employee Master (via Payroll or Personnel) window also indicates whether the employee has consented to receive electronic W-2s. Those with permissions to this window can update the employee's electronic W-2 consent status by selecting or deselecting the Electronic W-2 checkbox when necessary. |
1. Access the Generate W-2s window. The selected Tax Year appears at the top of the window.
2. To change the tax year, click the displayed year link to access the Payroll Controls window.
|
If you have access to the Payroll Controls window, a link to it appears at the top of the Generate W-2s window. Click the link to open the window. |
3. Select the desired year from the Tax Year drop-down list.
4. Save your change
on the Payroll Controls window.
The Generate W-2s window reappears
displaying information from the updated year.
* Some features and steps are only available to users with a license for J1 Web Employee.