![]()
Due dates are usually January 31 for the paper report and March 31 for the magnetic media output. More information about submitting completed 1098-T paper forms or magnetic media files to the IRS is available at www.irs.gov or 1.800.829.1040.
Per IRS regulations, all current calendar year payment transactions marked "1098-T eligible" must appear on the 1098-T form for that year. Transaction history data is extracted based on the transaction date and 1098-T eligibility flag. Once the data has been retrieved, the year/term start and end dates help determine which box each amount is included in.
1098-Ts are typically generated in January for the previous calendar year; however, they can be created at any time for one or more individuals.
|
Due dates are usually January 31 for the paper report and March 31 for the magnetic media output. More information about submitting completed 1098-T paper forms or magnetic media files to the IRS is available at www.irs.gov or 1.800.829.1040. |
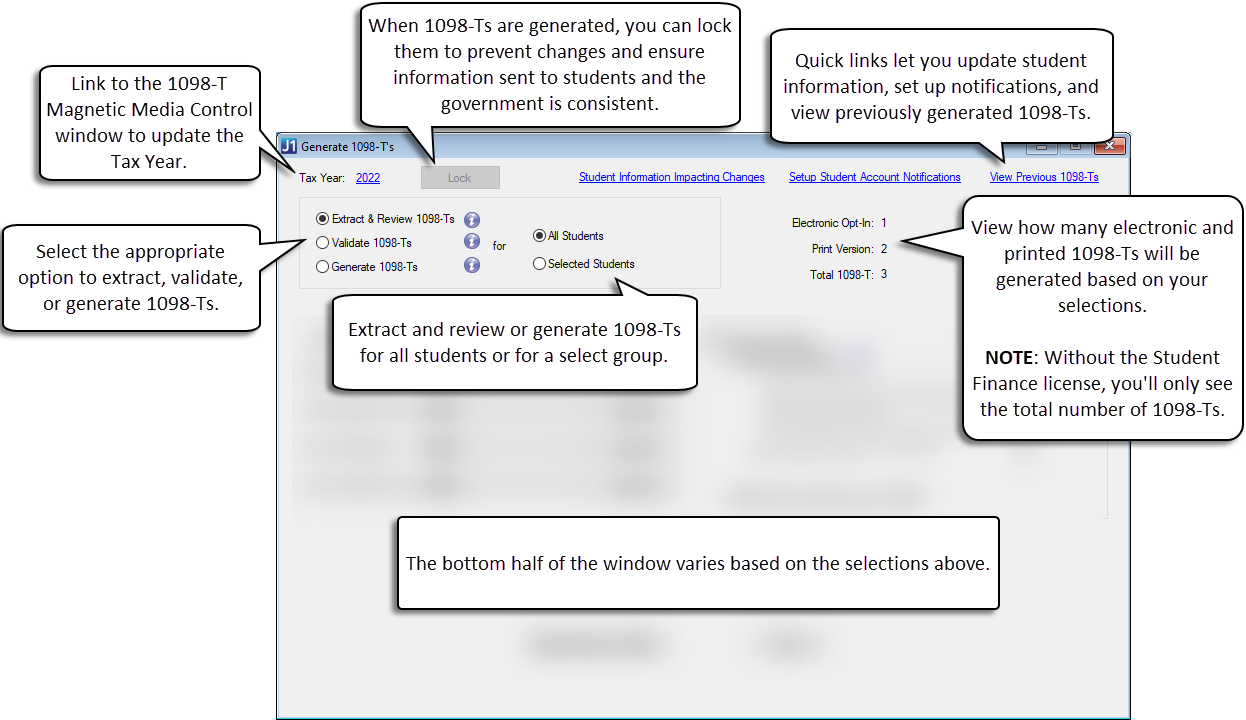
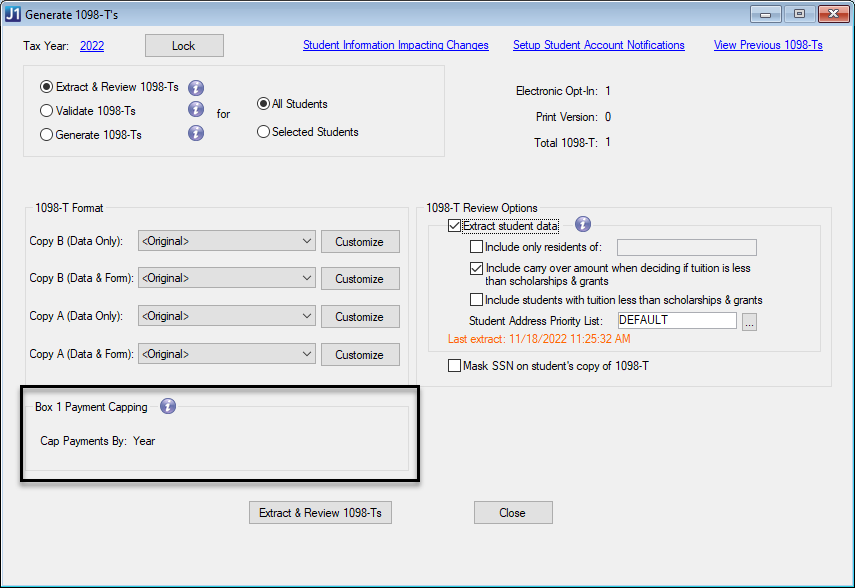
Use the Generate 1098-Ts window to work with 1098-T forms. The Tax Year appears at the top of the Generate 1098-Ts window as a link to the 1098-T Magnetic Media Control window. Use the link to easily update the tax year, if needed. Example
From this window, you can:
Extract student data
Edit and review 1098-T forms
Validate student data
Generate preliminary and final 1098-T forms
Print 1098-T forms
View previously generated and published 1098-T forms
View student 1098-T format preference
Create custom PDF versions of the 1098-T forms and publish to students
Lock 1098-T forms from additional updates
Create magnetic media output files to send to the federal government for a specified year
|
Refer to the 1098-T Overview and Preparing 1098-Ts help topics before running this process. |
Several reports can be created from the Generate 1098-T's window. Using the radio buttons at the top of the window, you can preview 1098-T reports, validate 1098-Ts to analyze student information, and generate 1098-Ts to run reports and create a magnetic media file.
 |
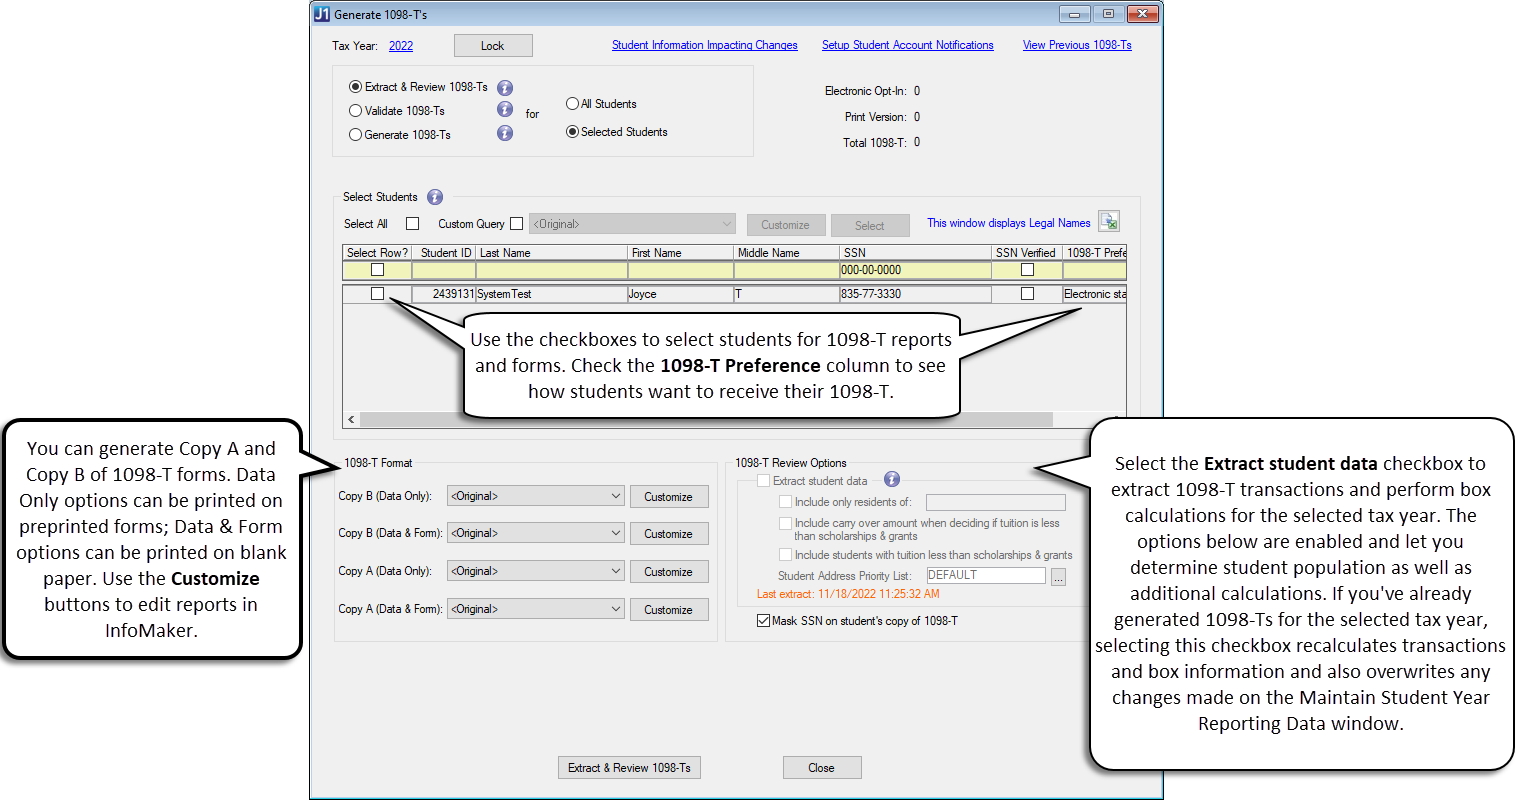
All 1098-T forms will display legal names for any selected IDs. Users will not be able to access the Generate 1098-T's window unless they have the appropriate permissions to view legal names. |
Before officially generating the 1098-T forms, you'll need to extract student data and review the student's information and box data. There are two ways you can review 1098-T Forms:
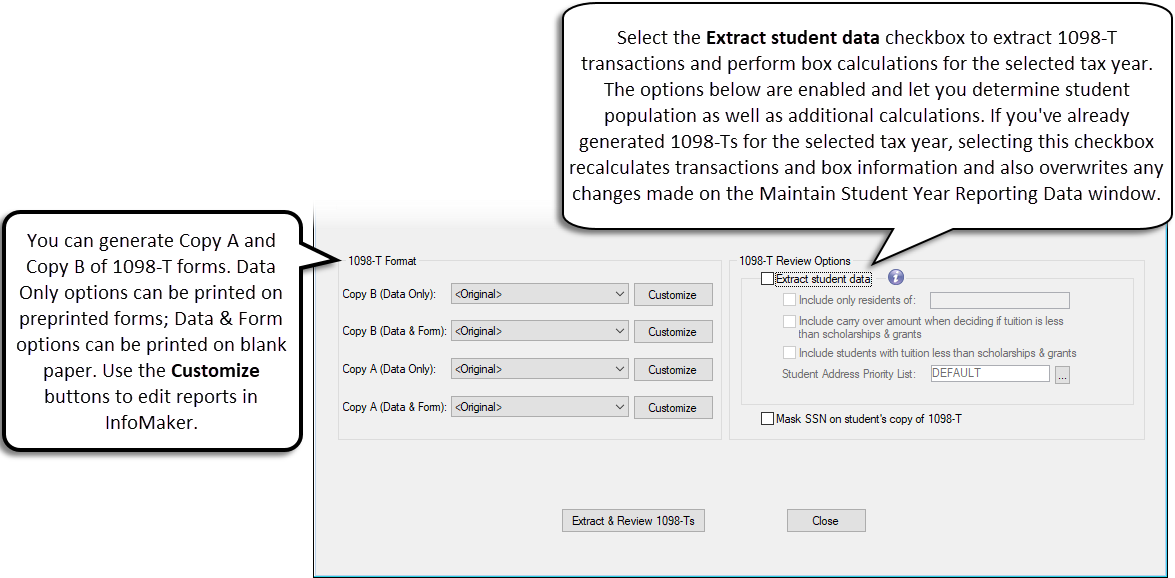
You can generate both Copy A (IRS copy) and Copy B (Student copy) versions of the 1098-T form. The "Data only" option is for printing forms on preprinted 1098-T forms, and the "Data & Form" option is for printing forms on blank paper. Use the Customize button to edit the format to fit your school's needs.
In the 1098-T Review Options section, select the Extract student data checkbox and use the options to determine how 1098-T totals are calculated. You can also choose to mask the social security number (SSN) for student copies of the 1098-T. The masked SSN displays only the last 4 digits; copies sent to the government must include the full SSN.
|
If you've already generated 1098-Ts for the selected tax year, selecting the Extract student data checkbox recalculates transactions and box information and also overwrites any changes made on the Maintain Student Year Reporting Data window. |
When you click Extract & Review 1098-Ts, the following reports are available for review. These reports are for reviewing only and cannot be published to students. Be sure to make any edits to student information and check 1098-T form layouts.
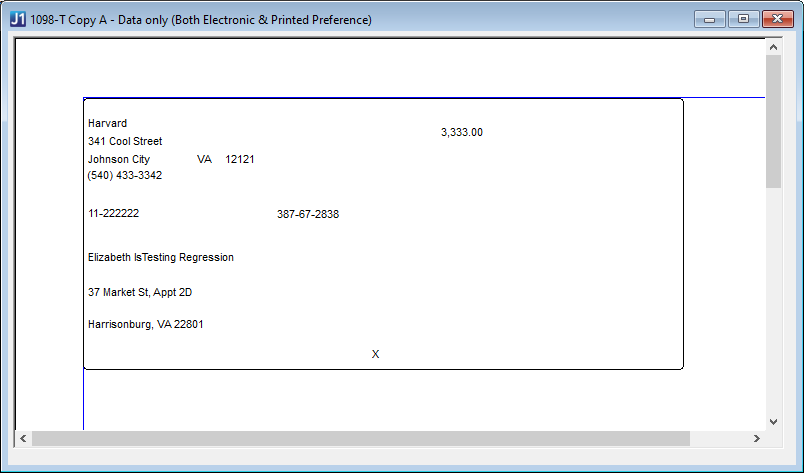
1098-T Copy A - Data only (Both Electronic & Printed Preference)
Includes all student data and can be printed on preprinted 1098-T forms. This version is for the government. Example
1098-T Copy B - Data only (Both Electronic & Printed Preference)
Includes all student data and can be printed on preprinted 1098-T forms. This version is for the student. Example

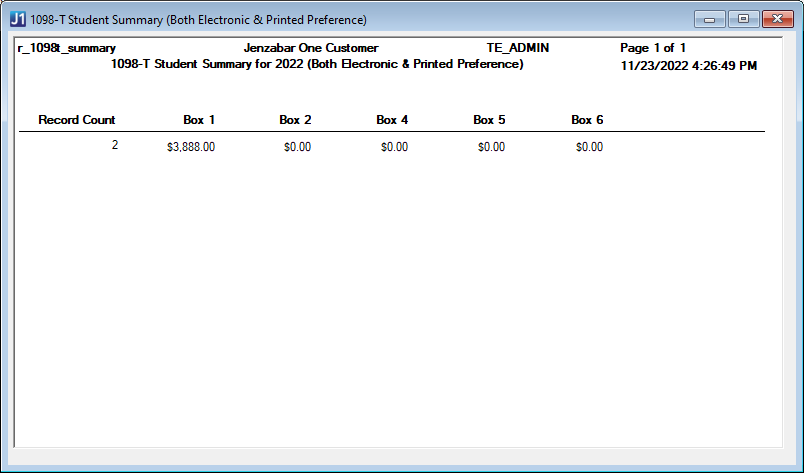
1098-T Student Summary (Both Electronic & Printed Preference)
Summarizes 1098-T box totals for all selected students. Example
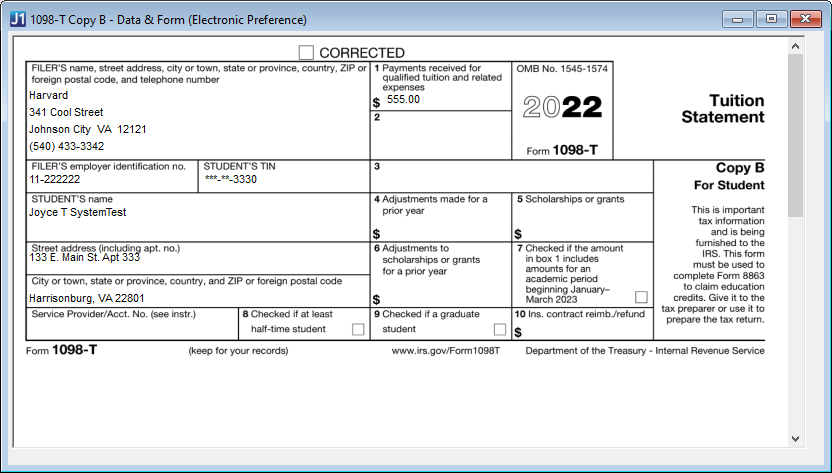
1098-T Copy B - Data & Form (Electronic Preference)*
Includes only students who have opted-in to Electronic Statement delivery. When the Publish to Students button is clicked, these PDF forms are available for students to download from their Financial Document Center on the Campus Portal. Example
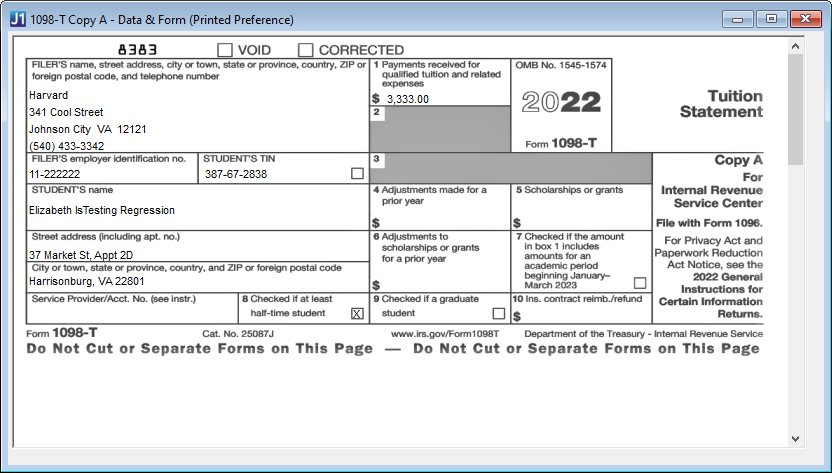
1098-T Copy A - Data & Form (Printed Preference)
Includes only students that have opted-in to Printed Statement delivery. When selected, the form can be printed on blank paper and mailed to students. Example
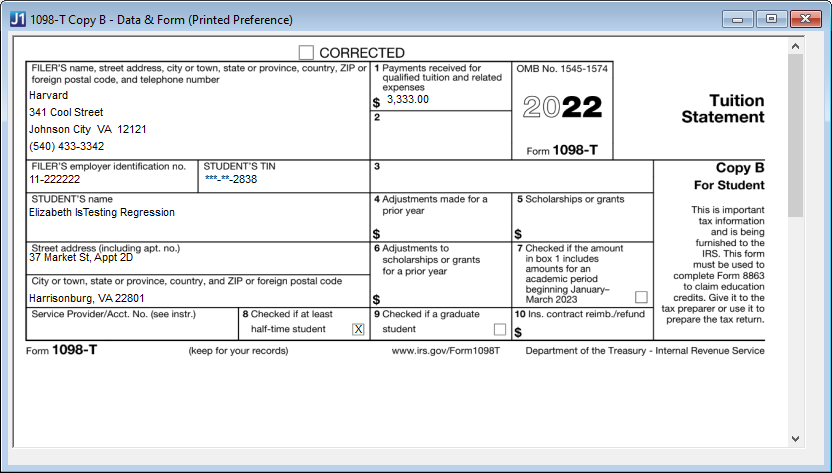
1098-T Copy B - Data & Form (Printed Preference)*
Includes only students who have opted-in to Printed Statement delivery. These PDF forms can be printed and mailed to students. Example
* Requires the Student Finance license
|
Once you have reviewed your forms, you can edit if necessary or move on to generate student 1098-T forms. |
|
You must select the Extract student data checkbox for the Box 1 Payment Capping options to appear on the Generate 1098-T window. |
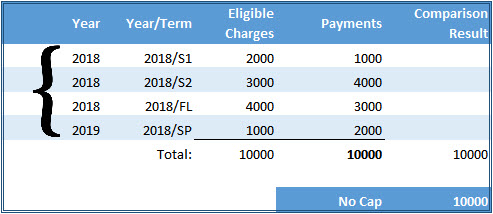
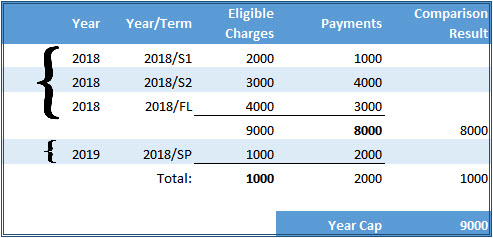
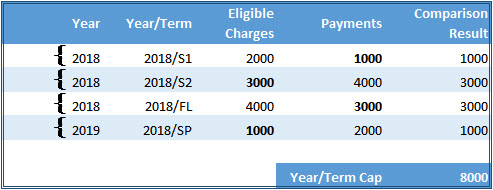
Cap Payments By options will allow you to determine any Box 1 maximums. The 1098-T process will calculate the Box 1 amount differently depending on which option you select.
If you are re-extracting data for a year that has already been processed, the capping options are locked and you can only use the capping option selected for the previously processed forms. Example
While reviewing student information on the Review 1098-T option of the Generating 1098-T window, there may be errors in the student information that you want to update. When you click the Review 1098-T button, a pop-up message appears to confirm you want to edit the data before continuing. If you need to make changes, click Yes to access the Maintain Student Year Reporting Data window.
|
The changes made in the Maintain Student Year Reporting Data window do not affect the original data. Changes remain until you edit the data in the Maintain Student Year Data window or re-extract the data to generate the 1098-Ts. |
Use these audit reports to help review student 1098-T information and determine which students and their associated transactions will be included/excluded in the 1098-T total amounts. You can preview the reports and customize the report queries as needed. Audit reports are grouped by ID number and then by box number. These reports are not submitted to the government. Example
Use the Preview button to view the following reports:
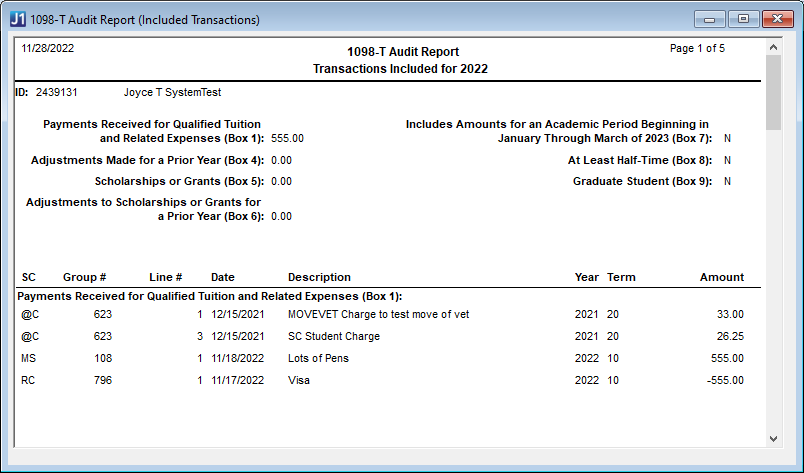
This report will display all transactions that will be included for each ID number processed for the selected 1098-T processing year, broken out by Payments Received (for qualified tuition and related expenses), Amounts Billed, Adjustments for Prior Year, and Adjustments to Scholarships or Grants for the previous year.
In the report, the list of included transactions will be sorted by student. Each student header will include name, ID number, 1098-T box amounts, and any additional box information. Each student will also have a details area that will display a list of transactions that were included in the calculation of the 1098-T box amounts These should match up to the numbers reported in the appropriate boxes on the 1098-T form. Example
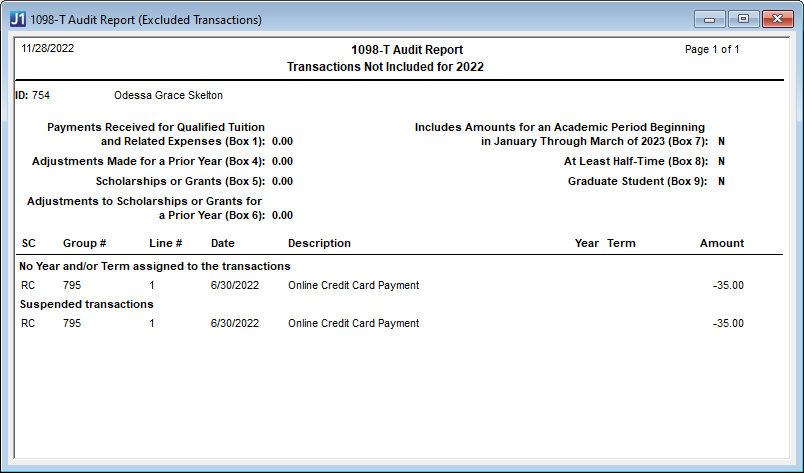
This report will display all transactions that will not be included in the 1098-T process due to certain criteria not being met. Any transactions that were excluded from 1098-T box calculations are stored in a table and used to create the Excluded Transactions report. In the report, the list of exclusions will be sorted by student. Each student header will include name, ID number, 1098-T box amounts, and any additional box information. Each student will also have a details area that will include a list of transactions excluded from the 1098-T calculations along with an "exclusion reason" to help the user determine why transactions were excluded from the process. Example
The Error / Warning report will show any data errors identified during extraction that should be reviewed before finalizing and sending forms to students. In the report, the list of issues will be sorted by student. Each student header will include name, ID number, and any additional box information. Each student will also have a details area that will display a list of issues that are related to the student. Example
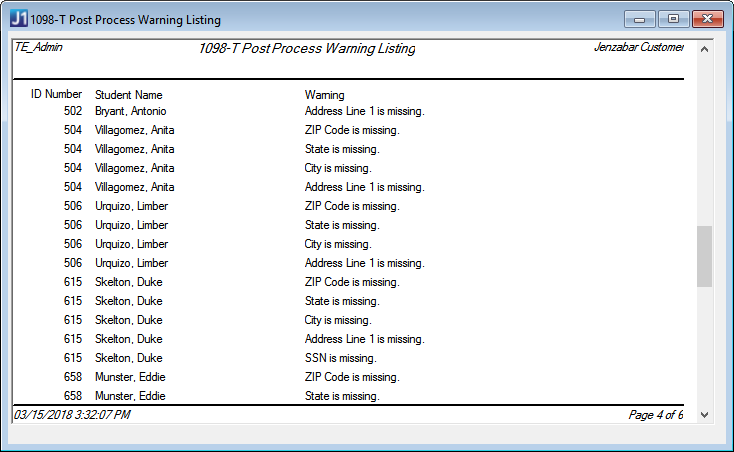
|
Make sure all warnings are reviewed and corrected. 1098-T information for students that appears on the Warning Listing report is not extracted into the 1098-T data and will not be included in the generated 1098-T forms. |
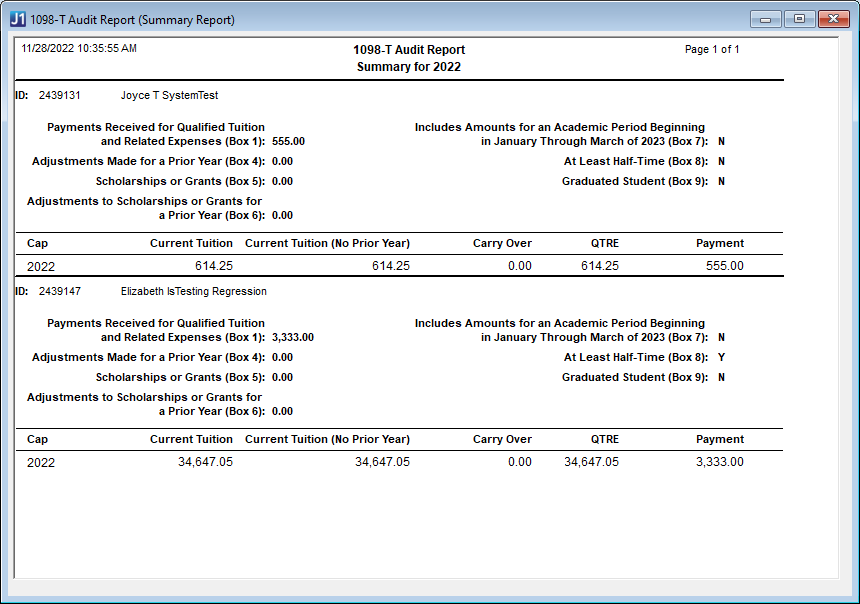
This report provides a summary of student tuition amounts and payments. It is sorted by student ID Number, and the header shows 1098-T box amounts and additional box information.
The details section for each student includes the following information:
Payment Capping: displays one of the following values based on the selected capping method.
Capping Method |
Value Displayed |
No Cap |
Tax Year |
Year |
Cap Year |
Year/Term |
Year/Term Code |
Current Tuition: the student's current qualified tuition and related expenses (QTRE) amount, which may include carry over from previous years.
Current Tuition (No Prior Years): the student's current QTRE amount without any carryover amounts from previous years.
Carry Over Amount: any QTRE amounts carried over from previous years.
QTRE: the total amount of qualified tuition and related expenses (i.e., transactions that have been marked as 1098-T eligible throughout the system for the associated tax year, cap year, or year/term, depending on the selected capping method).
Payment Amount: the amount the student has paid in the associated tax year, cap year, or year/term, depending on the selected capping method.
|
Together, the Included Transactions and Excluded Transactions Reports can be used to determine whether there are transactions appearing in the wrong section or not being selected. |
|
To generate the 1098-T forms, you'll need to make sure you've extracted, reviewed, and validated 1098-T student data. The Generate and Publish options are not available until data from the selected year has been extracted. Once you generate and publish the 1098-Ts, students who have opted for the electronic statement delivery will be able to access their statement from their Financial Document Center on the Campus Portal. |
Generate 1098-T forms and the magnetic media file for all students from this window. Example
You can also choose to generate 1098-Ts for select students; however, the magnetic media file can only be created when generating forms for all students. Example

When you select the Generate 1098-Ts option and run a report using the Generate 1098-Ts button, there are initial validation checks. When the 1098-Ts are generated, you will see the following reports:
1098-T Copy A - Data only (Both Electronic & Printed Preference)
Includes all student data and can be printed on preprinted 1098-T forms. This version is for the government. Example
1098-T Copy B - Data only (Both Electronic & Printed Preference)
Includes all student data and can be printed on preprinted 1098-T forms. This version is for the student. Example
1098-T Student Summary (Both Electronic & Printed Preference)
Summarizes 1098-T box totals for all selected students. Example
1098-T Copy B - Data & Form (Electronic Preference)*
Includes only students who have opted-in to Electronic Statement delivery. These PDF forms are available for students to download from their Financial Document Center on the Campus Portal. Example
1098-T Copy A - Data & Form (Printed Preference)
Includes only students that have opted-in to Printed Statement delivery. When selected, the form can be printed on blank paper and mailed to students. Example
1098-T Copy B - Data & Form (Printed Preference)*
Includes only students who have opted-in to Printed Statement delivery. These PDF forms can be printed and mailed to students. Example
* Requires the Student Finance license
|
Once you have generated the final 1098-Ts, you can lock them to prevent additional updates and ensure the information sent to students and the government matches what is in J1 Desktop. |
Before generating your 1098-T forms, you may want to correct errors in the student information. When you click the Generate 1098-Ts button, you will see a pop-up message asking if you want to edit the data before continuing. If you need to make changes, click Yes to access the Maintain Student Year Reporting Data window.
|
The changes made in the Maintain Student Year Reporting Data window do not affect the original data. Changes remain until you edit the data in the Maintain Student Year Data window or re-extract the data for that tax year when generating the 1098-Ts. |
* If you do not have a license for Student Finance, some features on the 1098-T window may not be available to you.
On the top, right-hand portion of the Generate 1098-T window, you will see a list with Total, Electronic Opt-in, and Print Version. These are the numbers of students that have 1098-T forms, the number that have chosen to receive electronic 1098-Ts, and the number that will receive print-only versions of their 1098-T.
When using the Campus Portal to provide electronic 1098-T forms to your students, they will need to consent to receive electronic statements on the Financial Document Center page of the Campus Portal. Alternatively, consent to receive electronic 1098-Ts can be assigned on the Student > Financial tab of the Student Information window, or on the Student Information tab of the Student Information Impacting Charges window using the 1098-T Preference drop-down.
To see which students have opted into electronic forms, go to the Generate 1098-T's window and click the Selected Students radio button on Review 1098-Ts or Generate 1098-Ts. In the Select Students section, review the 1098-T Preference column.When you select the Extract & Review or Generate 1098-Ts options, you can view reports that show how the PDF will appear to students. After generating 1098-Ts and then clicking the Publish to Students button, a PDF with the student's 1098-T data is added to their Financial Document Center in the Campus Portal if they've opted to receive electronic statements.
|
When you click Publish to Students, PDF versions of the 1098-T are only generated for students that have opted to receive electronic statements. |
|
To view PDFs generated by this window, the following must be installed:
|
If you want to view or print a 1098-T form that was published at an earlier date, you can click the View Previous 1098-Ts link. A window opens and you can select students and a tax year. You can then view a report that includes the 1098-Ts that were published for the selected students. The report only shows 1098-Ts that were previously published to students (i.e., the report doesn't include students that opted to receive the printed version of the 1098-T).
Once you've generated 1098-T forms for all students, you can make the PDF versions of the form available to students by clicking the Publish to Students button. When you click the button, the 1098-T file is posted on the student's Financial Document Center feature in the Campus Portal. If you have set up and turned on notifications, students will also receive an email letting them know a new document is available.
|
If you've previously published 1098-Ts for the selected tax year, when you click the Publish to Students button, a pop-up window asks if you want to replace the most recent 1098-T file or add a new version. If you have already generated 1098-Ts for the same tax year, you will most likely want to replace the most recent forms. |
|
Students need to opt-in to electronic forms to receive their 1098-T forms online. If they have not chosen to receive their 1098-T form online, they will not see the form in their Financial Document Center when the Publish to Students button is clicked. |
Extract and Review 1098-T Data Forms
Access the Generate 1098-Ts window.
Check the Tax Year in the top-left corner of the window to make sure you are generating forms for the correct tax year.
Select the Extract
& Review 1098-T option.
Choose an option to review information for all or selected students.
All Students: Continue to Step 5.
Selected
Students:
Choose students you want to review by selecting the checkbox
next to their Student ID. Once you have selected the students,
continue to step 5.
In the 1098-T Format section, select the appropriate report from the options for the Copy A and Copy B versions. The default <Original> report prints forms three per page. Click the Customize button to modify the 1098-T form layout in InfoMaker.
|
Copy A goes to the IRS and Copy B goes to the student. The "Data only" version can be printed on preprinted 1098-T forms; the "Data & Form" version can be printed on blank paper. |
Select the Extract
student data
checkbox if this is the first time generating 1098-Ts for the
academic year selected, or if you want to recalculate student
data from the transaction history table.
|
When extracting data for 1098-Ts, the Selected Students option only extracts data for the selected students. The All Students option extracts data for all students. |
|
If
data has been extracted previously, a note under the Student
Address Priority option shows details of the last data
extraction. |
|
The re-extracted data replaces existing data in the Student Year Reporting table for the selected 1098-T year. Do not select the Extract student data checkbox if you previously made edits to the data in the Maintain Student Year Report Data window for the selected 1098-T year and want to use that data to produce the 1098-T forms. |
When the Extract student data checkbox is selected, the following options are enabled. Select one or more to determine how 1098-T data is calculated for the forms.
Include only residents of. Select this checkbox to calculate transactions and generate 1098-Ts for students from the selected country. If the checkbox is not selected, residents from all countries are included.
Include carry over amount when deciding if tuition is less than scholarships & grants. When selected, any carry over QTRE from the previous year is included in the tuition amount when it is compared to the total amount of scholarships and grants.
Include students with tuition less than scholarships & grants. Select this checkbox to calculate transactions and generate 1098-Ts for students whose tuition amount is less than the total amount of their scholarships and grants.
Student
Address Priority List. Use
the drop-down options to select an address priority code.
The
address automatically selects the Address Priority
Code column
configured on the Maintain Address Priority
window and
uses the first address code found on the student's Address Master table.
To hide social security numbers (SSN) on reports sent to the students, select the Mask SSN? checkbox. When selected, students only see the last 4 digits of their SSN on the 1098-T. The social security number is not masked in the file or on the reports sent to the government.
Click the Extract & Review 1098-Ts button.
An edit data pop-up window appears.
If you click the Yes button, the Maintain Student Year Reporting Data window appears where you can view and edit Student Year Reporting table information.
If you click the No button, the Review Student 1098-Ts window opens.
In the Review Student 1098-Ts window, select one or more checkboxes to generate and review 1098-Ts.
1098-T Copy A - Data only (Both Electronic & Printed Preference): includes all student data and can be printed on preprinted 1098-T forms. This version is for the government.
1098-T Copy B - Data only (Both Electronic & Printed Preference): includes all student data and can be printed on preprinted 1098-T forms. This version is for the student.
1098-T Student Summary (Both Electronic & Printed Preference): includes a summarized report of 1098-T balances for all students.
1098-T Copy B - Data & Form (Electronic Preference): includes only students that have opted into Electronic Statement delivery.
1098-T Copy A - Data & Form (Printed Preference): includes only students that have opted into Printed Statement delivery. When selected, the form can be printed on blank paper and mailed to students.
1098-T Copy B - Data & Form (Printed Preference): includes only students that have opted into Printed Statement delivery. When selected, the form can be printed on blank paper and mailed to students.
Click Generate 1098-Ts and Review Reports. The selected reports open in separate windows for review.
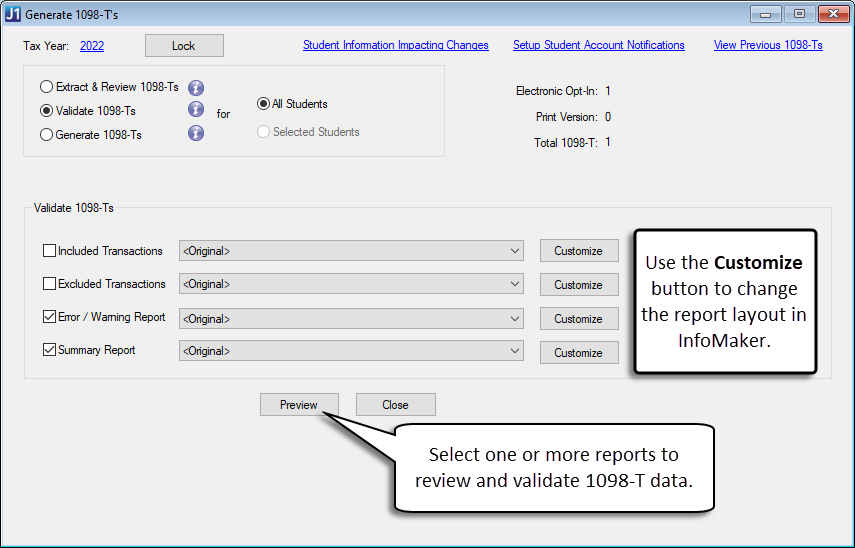
Validate 1098-T Student Information
Access the Generate 1098-Ts window.
Check the Tax Year in the top-left corner of the window to make sure you are generating forms for the correct tax year.
Select the Validate 1098-Ts option. The All Students option is automatically selected.
In the Validate 1098-Ts section, select the appropriate reports to review 1098-T data. Use the Customize button to update the report layout in InfoMaker.
Include Transactions: This report displays all transactions that will be included for each ID number processed for the selected 1098-T processing year, broken out by Amounts Billed, Adjustments for Prior Year, Scholarships or Grants, and Adjustments to Scholarships or Grants for the previous year. These should match up to the numbers reported in the appropriate boxes on the 1098-T form.
Exclude Transactions: This report displays all transactions that will not be included in the 1098-T process due to certain criteria not being met. The transaction information displayed supplements the information displayed on the Error Listing produced by the Generate 1098-T's process.
|
The Exclude Transactions report can be used to determine whether transactions appear in incorrect sections or if they have not been selected. |
Error/Warning Report: This report shows any data errors identified during extraction that should be reviewed before finalizing and sending forms to students. Make sure all warnings are reviewed and corrected. 1098-T information for students that appear on the Warning Listing report is not extracted into the 1098-T data and will not be included with the generated 1098-T forms.
Summary Report: This report provides a summary of student tuition amounts and payments sorted by ID Number. It includes details for payment capping, current tuition, current tuition (no prior years), carry over amounts, QTRE, and the payment amount for the year, cap year, or year/term, depending on the selected capping method.
Click Preview to review the selected reports.
Access the Generate 1098-T's window.
Check the Tax Year in the top-left corner of the window to make sure you are generating forms for the correct tax year.
Select the Generate 1098-Ts option.
Choose an option to generate 1098-Ts for all or selected students.
All Students: Continue to Step 5.
Selected Students: Select the checkbox next to the Student ID to add students to the list. After selecting students, continue to step 5.
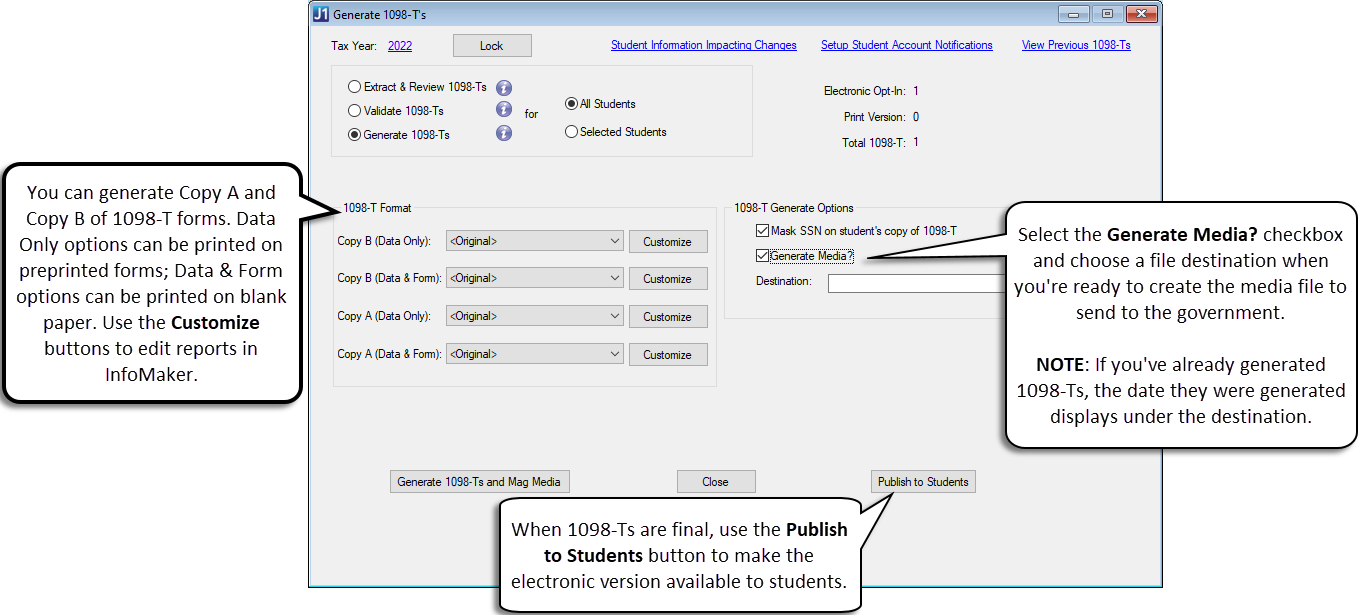
In the 1098-T Format section, select the appropriate report from the options for Copy A and Copy B versions. The default <Original> report prints forms three per page. Click the Customize button to modify the 1098-T form layout in InfoMaker.
 |
Copy A goes to the IRS and Copy B goes to the student. The "Data only" version can be printed on preprinted 1098-T forms; the "Data & Form" version can be printed on blank paper. |
To hide social security numbers (SSN) on reports sent to the students, select the Mask SSN? checkbox. When selected, students only see the last 4 digits of their SSN on the 1098-T. The social security number is not masked in the file or on the reports sent to the government.
Select the Generate Media? checkbox if you also want to generate a magnetic media output.
Next
to the Destination field,
click the Browse ![]() button.
The Select Magnetic Media File pop-up window
appears.
button.
The Select Magnetic Media File pop-up window
appears.
Navigate to the location on your computer or network where you want to store the media file.
In the File name column, enter a name for the media file.
Click
the Save button. The location is established.
|
If
data has been extracted previously, you will see a
note under the Student Address Priority option showing
details of the last data extraction:
|
Click the Generate 1098-Ts button. If Generate Media? is selected, it's the Generate 1098-Ts and Mag Media button.
An edit data pop-up window appears.
If you click Yes, the Maintain Student Year Reporting Data window appears where you can view and edit Student Year Reporting table information.
If
you click the No button, the Review
Student 1098-Ts window opens.
In the Review Student 1098-Ts window, select one or more checkboxes to generate and review 1098-Ts.
1098-T Copy A - Data only (Both Electronic & Printed Preference): includes all student data and can be printed on preprinted 1098-T forms. This version is for the government.
1098-T Copy B - Data only (Both Electronic & Printed Preference): includes all student data and can be printed on preprinted 1098-T forms. This version is for the student.
1098-T Student Summary (Both Electronic & Printed Preference): includes a summarized report of 1098-T balances for all students.
1098-T Copy B - Data & Form (Electronic Preference): includes only students that have opted into Electronic Statement delivery. When the Publish to Students button is clicked, this form will be available for students on their Financial Document Center on the Campus Portal.
1098-T Copy A - Data & Form (Printed Preference): includes only students that have opted into Printed Statement delivery. When selected, the form can be printed on blank paper and mailed to students.
1098-T Copy B - Data & Form (Printed Preference): includes only students that have opted into Printed Statement delivery. When selected, the form can be printed on blank paper and mailed to students.
Click Generate 1098-Ts and Review Reports. The selected reports open in separate windows for review.
Complete the steps to generate the final version of the 1098-Ts.
After final 1098-T documents are generated, click the Publish to Students button.
In the pop-up, select one of the following options:
Replace overwrites the existing 1098-T for the selected year so students only see one form. This option is helpful when you've made corrections to 1098-Ts and the student only needs to see the most current version.
Add New adds the 1098-T to the student's Financial Document Center. Use this option when you add the first 1098-T for the selected tax year. When it is selected for updated 1098-Ts, students will see multiple 1098-Ts in their Financial Document Center.
When you select an option, the PDF is added to the student's Financial Document Center. If you've set up notifications, they'll receive an email that a new document is available.
|
Before locking 1098-T data for a tax year, make sure that you've reviewed and corrected any errors in the data and generated the final versions of 1098-Ts. After a tax year is locked, you cannot make any changes to the data. |
Generate the final version of your 1098-Ts for the selected tax year.
Click the Lock button.
In the verification pop-up, click OK. The 1098-T data for that year is locked and can no longer be updated. This ensures the information submitted to students and the government matches what is stored in the system.
Customize a 1098-T Query to Select Students
Access the Generate 1098-T's window.
Verify the Tax Year in the top-left corner of the window to make sure you are generating forms for the correct tax year.
Select the Extract & Review 1098-T or Generate 1098-T option.
Choose the Selected Students option.
From the Select Students list, click the Custom Query checkbox.
Choose an existing query from the drop-down menu or click the Customize button to open InfoMaker and edit the selected query. Use the Save, File As option to create the new query and maintain the original query.
After selecting a query, click the Select button to retrieve the students.
View Previously Published 1098-Ts for All Students*
* Requires the Student Finance license
|
The View Previous 1098-Ts link appears only if 1098-Ts from any year have been generated and published to students. It is available regardless of which radio button (Validate, Review, Generate) you select on the Generate 1098-T's window. |
Access the Generate 1098-T's window.
Click the View Previous 1098-Ts link. The View Previous 1098-Ts window opens.
Make sure the All radio button is selected.
Select the year you want to view from the Tax Year drop-down. Any 1098-Ts that were generated and published for the selected year appear in the Available Versions grid.
In the Available Versions grid, select the form you want to view.
Click the View 1098-T button.
|
If you want to compare 1098-T forms, you can open multiple forms from this window. |
When finished, click the Close button on the View Previous 1098-Ts window.
View Previously Published 1098-Ts for Selected Students*
* Requires the Student Finance license
|
The View Previous 1098-T's link appears only if 1098-Ts from any year have been generated. It is available regardless of which radio button (Validate, Review, Generate) you select on the Generate 1098-T's window. |
Access the Generate 1098-T's window.
Click the View Previous 1098-Ts link.
Make sure the Individual radio button is selected.
To search for students to view:
In the Find an Individual section, enter the student???s identifying information into the search fields: Last Name, First Name, Student ID, and/or SSN.
Click the Search button. Students matching the search results appear in the grid.
Select the Student from the Find an Individual grid. All 1098-Ts that have been generated and published for that student are listed in the Available Versions grid.
In the Choose a 1098-T Version section, select the year you want to view from the Tax Year drop-down list. 1098-Ts that were generated and published for the selected year appear in the Available Versions grid.
In the Available Versions grid, click on the 1098-T version you want to view to select it.
Click the View 1098-T button.
|
If you want to compare 1098-T forms, you can open multiple forms from this window. |
Click the Close button on the View Previous 1098-Ts window.
1. On the Generate 1098-T's window, select either the Extract & Review 1098-Ts or Generate 1098-Ts option.
2. Click the Selected Students option.
3. From the Select
Students section, click the Export
to Excel button  .
.
4. An Export to Microsoft Excel window opens to show the progress of the export.
5. When the export is complete, the data opens in Excel and the Export to Microsoft Excel window automatically closes.
From the Generate 1098-T's window, click the Tax Year link to open the 1098-T Magnetic Media Control window.
In the Payment Year drop-down, select the correct tax year for the 1098-Ts.
Close the window and click Yes in the confirmation pop-up. The 1098-T Magnetic Media Control window closes and the tax year on the Generate 1098-T's window updates.
Set Up Student Account Notifications
From the Generate 1098-Ts window, click the Setup Student Account Notifications link at the top of the window.
If you click the link from the Generate 1098-Ts window, the process and event should automatically appear. If for some reason you need to select options, choose the Student 1098-T Notification Process, and 1098-T Delivered Event within Process.
The Who Gets Notified tab will automatically be assigned to students.
On the What Message To Be Sent tab, you will need to define the message details such as From, CC, BCC, email format, and file attachments.
In the Message section, you will see a standard message provided by Jenzabar. You may want to edit the message to be more specific to your school.
Once you're finished editing the message details, you want to make sure that the Notifications are On.
When finished, click Save. Students will receive a notification when the Publish to Students button is clicked.
 |
For more information about notifications, see the Set Up Notifications window. |
I want to change the Tax Year, but why is the link is not working?
You may not have permission to access the 1098-T Magnetic Media Control window and select or change the year shown. Contact your campus support team for additional information.
Why isn't the Lock button available?
You may not have the correct permissions to use the Lock button. If you have the correct permissions and the Lock button is still unavailable, make sure all 1098-T files have been generated. Contact your campus support team if you need additional assistance.
|
Make sure the generated 1098-Ts are final and have been sent to students and the federal government before locking them. Data cannot be changed after the year is locked. |
How are the Extract & Review 1098-Ts and Generate 1098-Ts options different?
The Extract & Review 1098-Ts option is the first step in the process and calculates 1098-T data. When that option is selected, you can review the data as it would appear to students, but the 1098-Ts cannot be published to students and the magnetic media file for the IRS cannot be generated. The 1098-T data must be extracted and reviewed before the final 1098-Ts are generated.
When the Generate 1098-Ts option is selected, you can still review the data and can also publish the final 1098-T PDFs to students. Additionally, you can generate the magnetic media file that is sent to the IRS.
What's the difference between replacing the most recent 1098-T and adding a new version?
When you replace the 1098-T, any existing forms are overwritten and are no longer available for students to view. Students will see only one 1098-T for the selected tax year in their Financial Document Center. When you add a new version, the new 1098-T is added to the student's Financial Document Center. Students will see multiple 1098-Ts for the same tax year in their Financial Document Center.
I locked the 1098-T data after generating, but now there is a last minute change. How do I unlock?
When the Lock button is clicked, it will become an Unlock button. If you have the correct permissions, you can click Unlock and make your changes.
Does qualified tuition equal the total tuition and fees a student is charged for the semester?
Qualified tuition and fees are the fees you have flagged as eligible charges. The rules for what is considered qualified tuition and fees is defined on the IRS documentation. For additional information about eligible charges, refer to the guidelines on www.irs.gov/.
If you re-extract data and make changes, are your changes lost if you re-extract again?
If you make changes after extracting the data and then re-extract the data, you will lose the changes that were made. Jenzabar recommends that you confirm the data extract is accurate before making changes in the Maintain Student Reporting Data window.
Please do not be concerned about the count on the window being different than the actual number of records extracted. The count on the window is an approximation of how many records could be extracted based on a simple query. The extraction process, on the other hand, is more complex and involves a lot more logic to accurately retrieve the 1098-T records. Before the changes in 2018, a simple query could be counted on to determine the number of records to be extracted. But because things are much different since 2018, a simple query won???t be able to necessarily predict the actual number of records to be extracted. It is planned for a future release to make a change to better communicate this information to the user on the window.
Why are the Box 1 Payment Capping options not available on the window?
If you are looking at a prior year, and your school's 1098-Ts have been processed previously for the selected prior year, you will not be able to change the Box 1 Payment Capping option. This prevents you from accidentally selecting a different capping option from what was previously selected and reported.
|
The system checks both the capping option flag and the 1098-T working tables to determine which capping option was used in the prior year. |
Analyze and Correct 1098-T Data
Maintain Student Year Reporting Data
* Some features and steps are only available to users with a license for Student Finance