
|
If your school is licensed for Document Management Integration, External Storage Provider options are available. Jenzabar integrates with the following providers: Docubase, Feith, and Softdocs. |
Use this window to enable the Document Storage system, select an administrator, determine the locations available for saving documents to, and delete assigned permissions settings.
To allow permissioned users to add new documents to the Document Storage system, select the Enabled radio button.
Select a group or individual as the Document Storage Administrator. This user/user group has all permissions over documents, regardless of what other permissions have been granted or denied. The Document Storage Administrator can be any J1 Desktop group or any active J1 Desktop user/user group.
You can delete all permission settings here. (The Document Storage Administrator drop-down gives you a quick glance at which users/user groups have permission, and the Document Security window has comprehensive controls for permissions.)
When you click the Delete All Assigned Permissions... button, you delete all the permission settings (both granted and denied) that have been set up in the Document Security window.
Pop-up messages require you to confirm that you want to delete all the permission settings and to inform you that you will be tagged as user who deleted them.
Document Storage provides internal and external storage options. Internal storage options let you store documents in your database and a designated network location. External storage options require a license and let you store documents with third-party providers Docubase, Feith, and Softdocs.
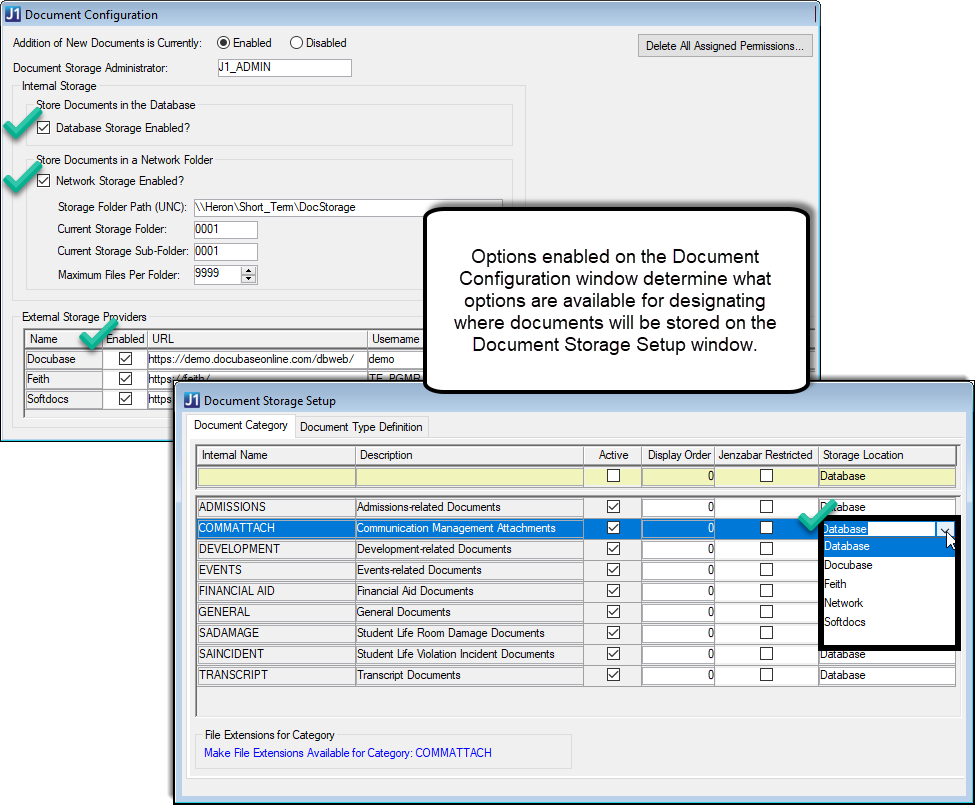
You can chose to store different document categories and types in different locations. For example, you can store Communication Management attachments on the network, Student Life documents in the database, and Financial Aid documents in Docubase.
Storage locations are managed on the Document Storage Setup window, but the options available are determined by the options enabled on the Document Configuration window.
 |
If you decide to switch where one document category or type is stored, be sure to migrate your files to the new locations beforehand. |
To allow documents to be stored in the database, select the Database Storage Enabled? checkbox. Consider how many files you will be storing and potential impacts to performance if a large number of files will be added.
To allow documents to be stored in a designated network location, select the Network Storage Enabled? checkbox.
§ For this feature to work, the J1 Web machine must have full permission to the network location (configured from the folder's properties, Sharing and Security settings).
§ When setting up network storage, consider using a location with restricted access as some files may contain confidential content. Files are stored with random file names that conceal their contents, but they are not encrypted.
To allow documents to be stored in a licensed third-party provider, select the Enabled checkbox and enter the necessary provider information. These options are only available if your school is licensed for Document Management Integration with Docubase, Feith, and/or Softdocs. If you do not see a third-party provider listed, your school is not licensed to use one.
|
To confirm license information, select About from the main menu, Help option and click License Information. 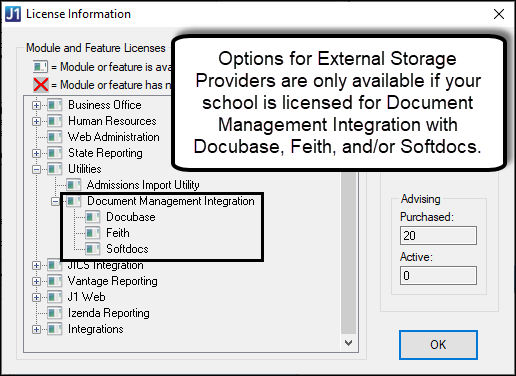 |
Enable/Disable Document Storage
1. Open the Document Configuration window.
2. To allow adding documents:
a. From the Addition of New Documents is Currently options, click Enabled.
b. From the Document Storage Administrator drop-down, select a user or user group you want to serve as the administrator. The Document Storage Administrator has all permissions over documents, regardless of what other permissions have been granted or denied.
c. Click Save.
3. To disallow adding documents:
a. From the Addition of New Documents is Currently options, click Disabled.
b. Click Save.
Select a Document Storage Administrator
1. Open the Document Configuration window.
2. In
the Document Storage Administrator
drop-down list, select a user or user group.
The Document Storage Administrator has all permissions over documents,
regardless of what other permissions have been granted or denied.
3. Click Save.
Manage Internal Storage Options
 |
When you enable database and network storage, they become storage location options for document categories and types (Document Storage Setup window). Because J1 Desktop and J1 Web can have many files, consider impacts to your database and network. To optimize system performance, enable both options and store document categories in more than one location |
1. Open the Document Configuration window.
2. To allow select documents to be stored in your database, select the Database Storage Enabled? checkbox.
3. To allow select documents to be stored to a network location:
a. Select the Network Storage Enabled? checkbox.
b. In the Storage Folder Path (UNC), enter the network location where you want documents stored.
c. Confirm the environment running J1 Web has full permissions to the network location. The J1 Web machine name is used because J1 Web uses Document Storage and uses the same database as the Desktop.
i. Access the network folder where files will be stored .
ii. Right-click on the folder and select Properties. The Properties window appears.
iii. Select the Sharing tab and click Advanced Sharing. The Advanced Sharing window appears.
iv. Select the Share this folder checkbox.
v. Click the Permissions button. The Permissions window appears.
vi. Everyone is the default. If you do not want everyone to have access, select Everyone and click the Remove button.
vii. Click the Add button. The Select Users, Computers, Service Accounts, or Groups window appears.
viii. Click the Object Types button. The Object Types window appears.
ix. Select the Computers checkbox and click the OK button. The Object Types window closes.
x. In the Enter the object names to select field, enter the name of the machine running J1 Web, which points to the same database the Desktop uses. For example, WEBSERVER-J1WEB-PROD.
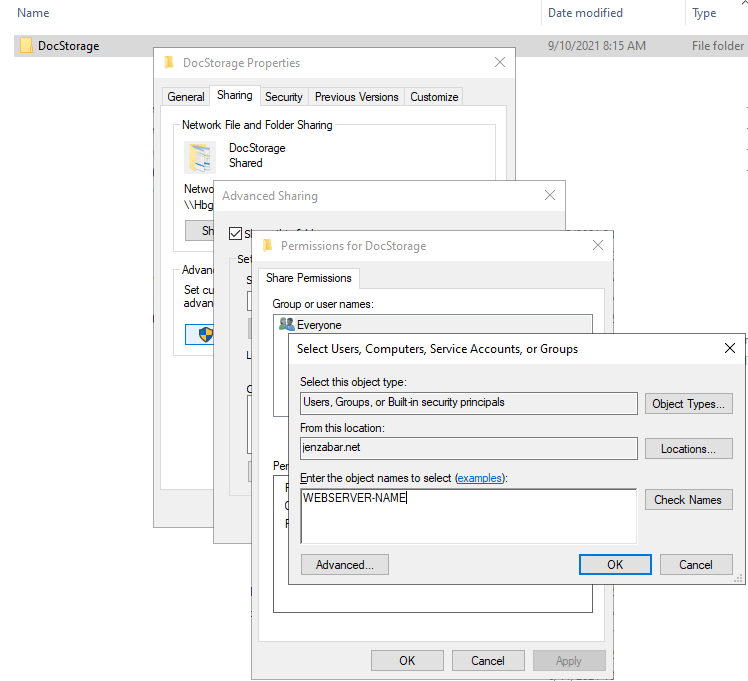
xi. Click the Check Names button. The official name is displayed.
xii. Click the OK button. The Permissions window reappears.
xiii. Select the machine and select the Allow checkbox for Full Control, Allow, and Read permissions.
xiv. Click the OK buttons to close all the permissions and properties windows.
d. Confirm the network folder has full share permissions enabled.
i. Access the network folder where files will be stored.
ii. Right-click on the folder and select Properties. Properties window appears.
iii. Select the Security tab and click the Edit button. The Permissions for the folder window appears.
iv. Click the Add button. The Select Users, Computers, Service Accounts, or Groups window appears.
v. Click the Object Types button. The Object Types window appears.
vi. Select the Computers checkbox and click the OK button. The Object Types window closes.
vii. In the Enter the object names to select field, enter the name of the machine running J1 Web, which points to the same database the Desktop uses. For example, WEBSERVER-J1WEB-PROD.
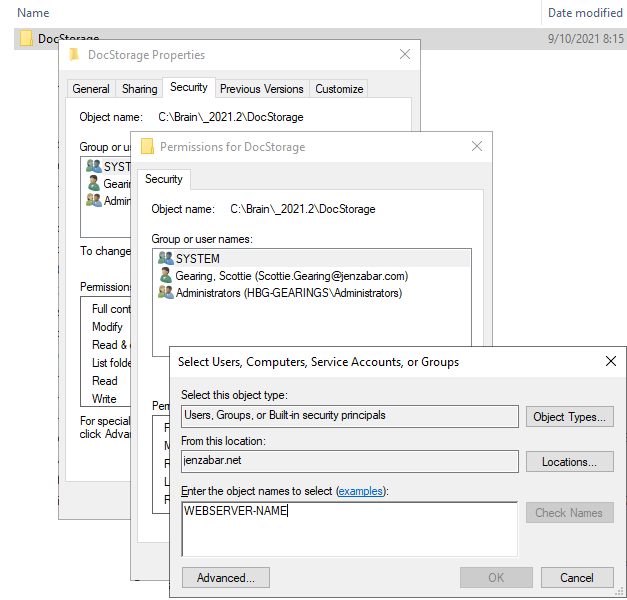
viii. Click the Check Names button. The official name is displayed.
ix. Click the OK button. The Permissions window reappears.
x. Select the machine and select the Allow checkbox for Full Control permissions.
xi. Click the OK buttons to close the permissions and properties windows.
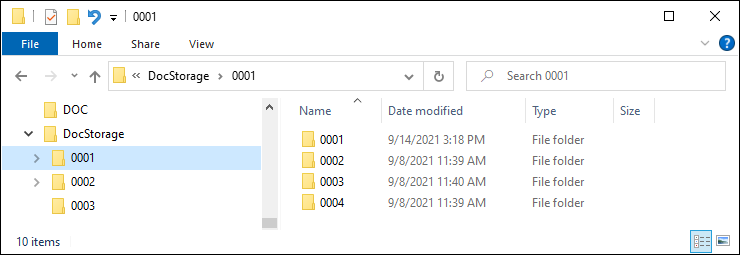
e. Current Storage Folder and Sub-Folders default to 0001. These are the names the folders will be given when they are created on the network. Files will be added until the folder reaches the maximum files per folder allowed and then new folders will be created. You can change these names, but Jenzabar recommends using a numbering convention to help keep the folder orders straight.
4. Click Save.
Manage External Storage Options
External storage options are only available if you are licensed with third-party providers Docubase, Feith, and/or Softdocs. To confirm your license, access the License Information window (from the Help menu, select About and click License Info).
On the Document Configuration window, select the Enabled checkbox for the third-party provider option you want to use as a document storage locations.
In the URL field, enter the website of the third-party provider.
Enter your school's credentials for accessing the third-party provider in the Username and Password fields.
In the Default Database field, enter the database information as configured with your third-party provider. For additional assistance, contact your Jenzabar Services representative.
In the Default Catalog field, enter the catalog information as configured with your third-party provider. For additional assistance, contact your Jenzabar Services representative.
Click Save. Enabled providers will be storage location options for document categories and types (Document Storage Setup window).
Delete All Assigned Permissions
1. Open the Document Configuration window.
2. Click the Delete All Assigned Permissions... button. A delete confirmation pop-up window appears.
3. Click Yes. A pop-up window appears informing you that you will be tagged as the one who deleted the permissions.
Document Storage System Overview
Permissions in Document Storage
Transcripts in Document Storage