For information about collecting data that will be used as the basis for the IPEDS 12-Month Enrollment report, follow the instructions in the "Collecting Data for IPEDS Fall Enrollment/GRS Reports" topic and then continue the steps in this set of instructions.
The database output view for the report is this: IR_IPEDS_E12_V
Create and Review the IPEDS 12-Month Enrollment Report
Open the Regulatory Reporting window.
In the Regulatory Forms box in the header, select E12 – IPEDS 12 Month Report.
In the Snapshots drop-down list, select the Snapshot Date for the 12 Month Enrollment that you have just created.
The Report tab opens with to Part A-GR (Graduate Students) with the Original report query selected.
Use the Part drop-down to select any part of the report.
Use the Report drop-down to select a different report query, or click the Customize... button to open InfoMaker and customize the selected query.
Click the Plus Sign buttons or the Expand to radio buttons to see details in each category.
If you have any "Unknown" labels, these indicate that you are missing gender or ethnic/race information for one or more students that are flagged for IPEDS in the Institutional Research Student Data Records window.
View the parts of the report.
Part A-Graduate Students lists students by gender and race/ethnicity.
Part A-Undergraduates lists students by Part-Time/Full-Time status, gender, and race/ethnicity.
Students and categories are tallied in these columns:
First-time
Transfer-in (non-first-time entering)
Continuing/Returning
Total degree/certificate-seeking
Non-degree/non-certificate-seeking
Total full-time undergraduate
Part B shows Credit Hour Activity and Clock Hour Activity for both undergraduate and graduate students.
Part C lists students by their participation in distance education.
Students are grouped by these categories:
Students enrolled exclusively in distance education courses
Students enrolled in at least one but not all distance education courses
Students not enrolled in any distance education courses
Students are tallied in these columns:
Undergraduate degree/certificate-seeking
Undergraduate non-degree/non-certificate-seeking
Graduate Students
To print the part you're viewing, click the Print button.
To print the whole report, click the Print All Parts button.
When you are satisfied that the numbers in the Part A and Part B reports are accurate for reporting to NCES, then you can do one of the following:
Manually enter the 12 Month Enrollment numbers on the IPEDS website.
Print the reports for Part A and Part B that display the numbers.
Go to the NCES website and type the numbers into their interface.
Import a file on the NCES website that contains your numbers.
Select the Web Import tab.
Click the Create the Web Import File button.
Accept the path defaulted in the Web Import File Path prompt that is displayed. Click the OK button.
If the file already exists, you get a message asking if you wish to continue. Click Yes.
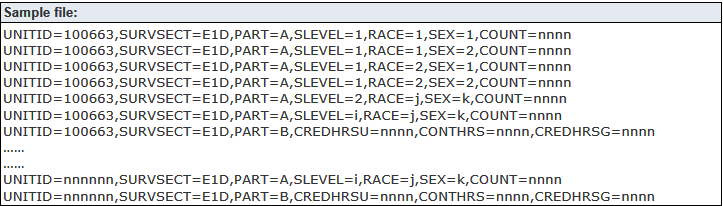
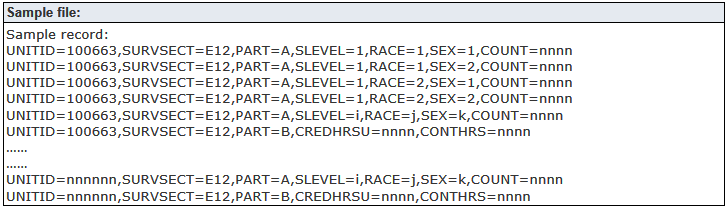
The
result you see will be similar to the following:
4-year Institutions:
Less Than 4-year Institutions:
If you wish, go to the NCES website to view the information about the Key Value pairs displayed above: https://surveys.nces.ed.gov/ipeds/VisImpSpecView.aspx?id=21&show=all&instid=504
Log in at https://surveys.nces.ed.gov/ipeds/ and follow the instructions on the website to import the 12 Month Enrollment Key Value Pair file you created within J1.
Modifying Regulatory Reporting Reports, Queries, and Views
If you wish, you can modify any of the IPEDS reports provided by default on the Report tab of the Regulatory Reporting window.
Open the Regulatory Reporting window.
Click the Report tab.
Click the Customize button, and click OK to the message that is displayed.
Once the report opens, immediately choose File > Save As and add your initials or some other identifier to the end of the report name. This addition keeps your changes from being overwritten the next time the Customize button is clicked.
Note that the reports are based on views and that a level of sophistication is needed to make major changes to these reports.
Modifying the Web Import File requires multiple steps.
First, you must customize the Original J1 query as described above.
Each of the queries selects a View that returns the Key Value Pairs needed so that you can import data when you are logged in to the IPEDS website.
If you wish to change the View, you must rename the View and then have your customized "r_ir_ipeds_grs_g1_2_1_uhe" query reference your renamed View.
If you make changes, be sure that you still maintain the argument and output of the query.
Lock the Snapshot for the 12-Month Enrollment Report
When you have successfully reported your 12 Month Enrollment data to NCES, lock the Snapshot that contains the data you reported if you have not already done so earlier in the process. When a Snapshot is locked, users are unable to modify the data in the Snapshot. If you have permission, you may unlock a Snapshot for a Purpose Code to which you have access (Purpose Definition window).
You must have Tasklist Permissions to select and clear the Lock Snapshot checkbox. Tasklist Permissions for the Lock Snapshot option should be given only to persons you trust to unlock a Snapshot that has been locked. |
Open the Create/Work with Snapshots window.
Click the Retrieve button in the header so that Snapshots display in the tree.
Select the date for the Snapshot you used for your IPEDS 12 Month Enrollment report.
Click the Work with Student Data for the Selected Snapshot link in the lower center part of the window.
The Institution Research Student Data Records window opens. Select the Lock Snapshot checkbox.
The following message is displayed: "The snapshot will be locked and all records will be in a view only mode. Continue?" Click the Yes or No button.
Save.