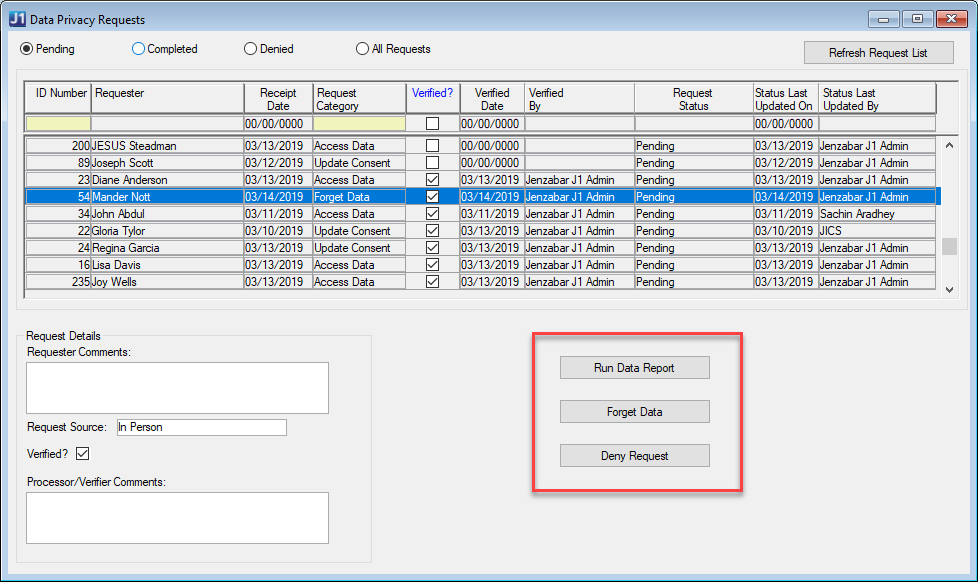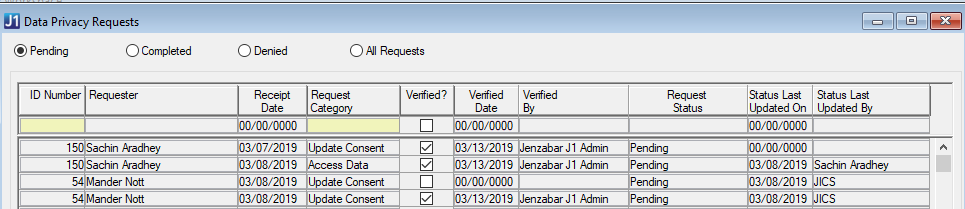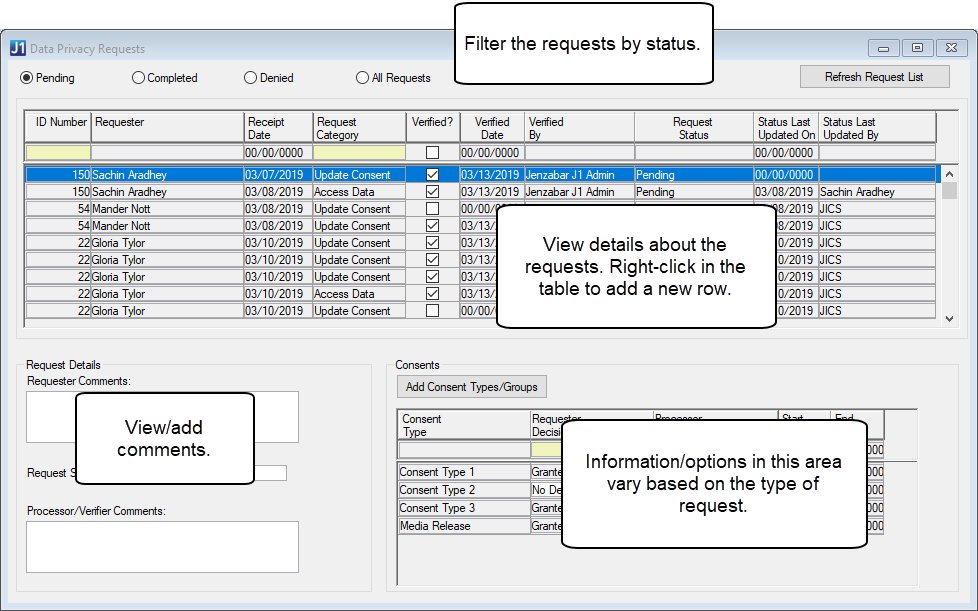
The Data Privacy Requests window displays data privacy requests submitted by users and other constituents whose data is stored in your system. The requests are shown in the order they were received, and the table is filtered to pending requests by default. You can also filter the list to view completed, denied, or all requests using the radio buttons at the top of the window.
Included in the data privacy requests grid are the requester's ID number and name, the receipt date, request category, verification status, who verified the request and when, the request status, when the status was last updated, and who updated the status. Only the Verified? column is editable for existing request rows. You can add new requests to the grid by right-clicking and choosing either Add Row or Insert Row. Requests may also be received via an online form available on your campus portal.
The Request Details section of the window shows comments added by the requester, the source of the request, and comments from the processor working on the request. Other information and options displayed vary depending on what type of request (Access Data, Update Consent, or Forget Data) the user is viewing.
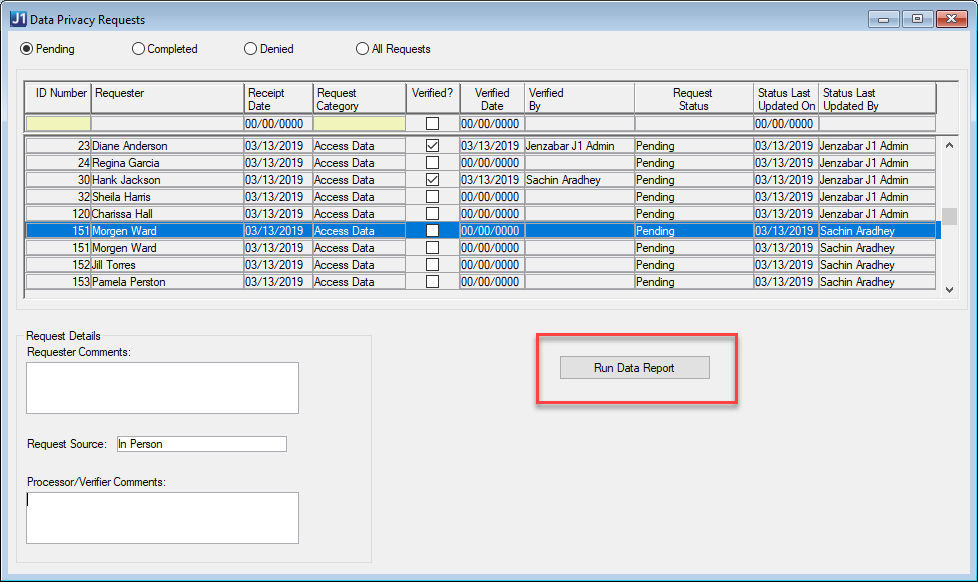
Individuals can submit a request to access the data your institution has on record for them. Upon selecting an Access Data request row, you have the option to run a report that indicates which database tables contain information about the person. You can then send the person a copy of this report. After running the report, the status for the selected Access Data request row is marked Completed, and the Status Last Updated On and Status Last Updated By fields are updated. If you are viewing only the pending requests, the currently selected request is removed from the list because its status is no longer pending. Example
|
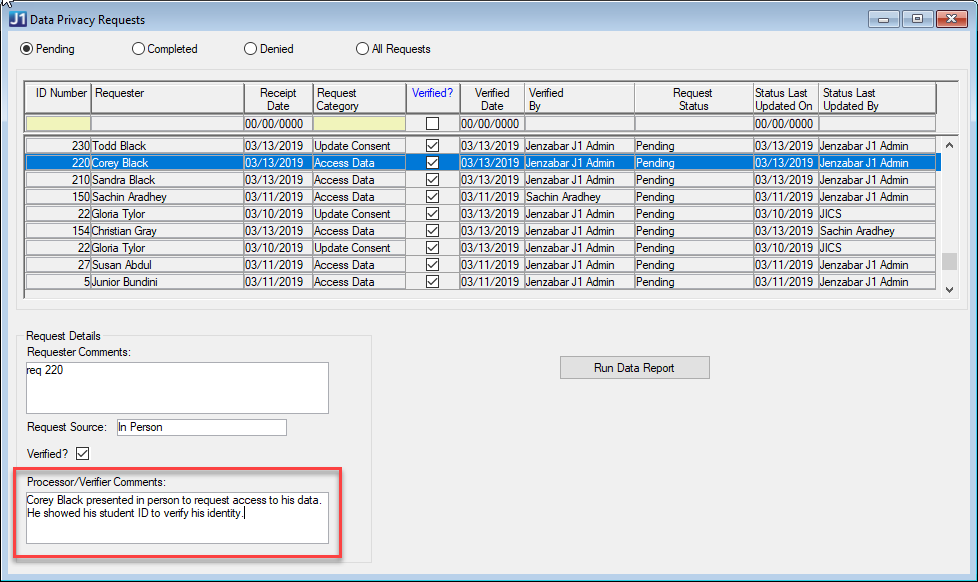
There should not be a need to verify an Access Data request prior to running the report for requests that have been submitted online since the requester would have been logged into the campus portal at the time of submission, and therefore it is most likely safe to assume that the person making the request is who he/she says they are. However, if a request is being made over the phone or in person, for example, you may want to ask for the person's ID or some other information to prove they are who they say they are before you provide them the Data Access report. In this scenario, you can check the Verified checkbox and add any desired Processor/Verifier Comments as documentation to indicate that a verification of their identify was done. |
 |
This option is not available for ID Numbers < 1 or with a NameMaster.APPID < 1. |
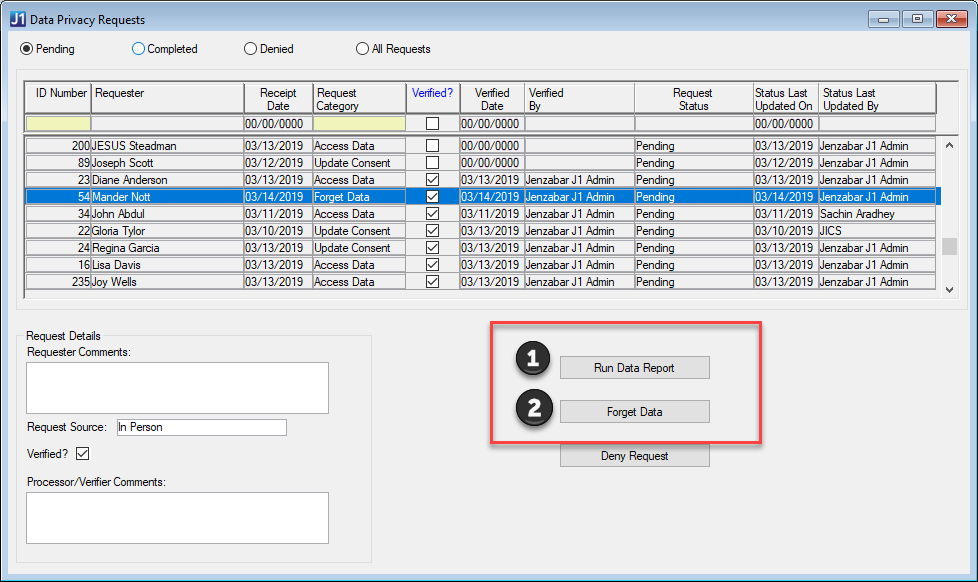
Individuals can submit a request that your institution “forget” their data so that it can no longer be used. Running the Forget Data option for a person removes data with personally identifying information (PII) that is not necessary to the running of the system and anonymizes (i.e., update or clear out) any PII data elements for records that should not be removed from the system. The records that are not removed include, for example, course history information required for governmental reporting purposes. Example
|
Any references in this document/topic to the 'anonymization' of the data cover both the data that will be deleted as well as the data that will be updated/anonymized. |
|
Individuals who request to have their data forgotten should be warned that removing their data will prevent them from accessing any of their data in the future. For example, a student would not be able to request a transcript to be sent to another institution once their data has been 'forgotten'. Additionally, individuals should be notified that your school has a right to deny their request if there is a business reason to keep their data. A student who still owes money to your school, for example, can have their Forget Data request be denied. |
|
Because of the very destructive nature of the Forget Data action, the user processing a Forget Data request should first ensure that the person making the request is who they say they are. You want to make sure that John Doe is not acting maliciously and is pretending to be Ben Smith in order to have Ben's data deleted from the system. This step is much more important for non-online requests. For online requests, the person will typically be making the request while logged into the campus portal, in which case it is likely that the requester is who they say they are. The second verification step is to research where the person's data resides in the system and determine whether or not their request can be honored. |
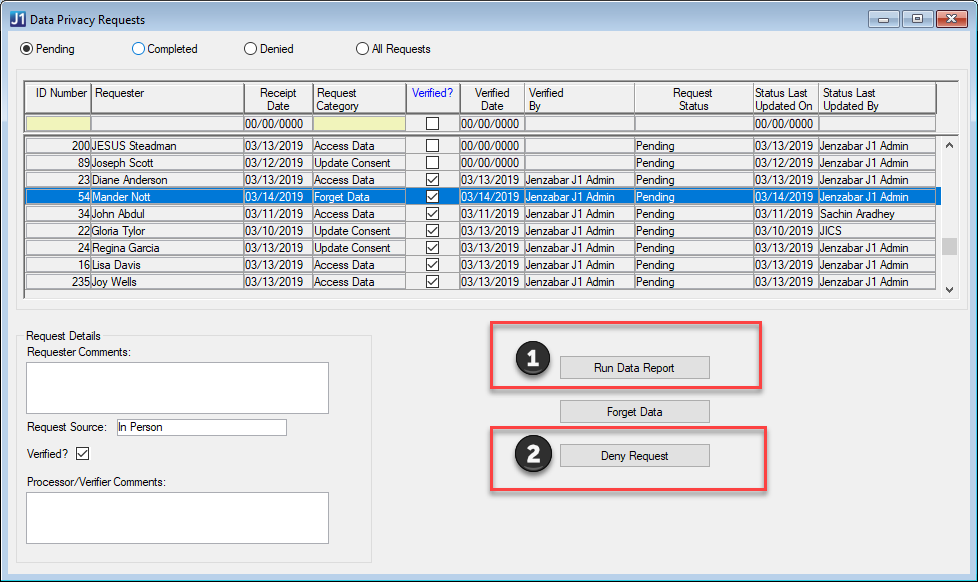
Run Data Report: Produces an InfoMaker report that shows where the person’s data is stored.
|
Use the data report as a starting point to verify if the person’s data can be anonymized. For example, if the person's information is only in the Admissions-related tables, you may be able to honor their request without doing a lot of research. However, if their data is in tables that are important to a variety of offices on campus, you should check with those other offices to see if there is any reason you cannot be able to honor their request. |
Forget Data: This option runs a stored procedure that scrubs all personally identifying information from the person's record. The Verified? checkbox must be selected before the procedure to forget the person's data can begin. This is to ensure that a processor has reviewed the person's data and confirmed that it can be anonymized.
|
Once you run the stored procedure to anonymize a person’s data, it cannot be undone. |
|
We recognize that each school may have customized the User Defined tables and columns and/or added their own custom tables that should also be cleared out when a person requests to be forgotten. Therefore, the Forget Data stored procedure calls customizable stored procedures that you can update to handle any tables and columns that need to be anonymized during the Forget Data process beyond the ones that we take care of by default. The CUST_DataPrivacy_Anonymize_Data_PRE stored procedure runs at the start of the standard Forget Data stored procedure while the CUST_DataPrivacy_Anonymize_Data_POST stored procedure runs at the end of the standard Forget Data stored procedure. |
Deny Request: Deny the person’s Forget Data request.
|
If an individual owes money to your institution or if you determine that the requester is not the person whose data is being requested, the Forget Data request should be denied. If a request will be denied, you may want to check the Verified? checkbox to indicate that you have done your due diligence in researching this request. You may also wish to enter and save notes in the Processor/Verifier Comments field as to why the request was denied prior to clicking the Forget Data request in case there is any question regarding the reason the request was denied. |
Upon completion of the process to forget a person's data, the status for the selected Forget Data request row will be marked Completed, and the Status Last Updated On and Status Last Updated By fields will be updated. If the Deny Request button is clicked, the selected Forget Data request will be marked Denied, and the Status Last Updated On and Status Last Updated By fields will be updated. In both of these scenarios, if you are viewing only the pending requests, the currently selected request will be removed from the list because its status will no longer be pending.
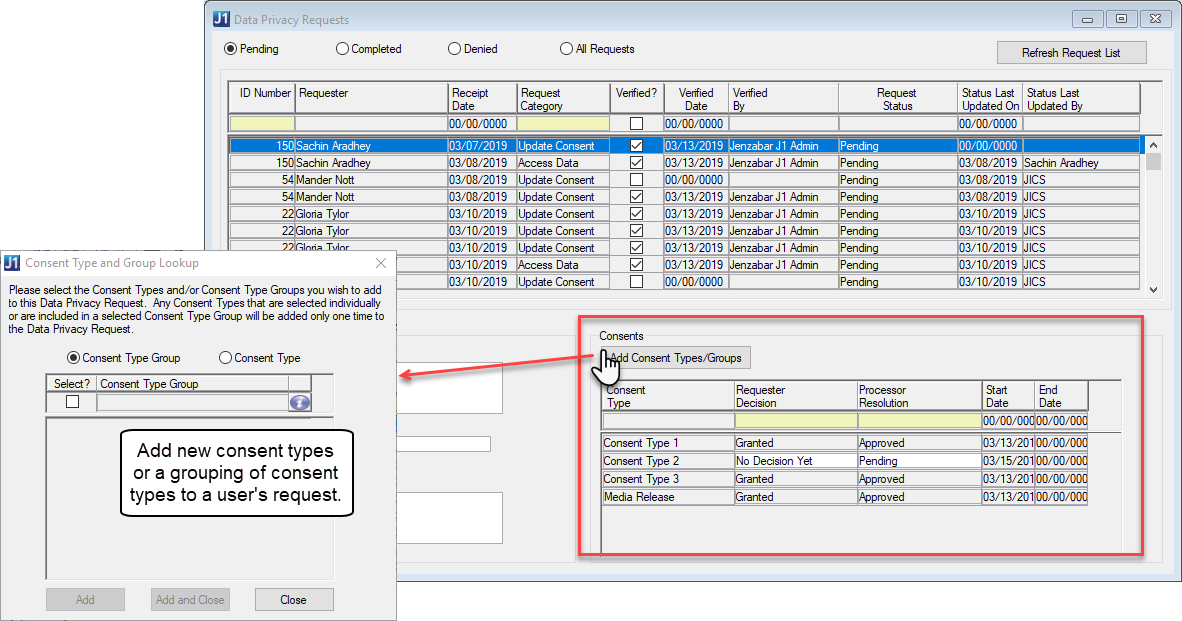
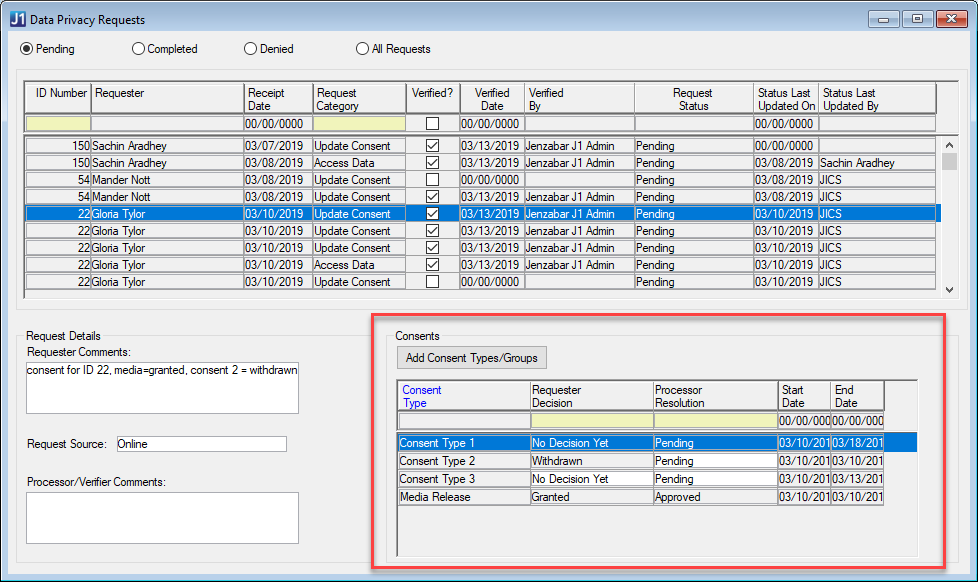
Individuals can submit changes to indicate whether or not they consent to your institution's use of their data. Your school can determine what consent types you wish to gather for the people whose data is in your system and which consent types apply to which groups of people. Example
|
If you choose to use online forms on your campus portal to collect consent information, you can create forms with varying consent types that would be presented to different groups of people (i.e. your students can be shown a different form than faculty and staff). |
Each consent type on a request record has a Requester Decision indicating what the requester's decision is for the consent type. The Decision options are: No Decision Yet, Granted, and Withdrawn. 'No Decision Yet' is only applicable to consent type rows added to a request that was manually entered on this window where the requester's decision has not yet been recorded. 'Granted' indicates that the person has given your school permission to use their data in the manner defined by the consent type. 'Withdrawn' means that the person does not grant your institution permission to use their data for the specified consent type. Once a decision of Granted or Withdrawn has been selected and saved, you canot change the decision in order to preserve the history of the person's selection.
The Processor Resolution indicates whether or not the user processing the data privacy requests approves or denies the person's consent decision. The Resolution options are: Pending, Approved, and Denied. 'Pending' indicates that a Resolution has not yet been identified for a particular consent type. 'Approved' means that the processer has approved the requester's decision for the consent type, while 'Denied' shows that the processer does not approve the requester's decision. Once a decision for a consent type has been approved/denied and saved, you cannot change the resolution. Therefore, be sure you have verified the person's data as necessary and selected the appropriate resolution before saving your changes.
 |
If a consent type has been inadvertently saved with the wrong Requester Decision or Processor Resolution, you can create a new Update Consent request row for the consent type, which will put an end date on the previous consent type, thereby allowing the new consent type's values to override the previous decision. |
Consent types associated with a specific request record for a person also have a start and end date, which allows you to collect the consent information from specific individuals on a periodic basis. An end date on a consent type indicates that the requester's decision for a particular consent type is no longer applicable because a newer request and decision for the consent type has been recorded in the system.
When a consent type is marked Granted in the Decision column, the Resolution will be automatically set to 'Approved'. If there is a Hold associated with the consent type in the Consent Type Setup window and if the requester has that hold applied (i.e., if they had previously withdrawn their consent for the consent type), the processor will be prompted if they wish to remove the hold and/or apply any defined action or action list to the person's Notepad.
If a consent type is marked Withdrawn in the Decision column, the processor will have to do any appropriate research and then approve or deny the requester's decision. Typically, withdrawn consents should be approved. However, depending on what consent types you decide to collect and specific conditions in the person's data, there is the possibility that you may need to deny a withdrawn consent type. For example, if you have a consent type for 'Processing employment data' and a former employee withdraws their consent for processing their employment data, you may have grounds to deny the request if you have not yet processed their W-2 form for a year they were employed. In this case, notes should be added to the Verifier/Processor Comments field to indicate why the person's decision for the consent type was denied.
When a Withdrawn consent type is approved, the processor will be prompted if they wish to add a hold to the person's record. The hold associated with the consent type (in the Data Privacy Consent Types Setup window) will be defaulted in for selection. The user can then choose to apply the hold and/or the action/action list associated with the hold. Adding the hold can automatically block some processing of the person's data as required by the consent type. For example, if a student withdraws their consent for the school to use their student data, then you would want to apply the hold associated with the consent type to the student in order to block the student from registering for courses and/or block the registrar's office from generating a transcript for the student.
Upon marking the last Consent Type as approved or denied and saving the changes, the status for the selected Update Consent request row will be marked Completed, and the Status Last Updated On and Status Last Updated By fields will be updated. If you are viewing only the pending requests, the currently selected request will be removed from the list because its status will no longer be pending.
View a List of Data Privacy Requests
Filter Data Privacy Requests by Status
Complete a Pending Data Access Request
Complete a Pending Update Consent Request Submitted Online
Complete a Manually Entered and Pending Update Consent Request
Complete a Pending Forget Data Request
Change a Request's Verification
Add a New Consent Type/Group to a Person's Update Consent Request
Add Comments to a Data Privacy Request
What order are the requests displayed in?
Can I add comments to a request?
Can I delete an existing request?
Can I enter a request for someone?
Why is the Verified? checkbox disabled?