
The Process Scheduler provides the ability to schedule certain J1 processes and have them run automatically in the background of a user's machine or application server. It also gives you the ability to create and maintain recipients so that others can be notified of the status of these scheduled jobs. In this section you will learn how to configure and utilize the Process Scheduler so that it can run scheduled jobs and send notifications to users.
To view the most current list of processes available for scheduling, open the Process Definition window. You can also use this window to change the description of the process and associate the process owner's e-mail address.
|
|
The DB Blackout process is not a scheduled process and can be used to define a period of time when scheduled process should not be run |
In order to schedule and run one or more processes on your computer, you must successfully install the J1 Client Application Services (Service).
|
|
Once the J1 Client Application Services is installed, it must be started in order to automatically run a process. |
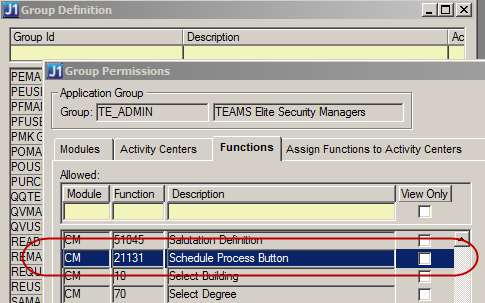
1. Locate the Schedule... button that is available on the prompt window of each process that can be scheduled.
If the Schedule... button is not visible, you have not yet installed the Service on your machine or you have not been granted access to the Schedule Process Button function. This function applies to the Schedule button in all modules and windows.
2. Once you have entered the criteria required to run your process, click the Schedule... button, which opens the Process Schedule window.

3. In the Schedule Name column, enter a descriptive name for this process (Jenzabar recommends including information about the criteria). For example, you could name a process "Create Student Update for POE Spring 2008".
4. Choose when and how often you would like this process to run.
5. Save your scheduling options.
|
|
Before scheduling, Jenzabar recommends that you first run the process in "interactive" mode (running the process as you normally would through the module) to verify the criteria entered will produce the desired results. This helps to avoid unexpected errors when running the process in scheduled mode. |
6. Once a job is scheduled, you can view the status in the Process History window.
7. Use the Process Name drop-down list box in the left corner of the window to select your process. If the process was automatically initiated by the J1 Client Application Services, a row will be created and displayed in the grid located in the lower portion of the window. Because a Process History row typically represents each time a process was run, a Status column is available to help determine if an error occurred or if the job was successful, skipped, or missed. By selecting one of the rows, you can also click the View Application Log... button or View Reports... button for more details about your scheduled process. These buttons will only be enabled if data is available.
The machine(s) on which the J1 Client Application Services is running requires the following to be installed if you plan to run scheduled processes:
· J1 Client
· J1 Client Application Services
· Any other software required by J1 Desktop (for example, create an ODBC DSN for the PowerFAIDS database)
If you would like a scheduled job to run on a particular machine, the process must be scheduled from THAT SAME MACHINE. You must open the J1 client application on that machine (either locally or through a remote desktop utility) and schedule the process using the Schedule button. Currently, J1 Desktop does not allow you to select a different machine when scheduling a process.
In addition to using the Process History window to check on the progress of your scheduled job, you can also have J1 Desktop automatically notify you or others about the status of a process by using one of the notification methods available in the Notification System.
Before J1 Desktop can notify others about the status of a scheduled process, recipients must belong to a Notification Group.
1. To create and add members to a Notification Group, open the Notification Group Definition window.
2. In the
Notification Groups tab, you can
add, remove, and edit notification groups.
Jenzabar recommends creating group names based on the type of process to
which they will be associated. For example, you may want to create a notification
group named "Loan Disbursement Group" that will be associated
with scheduled processes related to Loan Disbursements.
Before clicking on another tab, save your changes and make sure the group
is selected by clicking on the row.
3. If you would like certain J1 Desktop users to receive Application Alerts, select the Application Alert Members tab. This tab allows you to assign J1 Desktop users to a Notification Group by moving them from the Available group box to the Selected group box. Use the buttons in the center of the window to add/remove J1 Desktop users.
4. If you would like certain J1 Desktop users to receive notifications by e-mail, select the J1 E-Mail Members tab. This tab allows you to assign J1 Desktop users to a Notification Group by moving them from the Available group box to the Selected group box. J1 Desktop will send e-mail notifications to members in this group if the users have valid e-mail addresses in the Address Master table.
5. If you would like to send e-mail notifications to persons who are not J1 Desktop users, select the External E-mail Members tab. This tab allows you to assign external e-mail recipients to a Notification Group by moving them from the Available group box to the Selected group box. J1 Desktop will send e-mail notifications to members in this group if the users have valid e-mail addresses stored in the External E-mail Address table.
6. To add, remove, or edit external e-mail address recipients, click the Maintain E-mail Addresses button at the top right corner of the External E-mail Members tab. This button opens the External E-mail Address window.
Once you have created notification groups and assigned recipients, you can now assign the groups to a process through the Process Definition window. After the scheduled process runs, it will notify the recipients you assign to these groups.
1. Open the Process Definition window, and select a process on the Processes tab.
2. Click the Notification Groups tab.
3. Use the buttons in the center of the window to add Notification Groups to the process.
4. Save.
5. Once the scheduled process runs, it will notify the group you have assigned to the process.
The Notification
System allows the user to view new and previously viewed notifications
created by scheduled processes. If a J1 Desktop user is configured to
receive application alerts, the user will notice a small icon (![]() ) at the bottom right corner of any J1 Desktop
module.
) at the bottom right corner of any J1 Desktop
module.
The Process Machine Definition window is used to view and maintain the list of computers used to run scheduled processes and/or send e-mail notifications.
When the J1 Client Application Services is installed, the machine name is automatically added to the list. If you are a system administrator and do not want a particular user/machine to have the ability to run scheduled processes, you must clear the Run Scheduled Processes? checkbox.
Use the SMTP Relay Configurations window to configure J1 Desktop to send e-mail notifications.