| |
Information and features vary according to the user groups to which you belong and the permissions associated with those groups. For more information, contact your module manager or your campus support team. |
An ID Number can be up to nine digits in length (e.g., 123456789) and is associated with the name of a person, organization, or location. The ID Number is used throughout J1 Desktop to locate that entity.
The ID Number column in some windows may have icons displayed beside them.
The
Holds icon (![]() ) may be displayed
if the selected student has one or more Holds.
) may be displayed
if the selected student has one or more Holds.
Hover over the icon to view a short description of the Holds.
Click on the icon to open the Manage Holds window.
FERPA
icons  or
or  may be displayed if you are in a group with permission to the FERPA Permissions window. If you
do not have permissions, neither of the icons is shown.
may be displayed if you are in a group with permission to the FERPA Permissions window. If you
do not have permissions, neither of the icons is shown.
The
unlocked icon is displayed if the student
or ID Number has granted FERPA permissions that are active. Click
this icon to open the Current
Student/Parent FERPA Permissions window to view FERPA permissions
the student has granted.
The
locked icon is displayed if the student/ID
Number has granted FERPA permissions that are inactive.
Click here for a list of these windows.
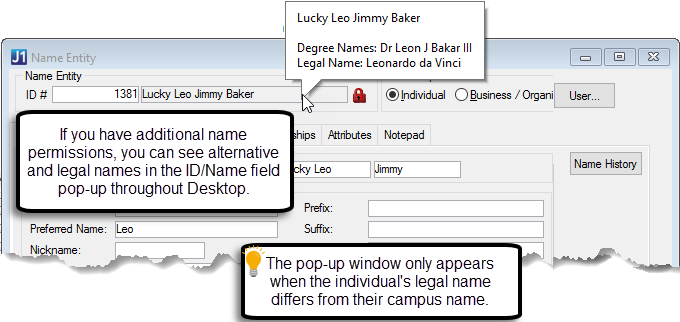
Users with the appropriate permissions can view and manage legal name information. To view legal names, hover over the name field. If the legal and campus names differ, you'll see a pop-up window. Example
To add or update legal names for an individual, right-click in the ID or Name field and select Additional Names??? The Additional Names window appears.
On the Name Entity window, you can create and assign your own ID Number to a new name entity. When you create a new ID Number, you will receive the following message: "This is not a valid ID Number. Do you wish to add a new ID Number and Name?" Choose Yes, and you can continue entering information. Click Save to accept the information and new ID Number. Also, when you enter a new name and Save, the system will automatically generate the next available ID Number.
Clicking the browse button beside the ID Number column on the Action Detail window opens the Name Search window.
If the Populate inventory code drop-downs with vendor specific inventory codes checkbox is selected on the Purchasing Module Setup window, the Vendor ID Number column on a new row in the Inventory window (PO) is editable and the drop-down data window is populated with values where NAME_TYPE = 'VEND'.
If the Populate inventory code drop-downs with vendor specific inventory codes checkbox is cleared on the Purchasing Module Setup window, the Vendor ID Number column is never editable. The value of 999999999 will always default into a new row.
If you save the Detail tab that has line items attached to inventory codes and if the Populate inventory code drop-downs with vendor specific inventory codes checkbox is selected on the Purchasing Module Setup window, the Vendor ID Number column on the Requisitions window (PO) is not editable. If you attempt to edit the column, the following message displays: "You have already created detail line items with inventory codes from another vendor. If you wish to create a requisition with another vendor, please create a new requisition."
If you save the Detail tab that has line items attached to inventory codes and if the Populate inventory code drop-downs with vendor specific inventory codes checkbox is selected on the Purchasing Module Setup window, the Vendor ID Number column on the Purchase Orders window (PO) is not editable. If you attempt to edit the column, the following message displays: "You have already created detail line items with inventory codes from another vendor. If you wish to create a PO with another vendor, please create a new PO."
The ID Number is optional, but, if used, needs to be unique across all users.
Current Student/Parent FERPA Permissions Window
Populate inventory code drop-downs with vendor specific inventory codes Checkbox
Detail Tab (Requisitions Window)